
Submission process per channel
The detailed description below follows the user journey step by step. The same underlying pipeline runs for every channel; differences are called out inline.
Product group settings that affect the journey
Every product group has settings that determine which fields and steps the customer sees during intake. The main intake-relevant settings are:
| Product group setting | Effect on the application flow |
|---|---|
| Loan type (Fixed-term loan or Credit line) | Drives which payment frequencies are offered and which loan management flow runs after approval. |
| Calculation type | For fixed-term: PDL, Annuity installment, or Linear principal repayment installment. For credit line: Revolving credit line or Non-revolving credit line. Affects the calculator behaviour and the conditions shown for confirmation. |
| Interest rate type (Fixed or Floating) | If floating, the interest rate is shown as “prime rate + margin”. If fixed, the interest rate is taken as is. |
| Amount and term ranges (min/max amount, min/max term, amount selection step, term selection mode) | Drives the sliders on the loan calculator: min/max, step, and whether the term is chosen from a fixed-step slider or from a predefined list. |
| Available payment frequencies | Populates the payment frequency selector on the loan calculator. If only one option is configured, the control is hidden. |
| Credit bureau provider (Equifax for individuals; none for legal entities) | When Equifax is selected, the National ID field becomes visible on the personal details form (the bureau itself runs in origination). |
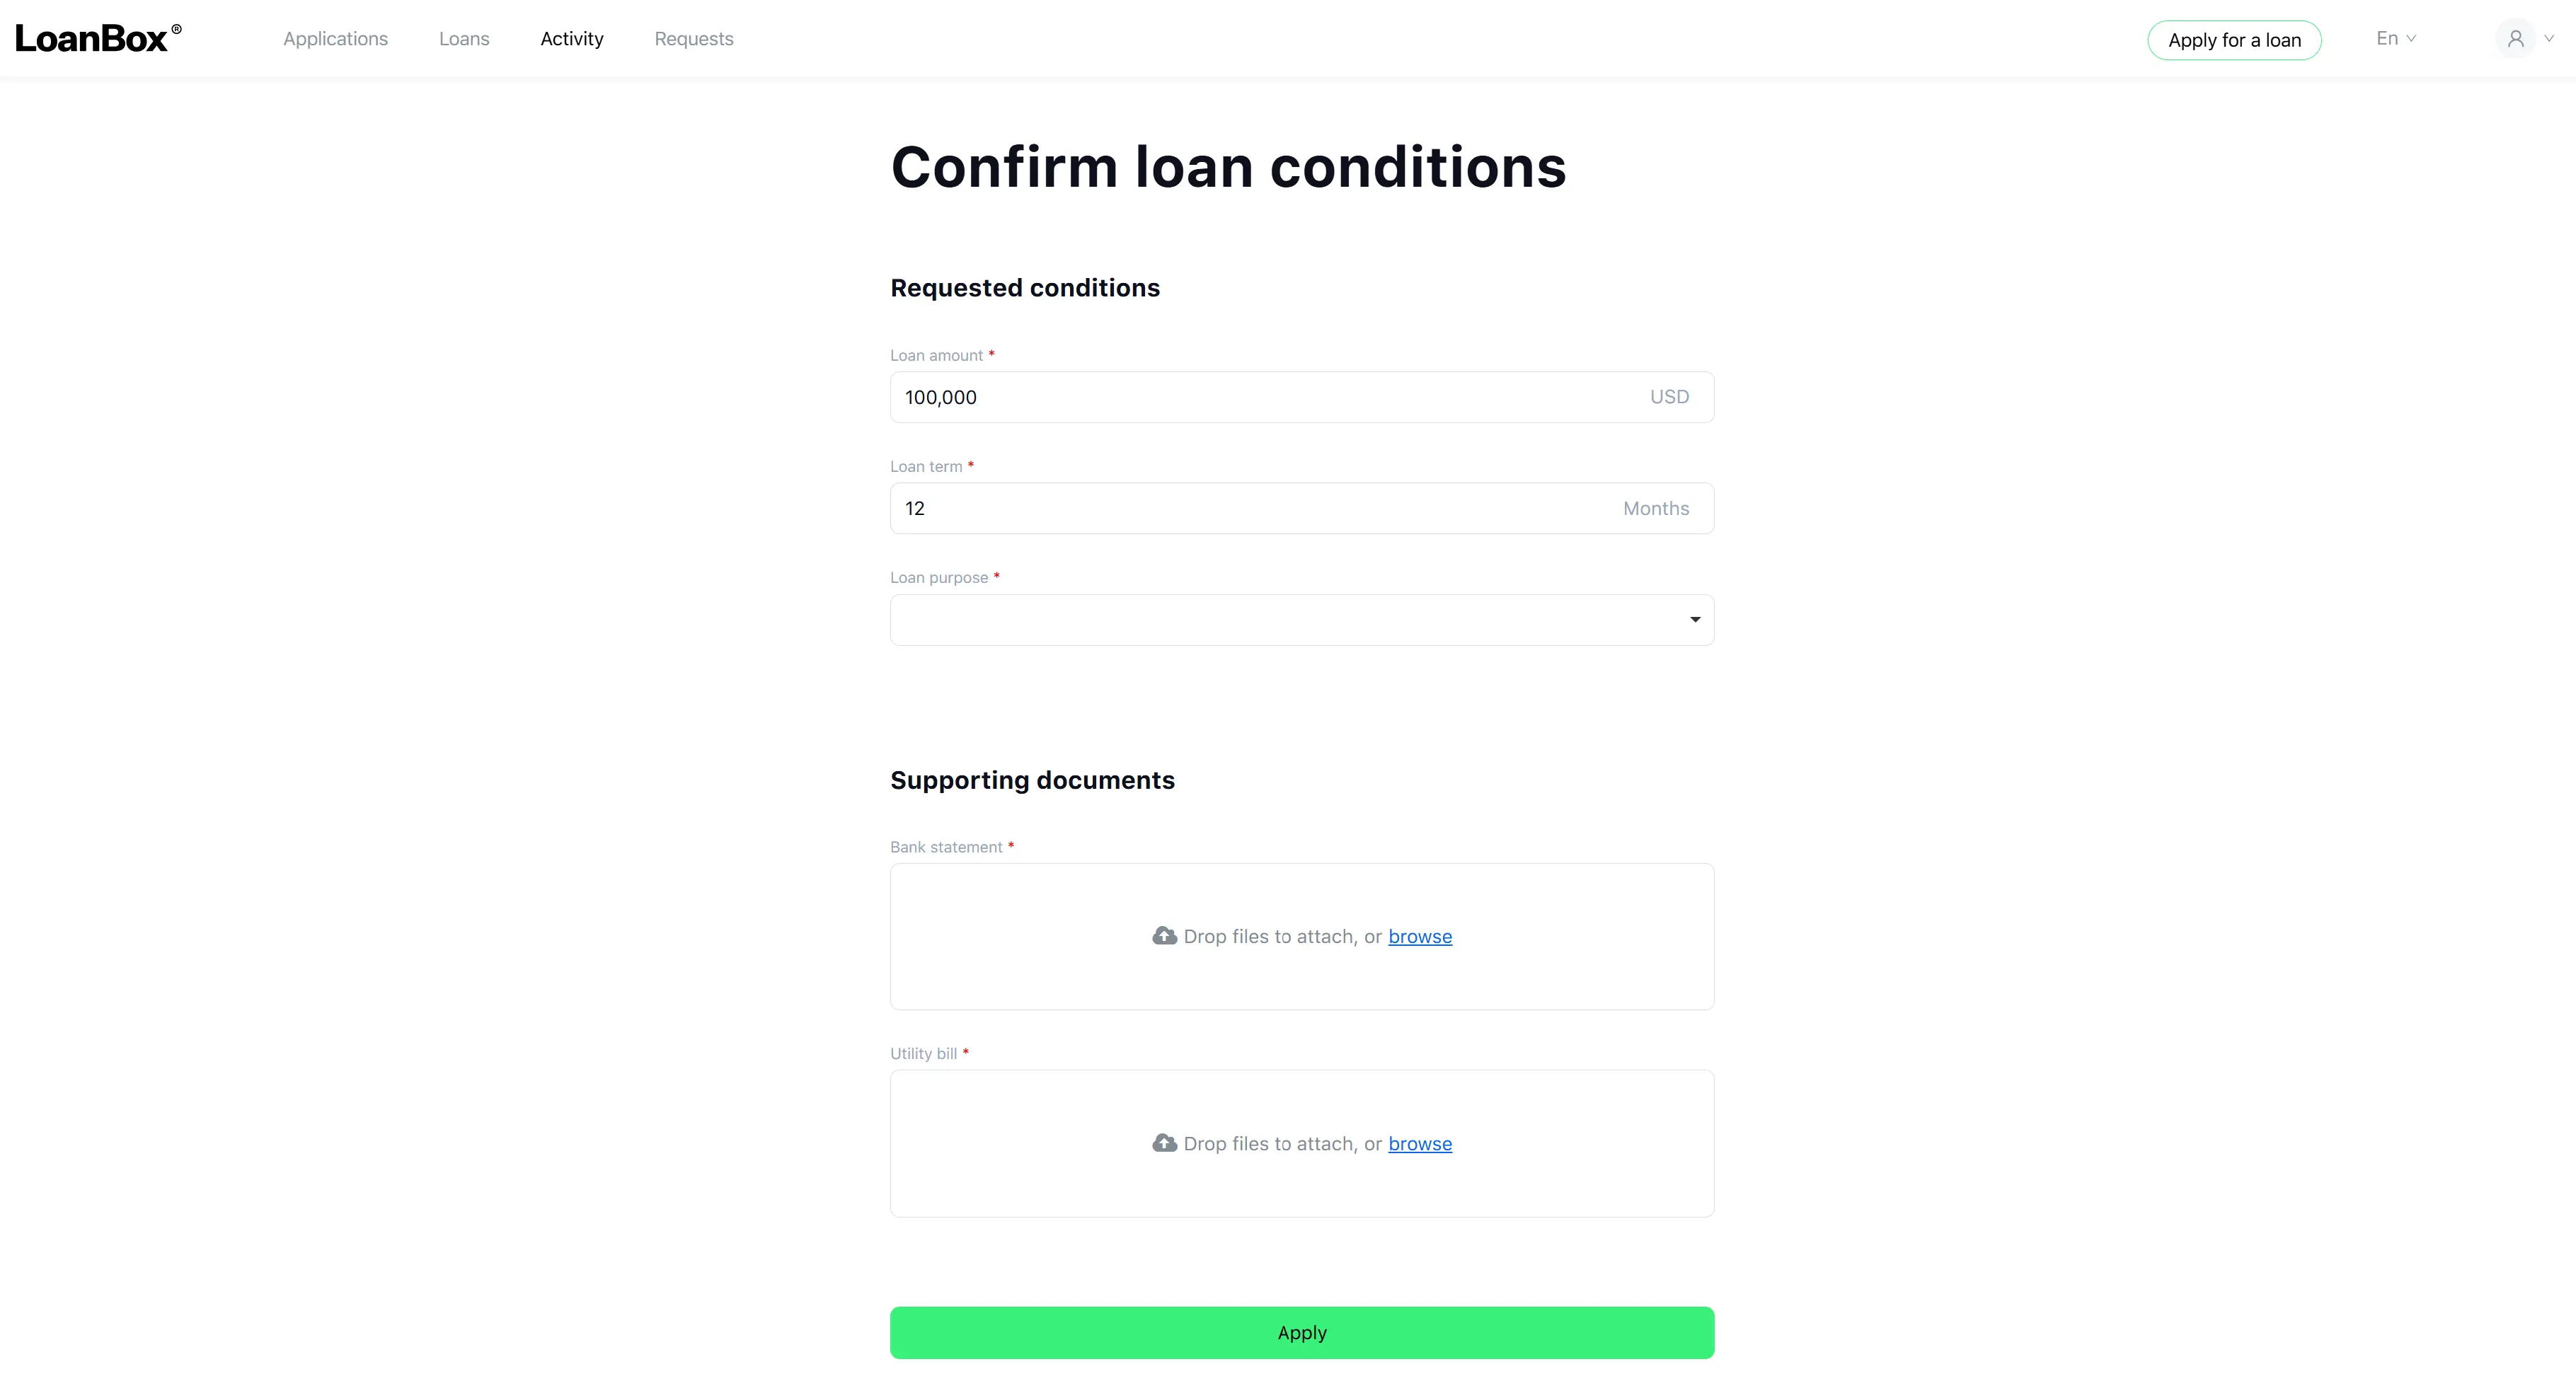
| Application form—Supporting documents (Request Bank Statement / Utility Bill / Financial Statement / P&L Statement / Balance Sheet) | Each is a toggle on the product group. If any of them is on, a “Supporting documents” block is displayed on the Confirm Loan Conditions step. |
| Application form—Request Loan Purpose | If on, a “Loan purpose” dropdown is shown on the Confirm Loan Conditions step. |
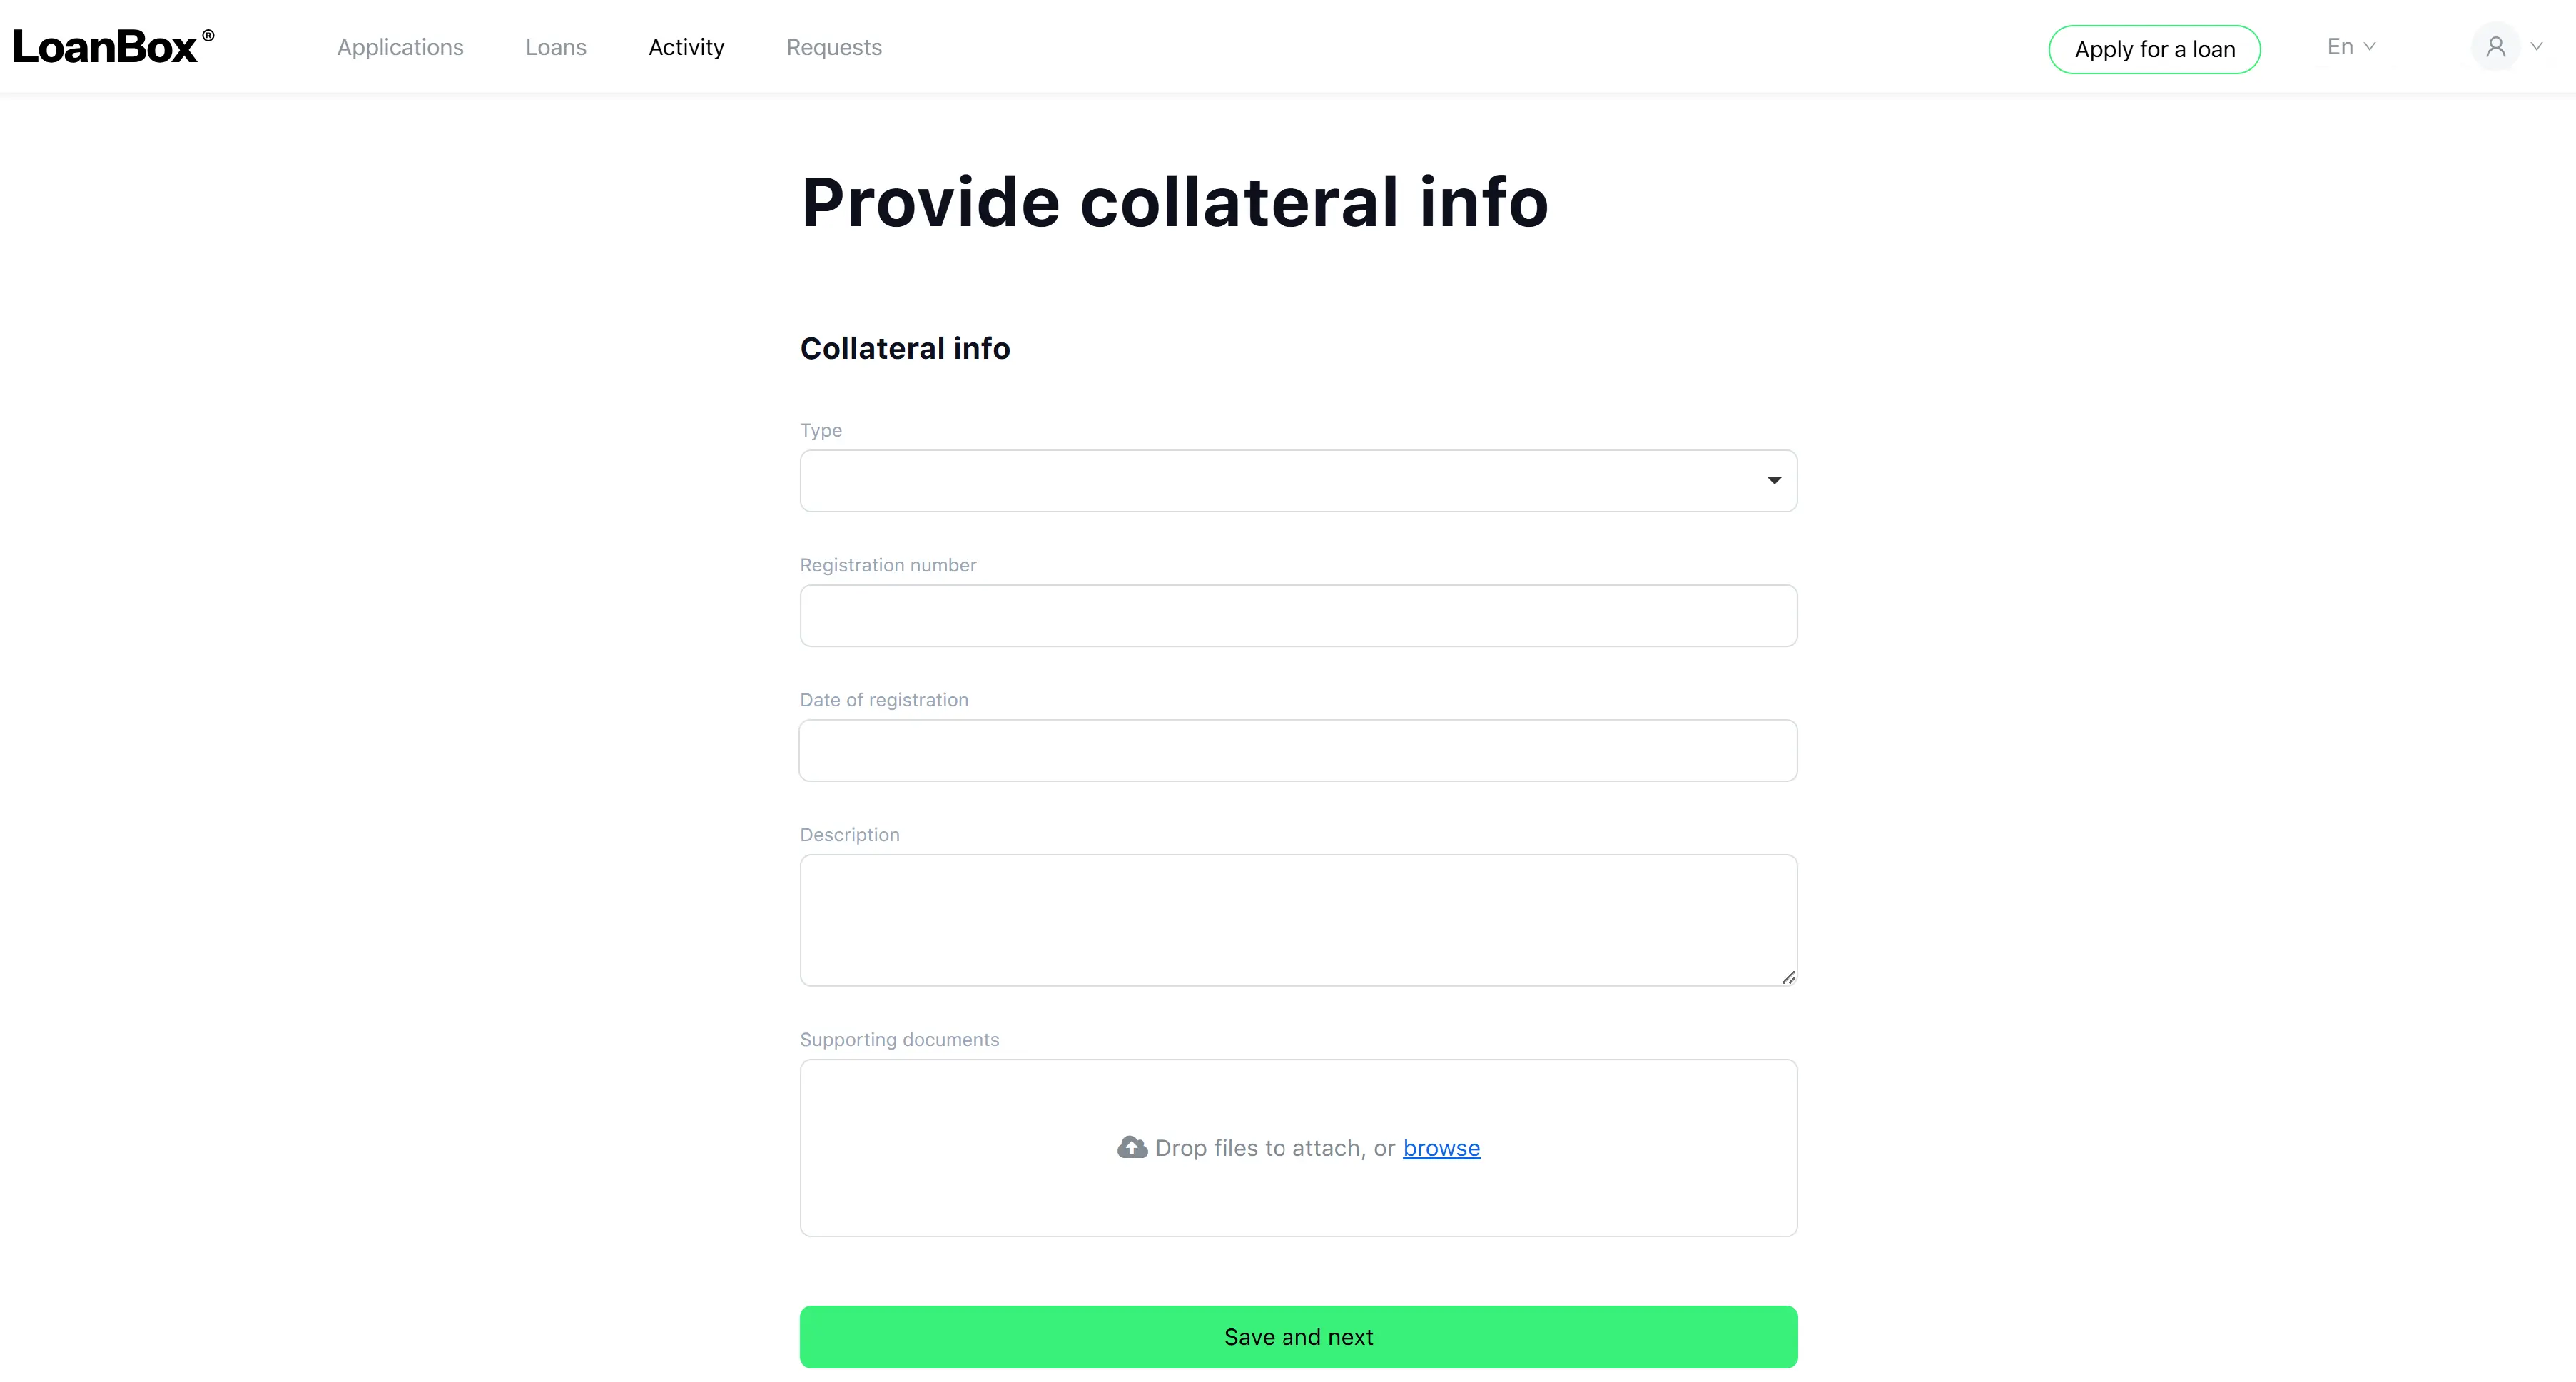
| Application form—Request Collateral (and the dynamic collateral form) | If on, the customer sees a “Provide collateral info” step with collateral type, registration details, description, supporting documents, and any additional collateral fields defined by the product group. If off, the step is skipped. |
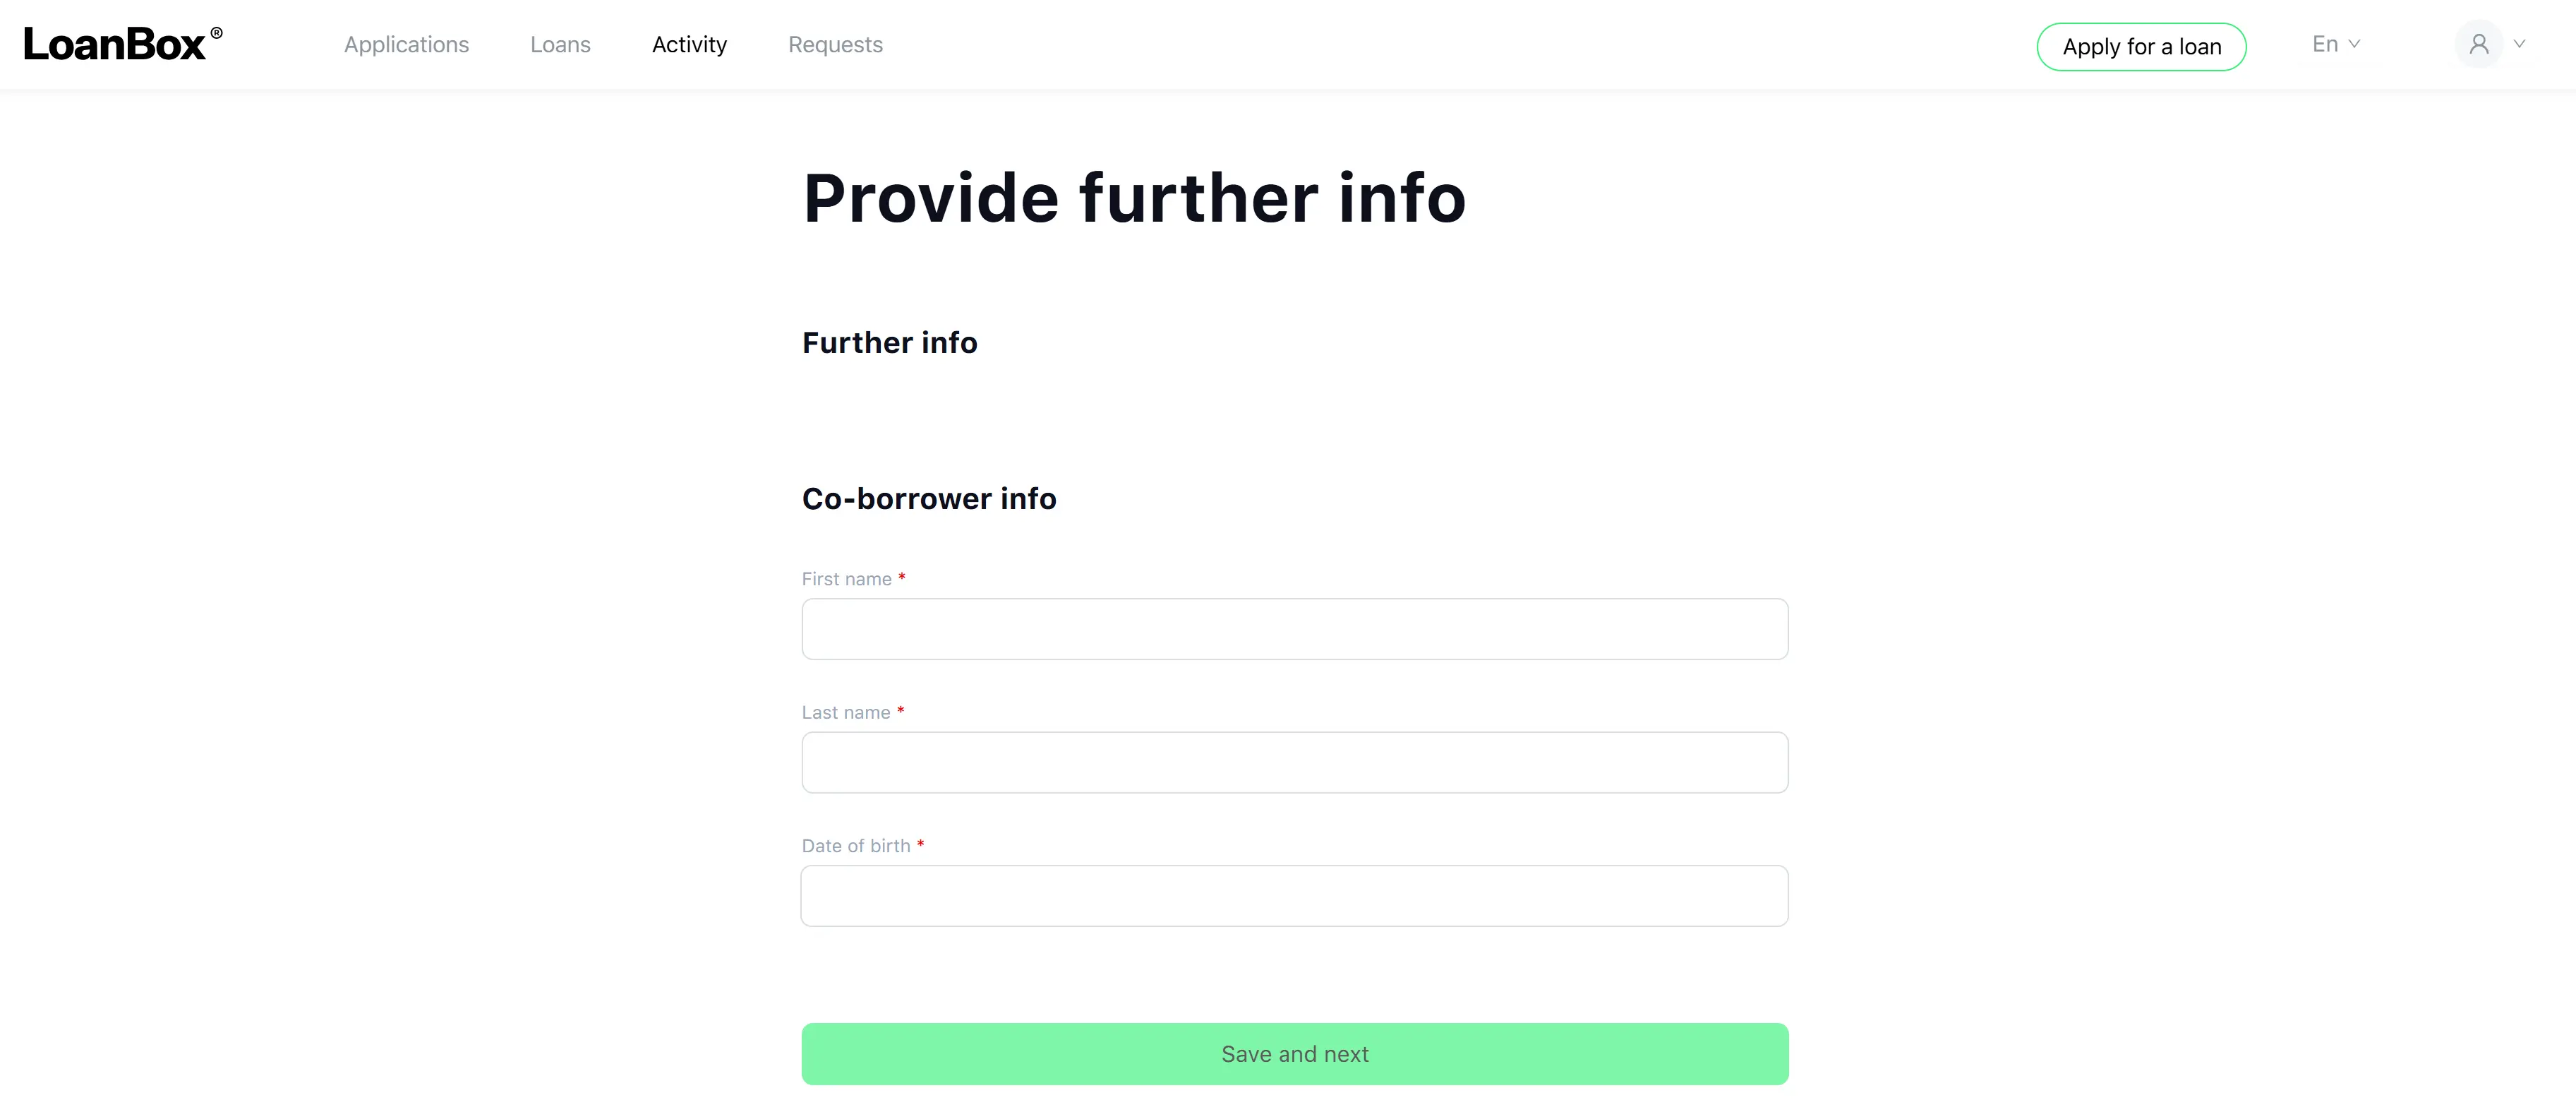
| Application form—Request Further Info (and the dynamic further information form) | If on, the customer sees an additional “Provide further info” step that renders the fields configured on the product group. If off, the step is skipped. |
The deployment also has one system-wide setting that affects intake: the borrower type (Individual or Legal Entity). Every customer that uses the platform is treated as the configured type; the data collected differs accordingly.
Step 1. Starting the application (Channel-specific entry)
The starting screen differs per channel.
Borrower Portal — “Choose a campaign”
a. Open the application flow.
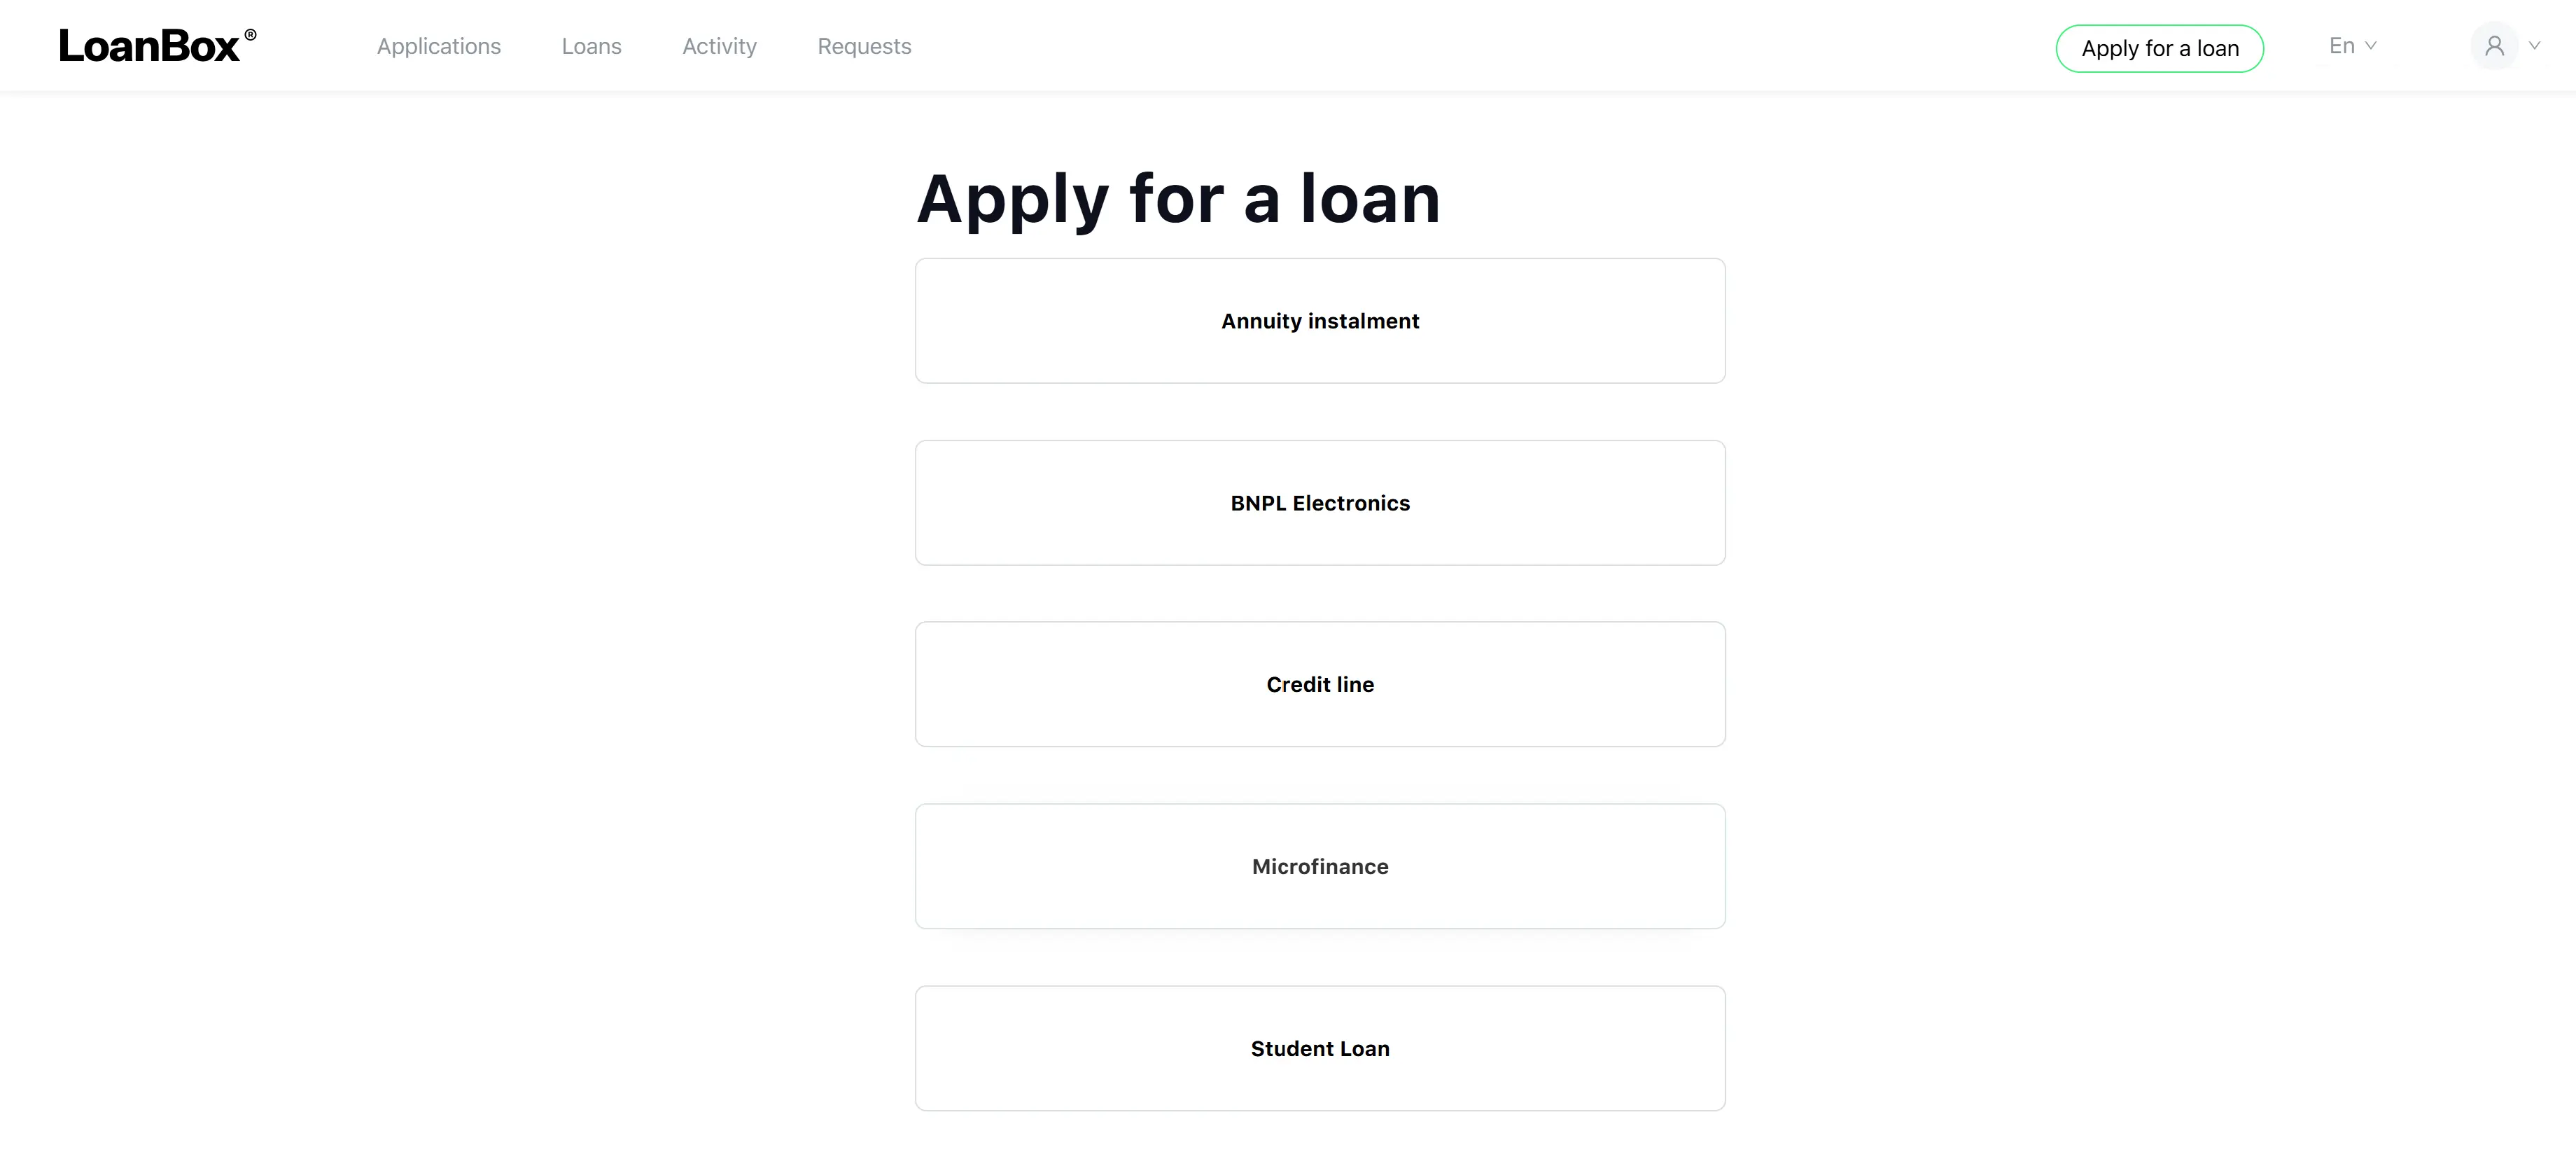
The logged-in customer selects “Apply for a loan”. The screen shows the active product groups in the system.
b. Choose a product group.
The customer picks one product group. The system:
- Records the chosen product group on the new application.
- Sends a “cancel previous not-finished applications” signal to close any half-started application from a previous attempt.
Back Office — “Choose borrower”
a. Open the “new application” screen.
A Credit Officer clicks the button to create a new application. The system displays the “Create new application” form.
b. Enter the customer’s contact.
The operator enters the customer’s phone number or email (matching the system’s authentication method). If the system does not yet have a user for that contact, a new customer user is created; otherwise the existing one is used.
c. Choose a product group.
The operator selects one of the active product groups.
d. Start the application.
The system closes any previous not-finished application for that customer and starts a new one.

Agent Portal — “Choose borrower”
a. Open the “new application” screen.
An Agent clicks the button to create a new application. The system displays the “Create new application” form.
b. Enter the customer’s contact.
The operator enters the customer’s phone number or email. The system creates a customer user if one does not exist, otherwise reuses the existing one.
c. Choose a product group.
The operator selects one of the active product groups.
d. Start the application.
The system attaches the logged-in agent’s partner organisation to the application automatically, closes any previous not-finished application, and starts the new one.

Agent Invitation to a Lead
This channel lets an agent invite a lead the agent has already captured in the system. Once the invitation is accepted the lead continues the application on the Borrower Portal.
a. Create or open the lead.
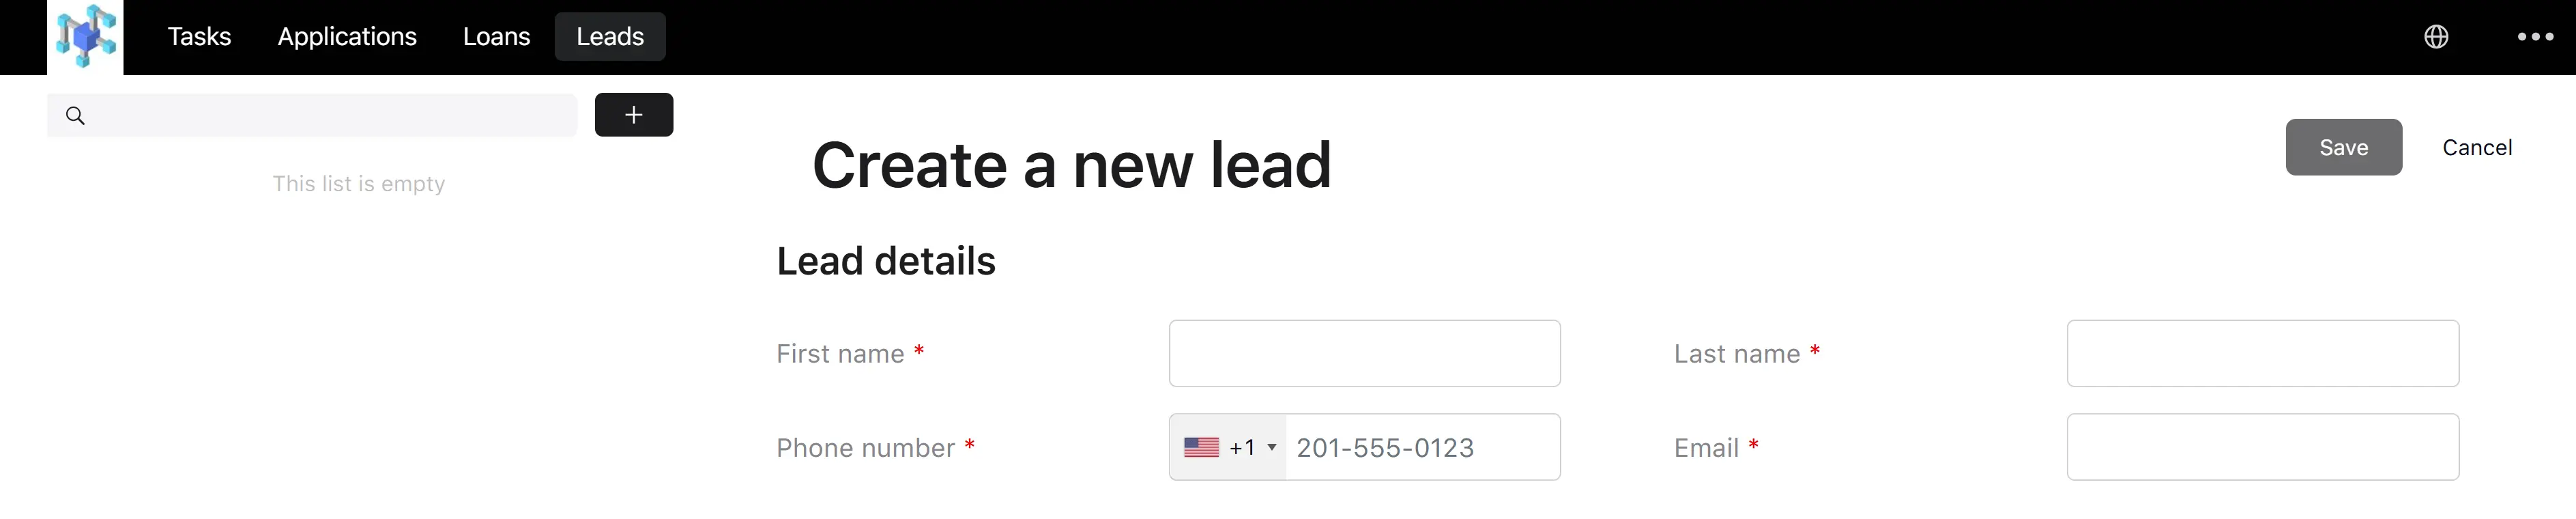
The agent opens the “Lead” screen in the Agent Portal. If the lead does not yet exist, the agent creates one by entering first name, last name, phone, and email. If the lead already exists, the agent opens it.
b. Open “Send loan application” for the lead.
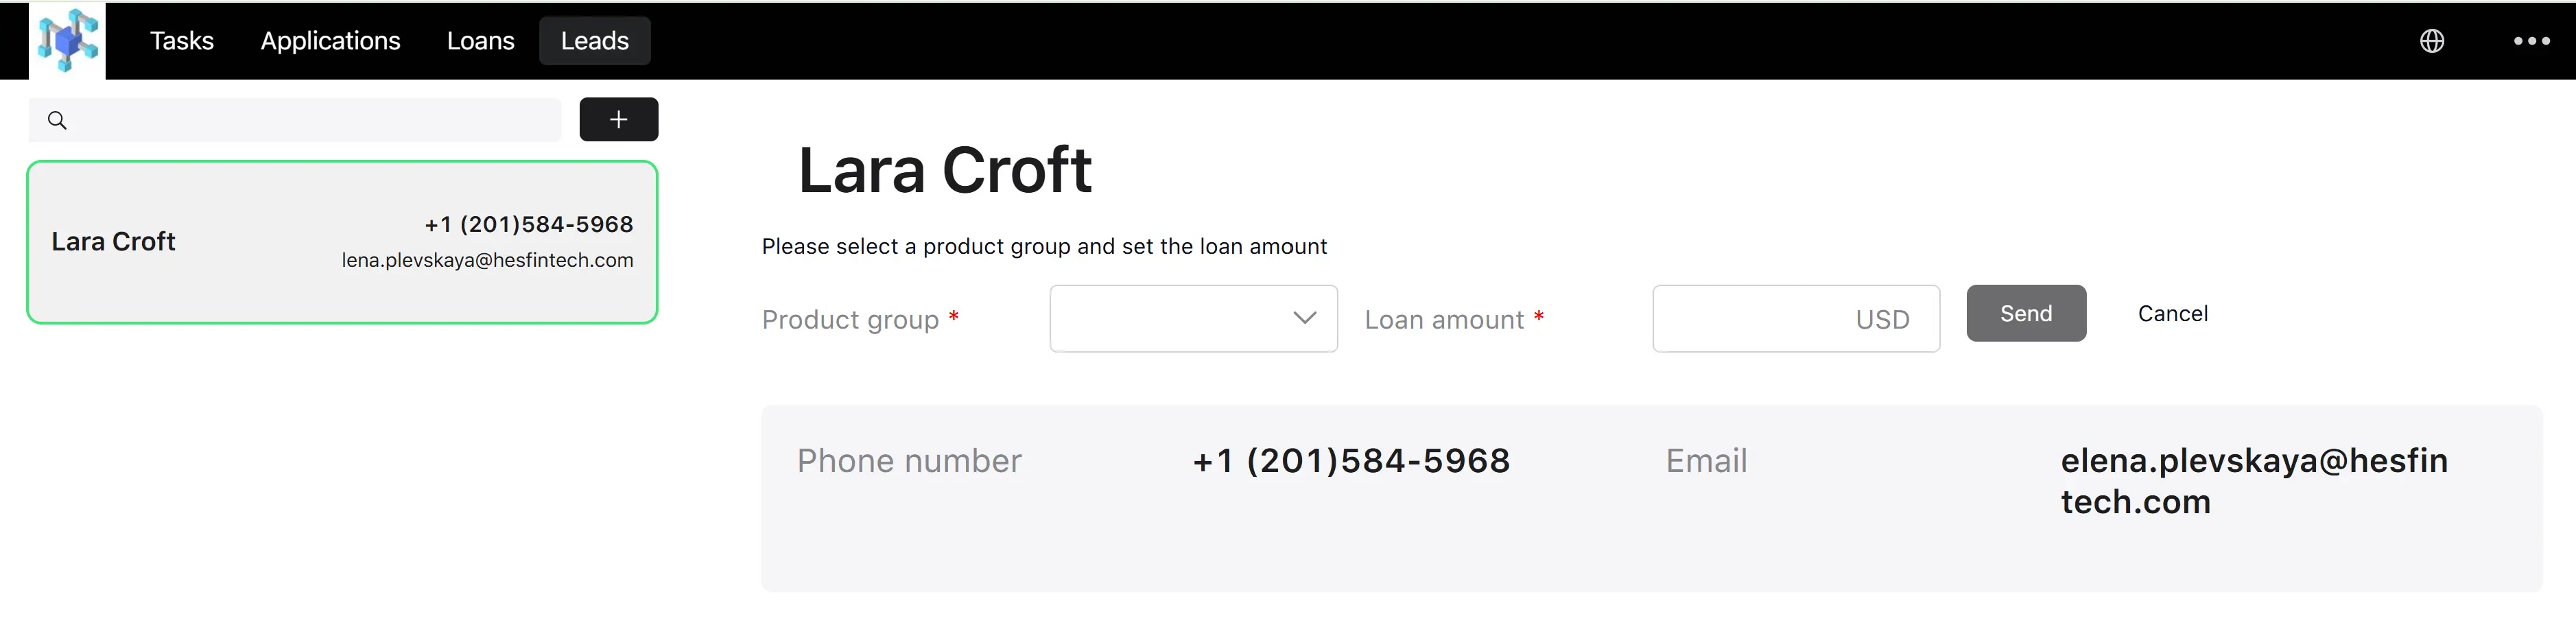
On the lead’s card, the agent clicks the “Send loan application” action. The system shows a form with the lead’s full name at the top and the lead’s basic info below.
c. Choose a product group and a suggested loan amount.
The agent picks one product group from the list of active product groups available for their agent organisation and types a Suggested loan amount (validated against the product group’s min/max amount).
d. Send the invitation.
On “Send”, the system:
- Looks up or creates a Borrower Portal user for the lead using the lead’s phone (if the deployment authenticates by SMS) or email (if it authenticates by email). If the user does not exist, a new one is created and, for email deployments, a temporary password is generated.
- Sends a “lead invitation” notification containing a link the lead can use to sign in to the Borrower Portal and the chosen product group and suggested loan amount attached to their session.
e. The lead opens the Borrower Portal.
The lead clicks the invitation link, authenticates, and is placed directly into the Borrower Portal application flow. The product group is already chosen and the suggested loan amount is already pre-filled. The lead then proceeds through the same steps as any other Borrower Portal customer (eligibility pre-checks → loan calculator → data collection → confirm loan conditions).

Step 2. Eligibility pre-checks
Before the loan calculator is shown, the system checks two things:
- Blacklist check on the contact. The phone number (if the system authenticates by SMS) or the email (if the system authenticates by email) is checked against the blacklist. If it is on the blacklist, the application cannot proceed. The customer (or operator) sees a short “sorry, you cannot apply for a loan” screen and the application ends.
- Active application check. The system checks whether the customer already has an open (not closed) application. If they do, the customer sees an “already has an active application” screen and the new application ends.

An application is considered “active” when it has been started by the borrower (or on their behalf) and has not yet reached a terminal (closed) state. In practice the check catches applications in any of the following statuses:
| Status | When the application is in this status |
|---|---|
| (Intake in progress — no status yet) | The previous attempt reached the loan calculator, data collection, or the Confirm Loan Conditions step but has not been submitted to origination yet. |
| Account verification | The previous application was submitted to origination and is running automatic checks. |
| Verification | The previous application is waiting for a manual Verifier review. |
| Update requested | The previous application was returned to the initiator for updates. |
| Underwriting | The previous application is waiting for a manual Underwriter decision. |
Applications that have already been Approved, Declined (with a decline code), Canceled (with a cancel code), Disbursed, or marked Error are no longer active and do not block a new application.

Step 3. Loan calculator
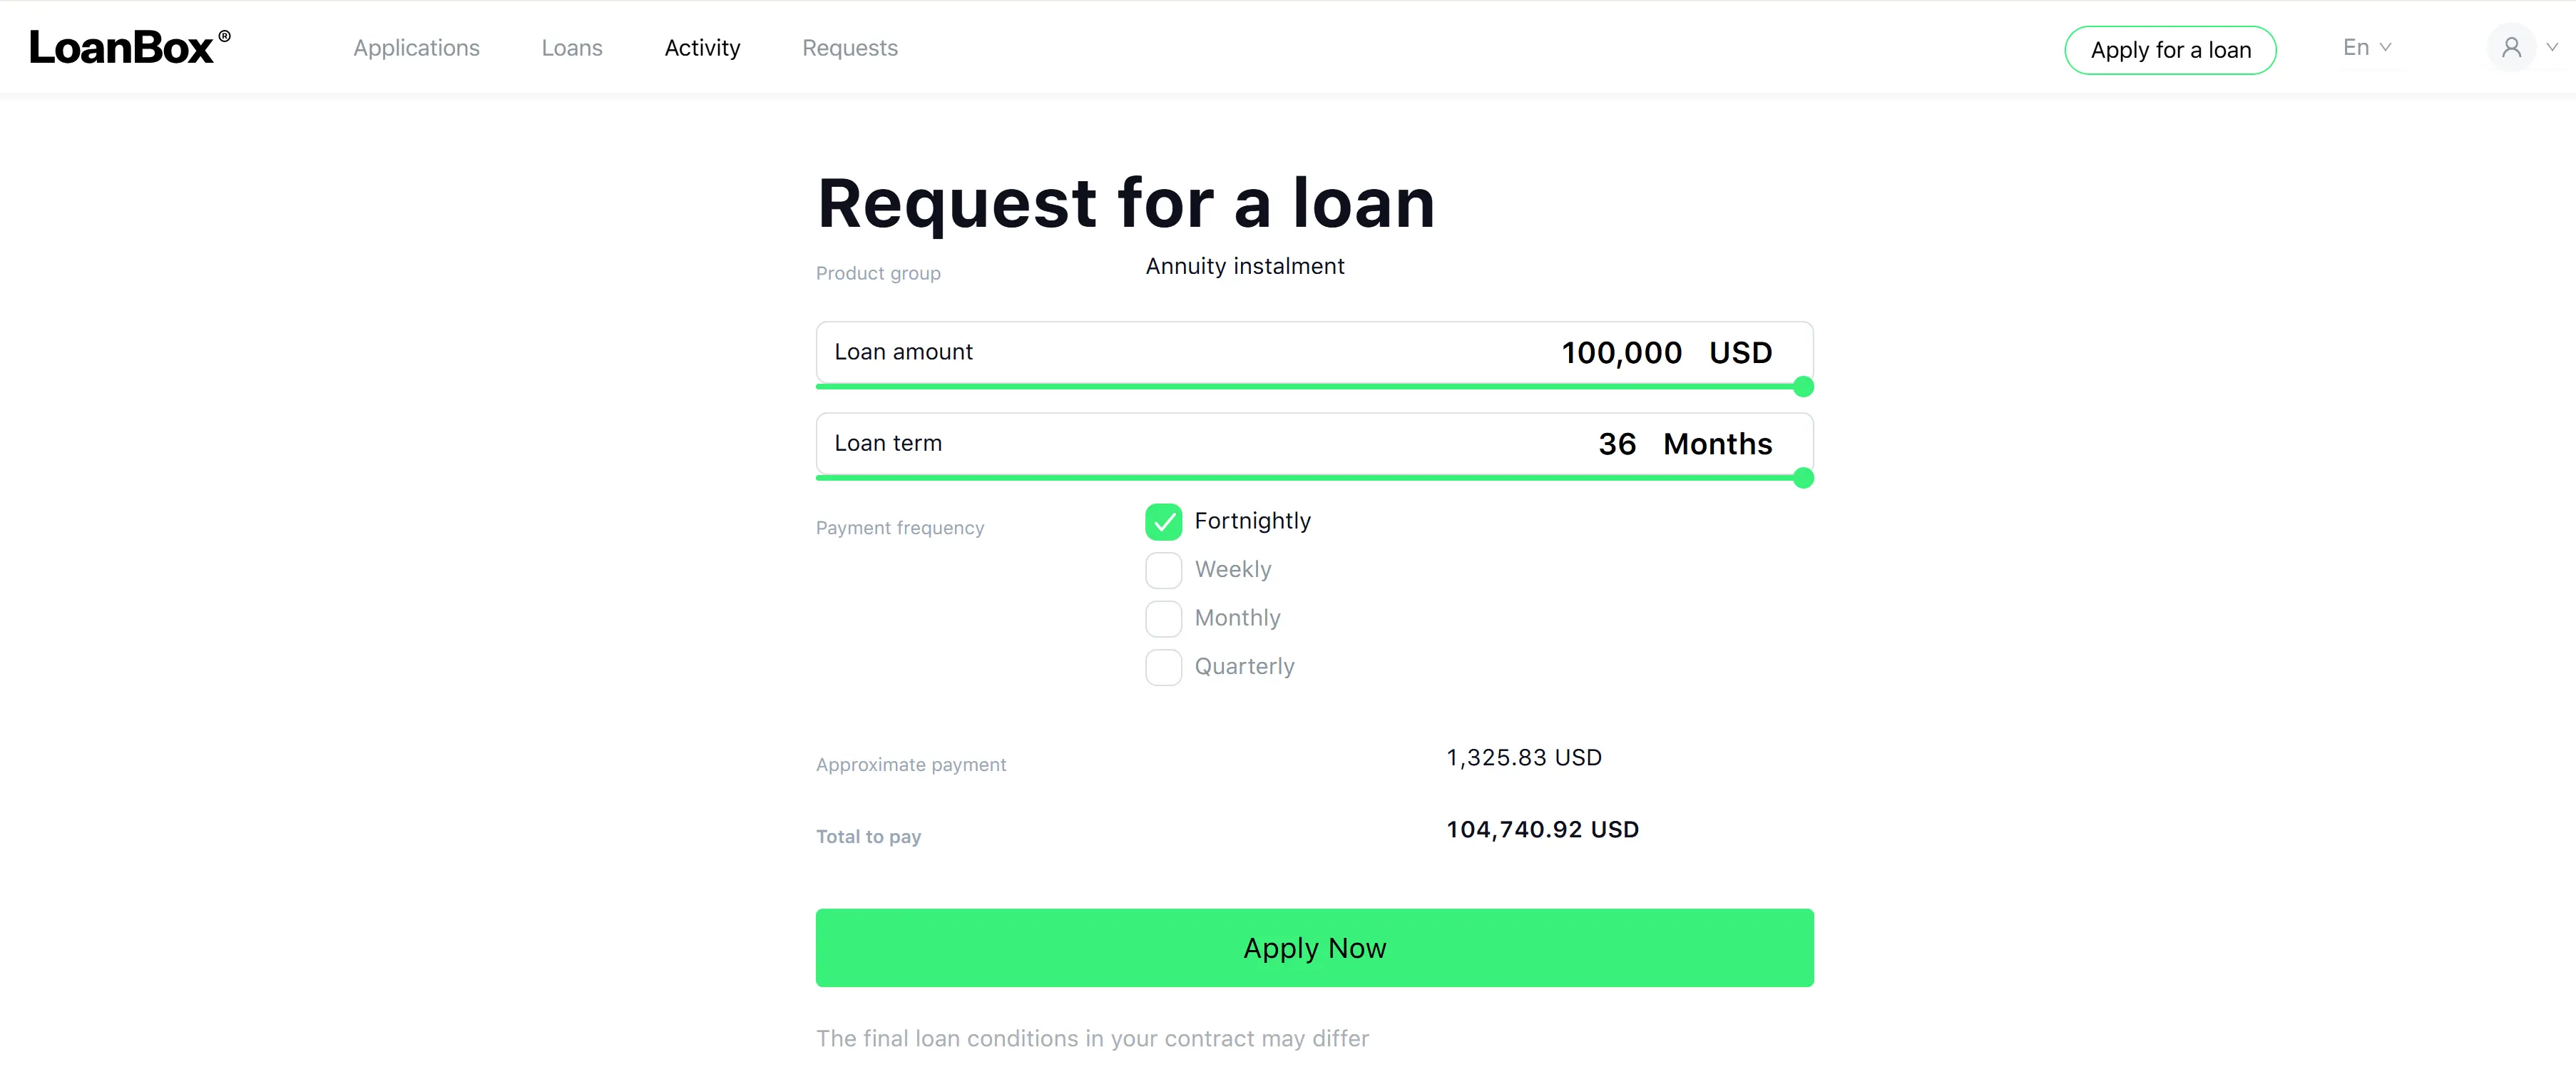
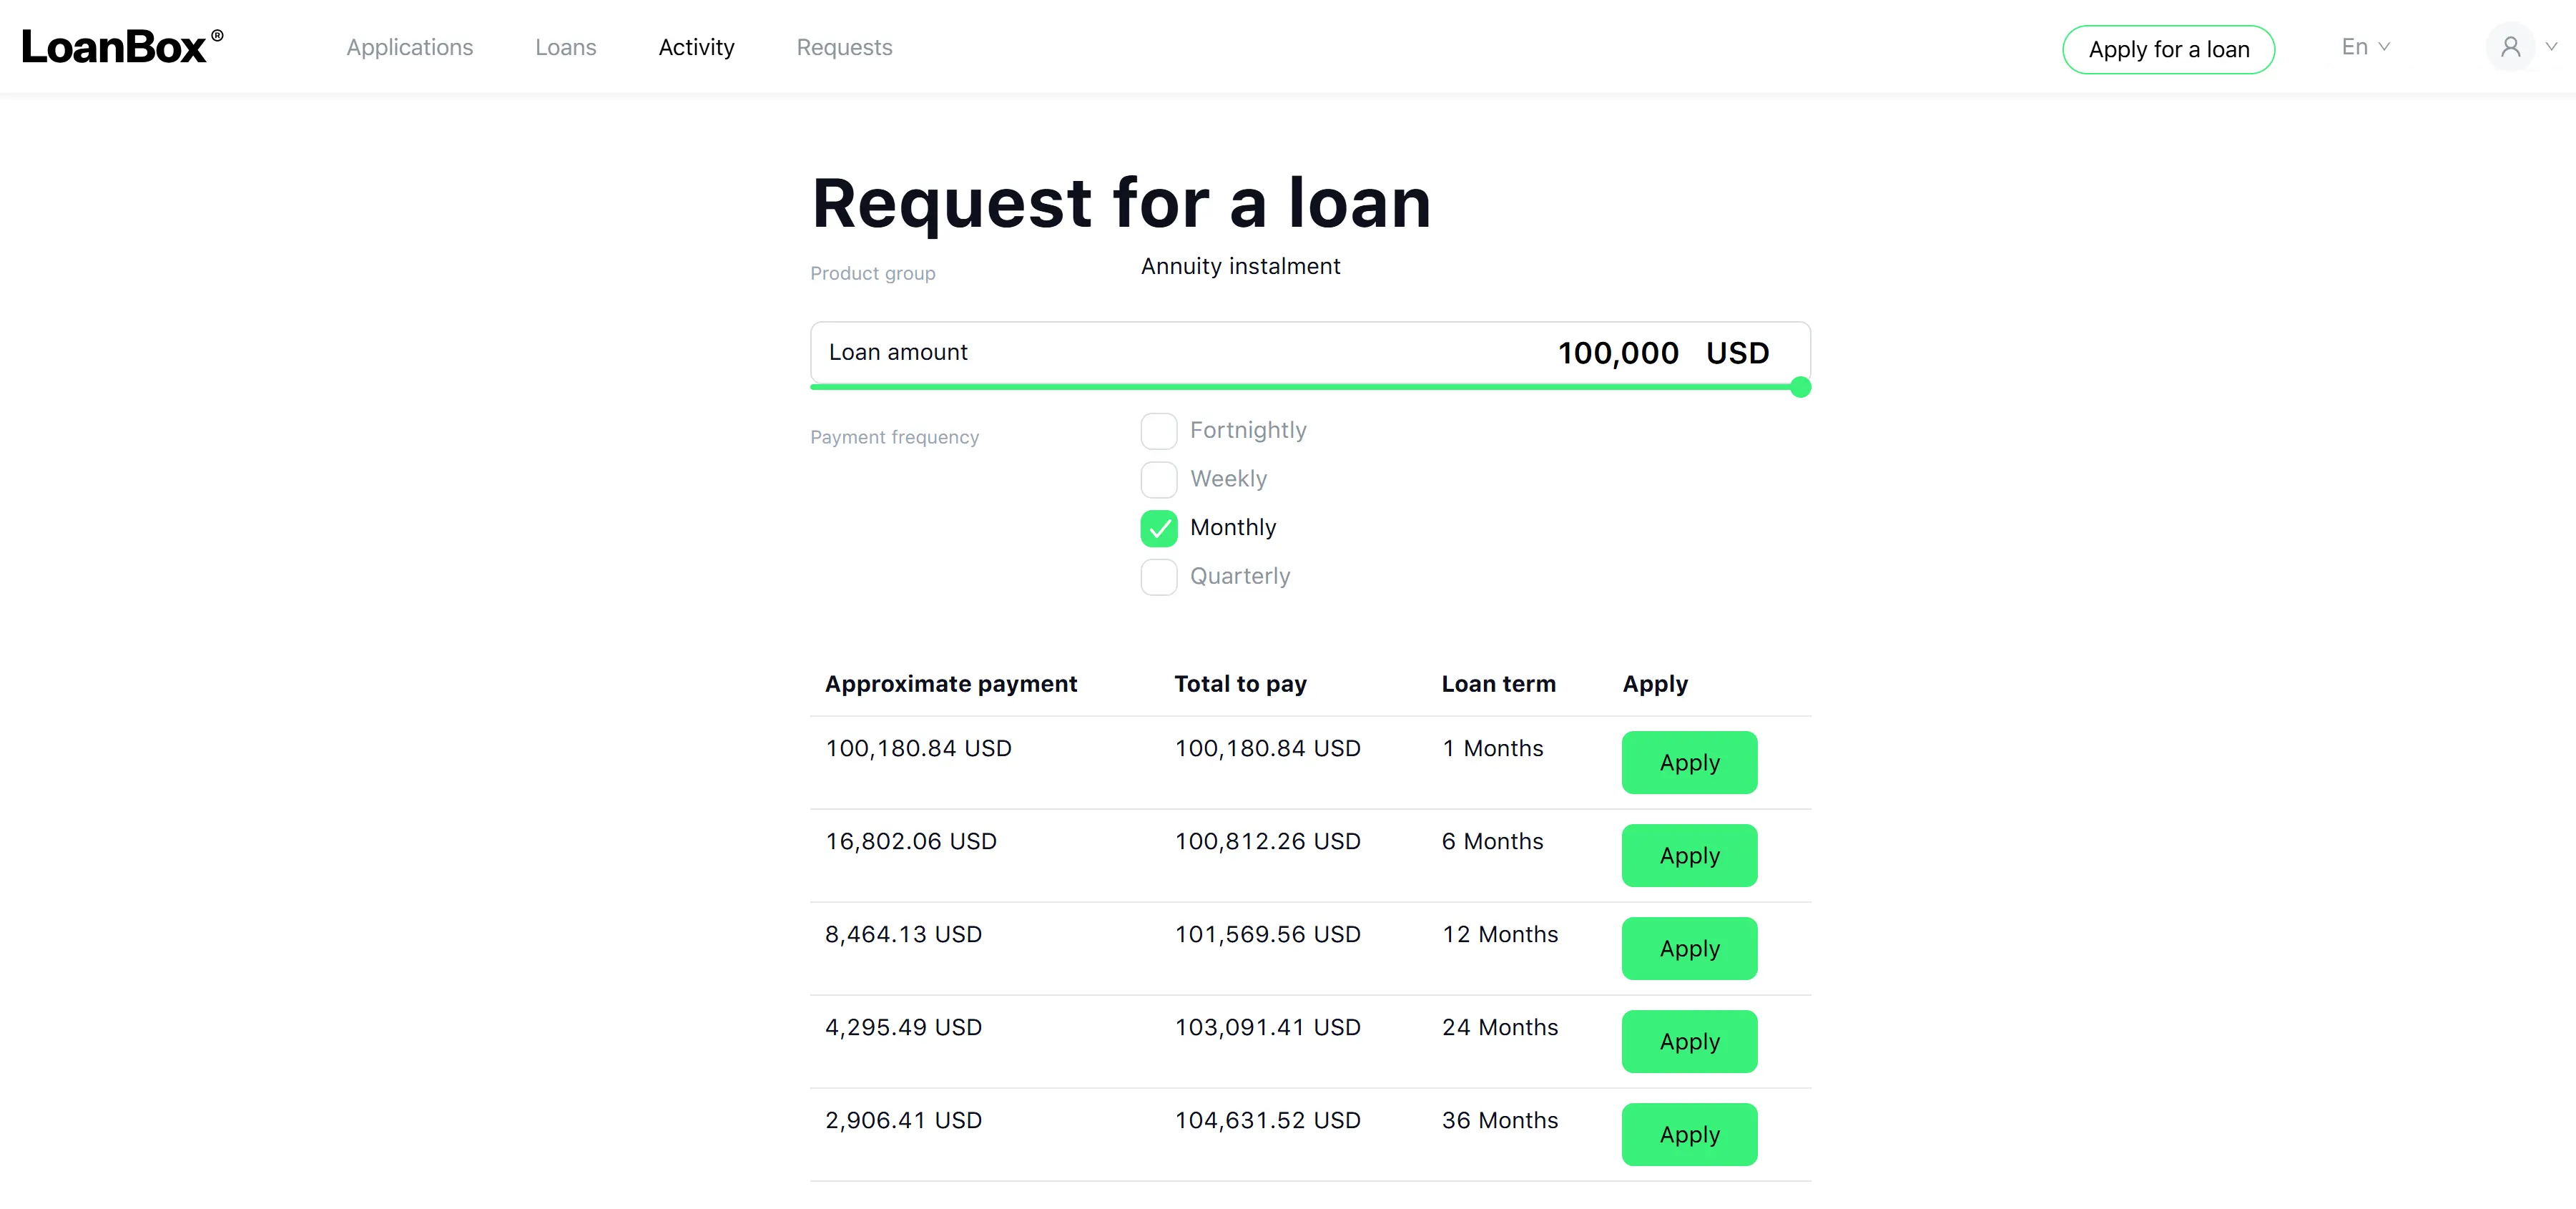
The customer (on the Borrower Portal) or the operator (in Back Office and Agent Portal) sees a loan calculator form pre-filled with the product group’s parameters. The form looks the same on all portals, with only the form variant differing.
Fields on the loan calculator:
| Field | Description | Type | Required | Possible values | Notes |
|---|---|---|---|---|---|
| Product group | Name of the chosen product group | Text | — | — | Read-only |
| Loan amount | Requested loan amount | Number (slider) | Yes | Between the product group’s min and max amount, stepped by the configured step | Currency suffix from deployment settings. When a pre-calculated “suggested loan amount” is passed in (e.g., from an agent invitation to a lead), the slider is hidden and the suggested amount is used. |
| Term | Requested loan term | Number (slider) or Radio button | Yes | When term selection mode is “Fixed step”: free slider between min and max term. When term selection mode is “Predefined options”: radio list of predefined term lengths. | Period suffix matches the product group’s term period (e.g., months, days). |
| Payment frequency | How often repayments are due | Radio button | Yes | Options come from the product group’s available payment frequencies (see values below) | Hidden automatically if the product group has only one payment frequency configured. |
| Agent | Assigned partner/agent | Object (read-only) | — | — | Shown on the Agent Portal, when an agent is present on the Borrower Portal (for example, from an agent invitation), and on the Back Office when assigned. |
Payment frequency values (from the product group configuration):
| Value | Meaning |
|---|---|
| Weekly | Every 7 days |
| Fortnightly | Every 14 days |
| Monthly | Monthly |
| Quarterly | Every 3 months |
Fixed-term product groups can use any of the four. Credit line product groups only offer Monthly.
Completion of this step:
On submit, the system creates a new application record with the chosen amount, term, payment frequency, product group, and (if present) agent. If the customer does not submit this form within 48 hours, the application is automatically canceled.
Step 4. Borrower information collection
From this point on, the flow splits by borrower type (Individual or Legal Entity). The system-wide setting determines which sub-flow runs.
Individual borrower (person) flow
a. System looks up or creates the customer record.
Depending on whether the system authenticates by phone (SMS) or email, the system finds an existing person by that contact or creates a new one.
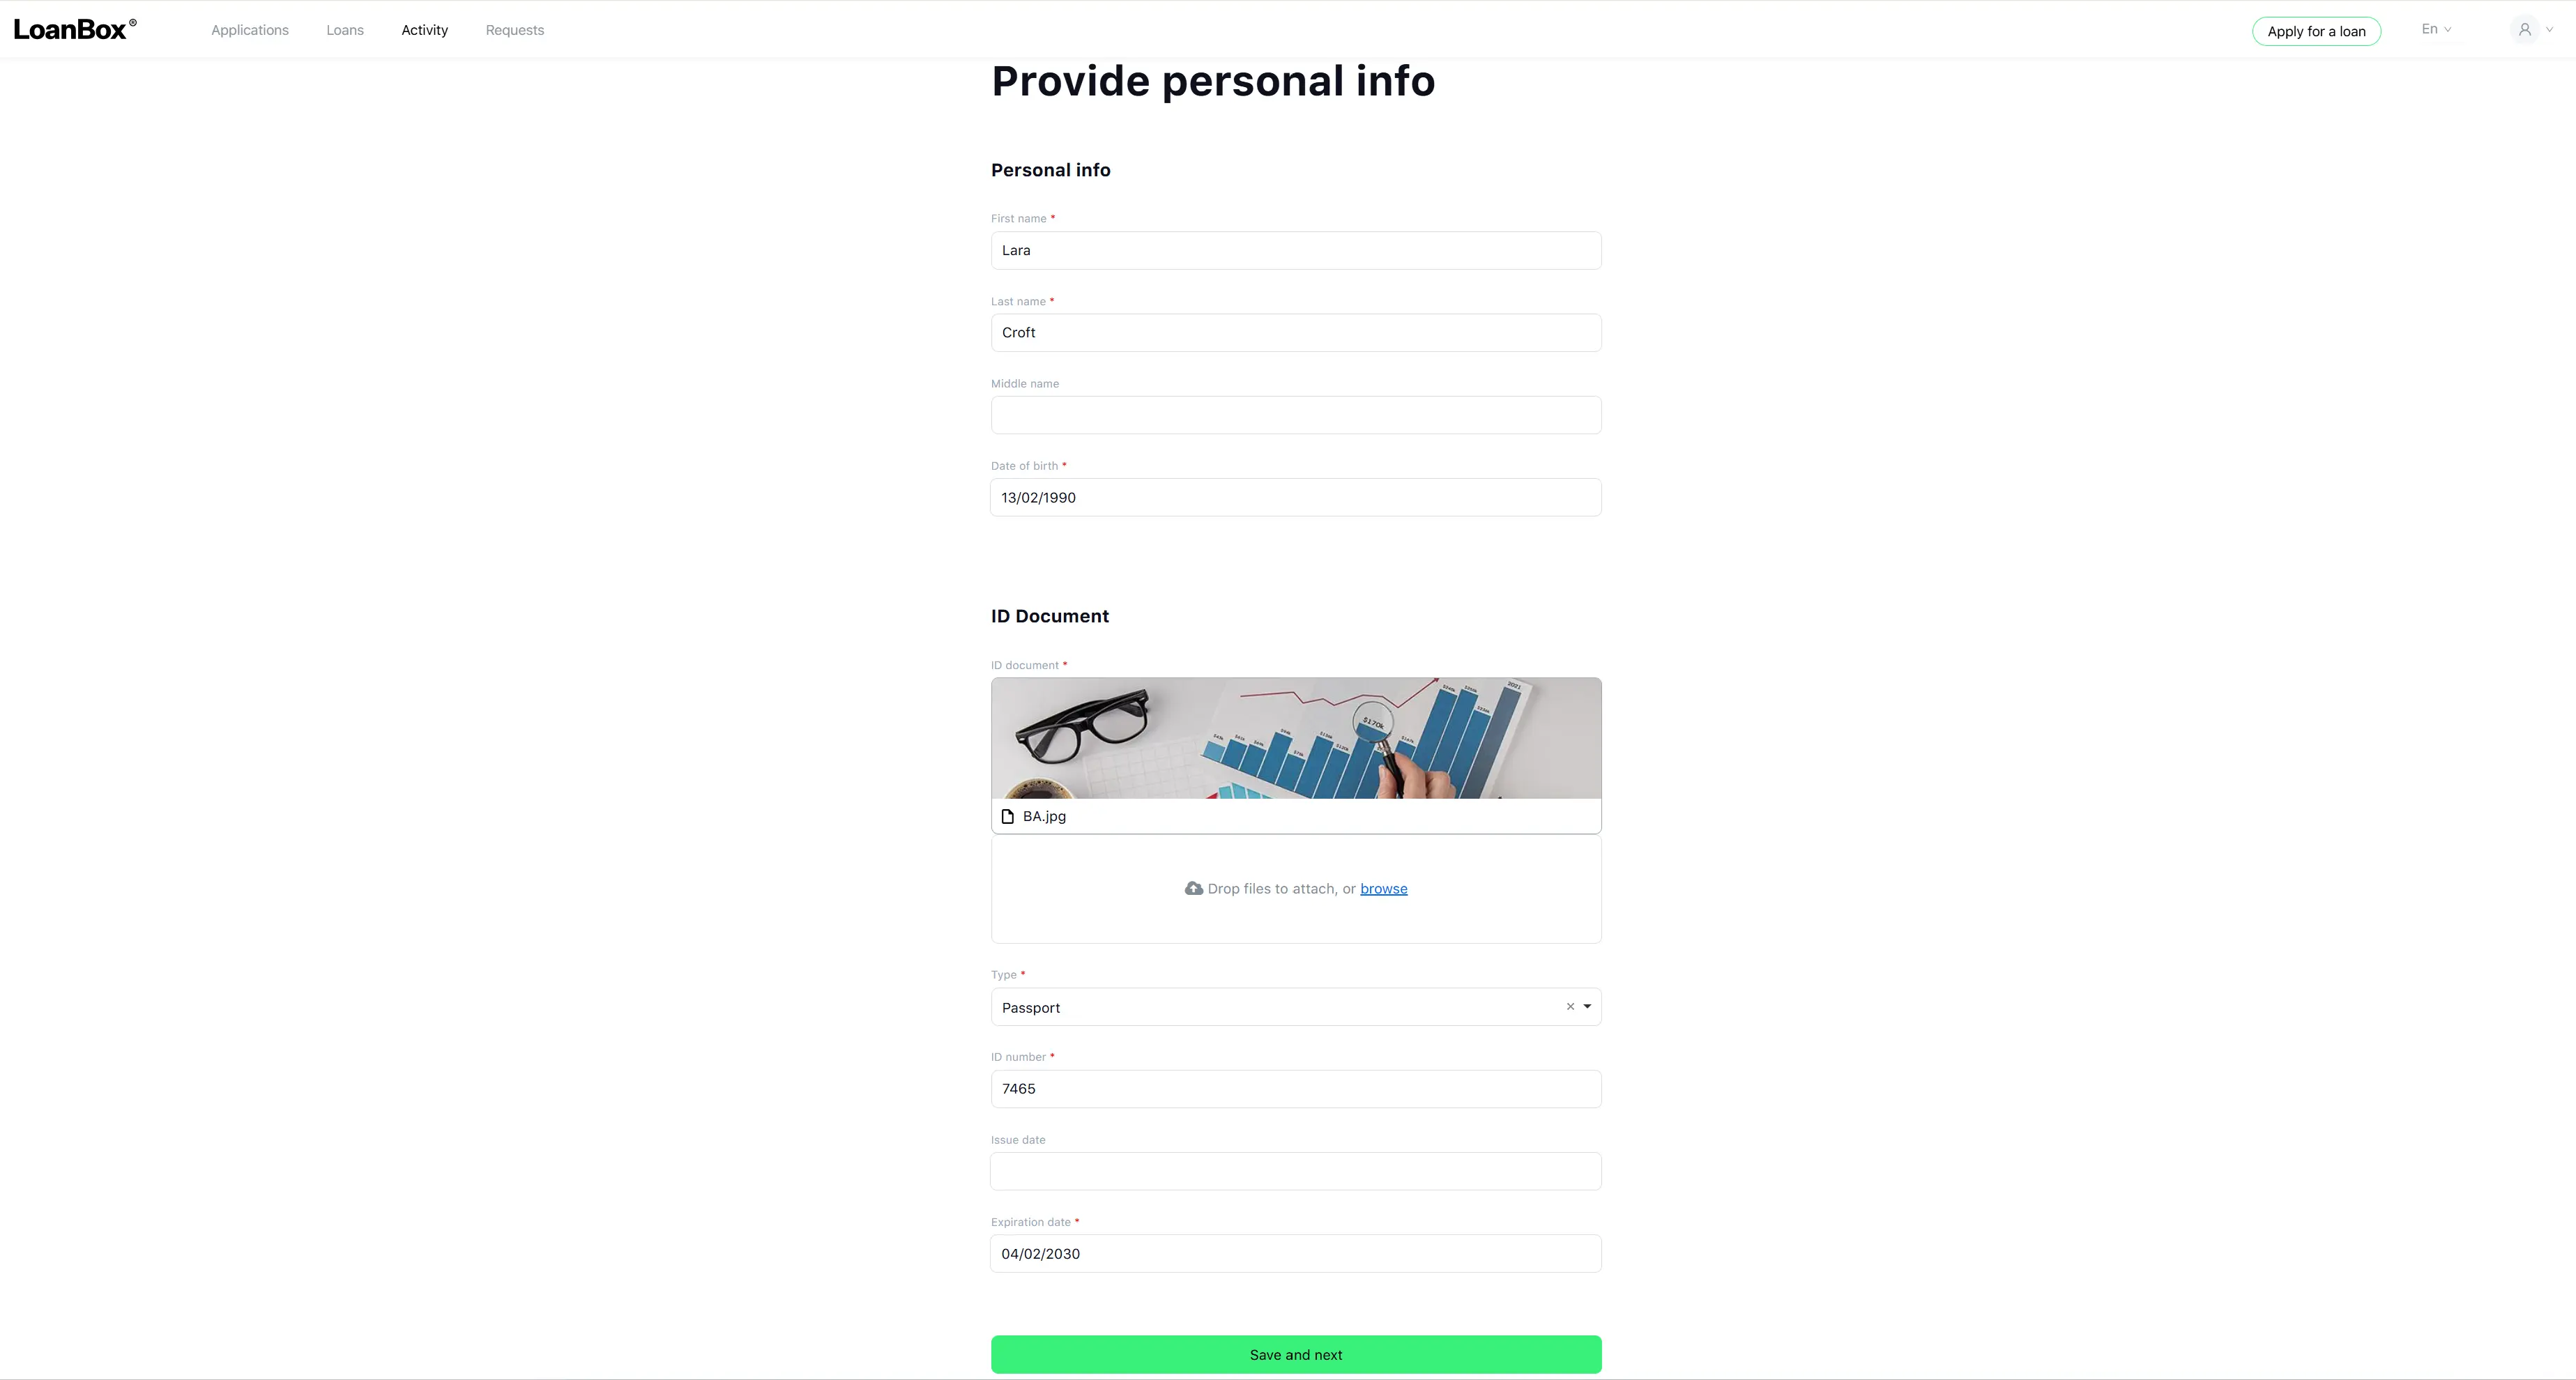
b. Identity verification (KYC).
The system runs an identity check. Depending on the system KYC configuration, this is done automatically through an external provider (Jumio or Ondato) or manually by an operator. The check enriches the customer record with first name, last name, date of birth, and ID document details.
If the identity check is rejected, the application ends.
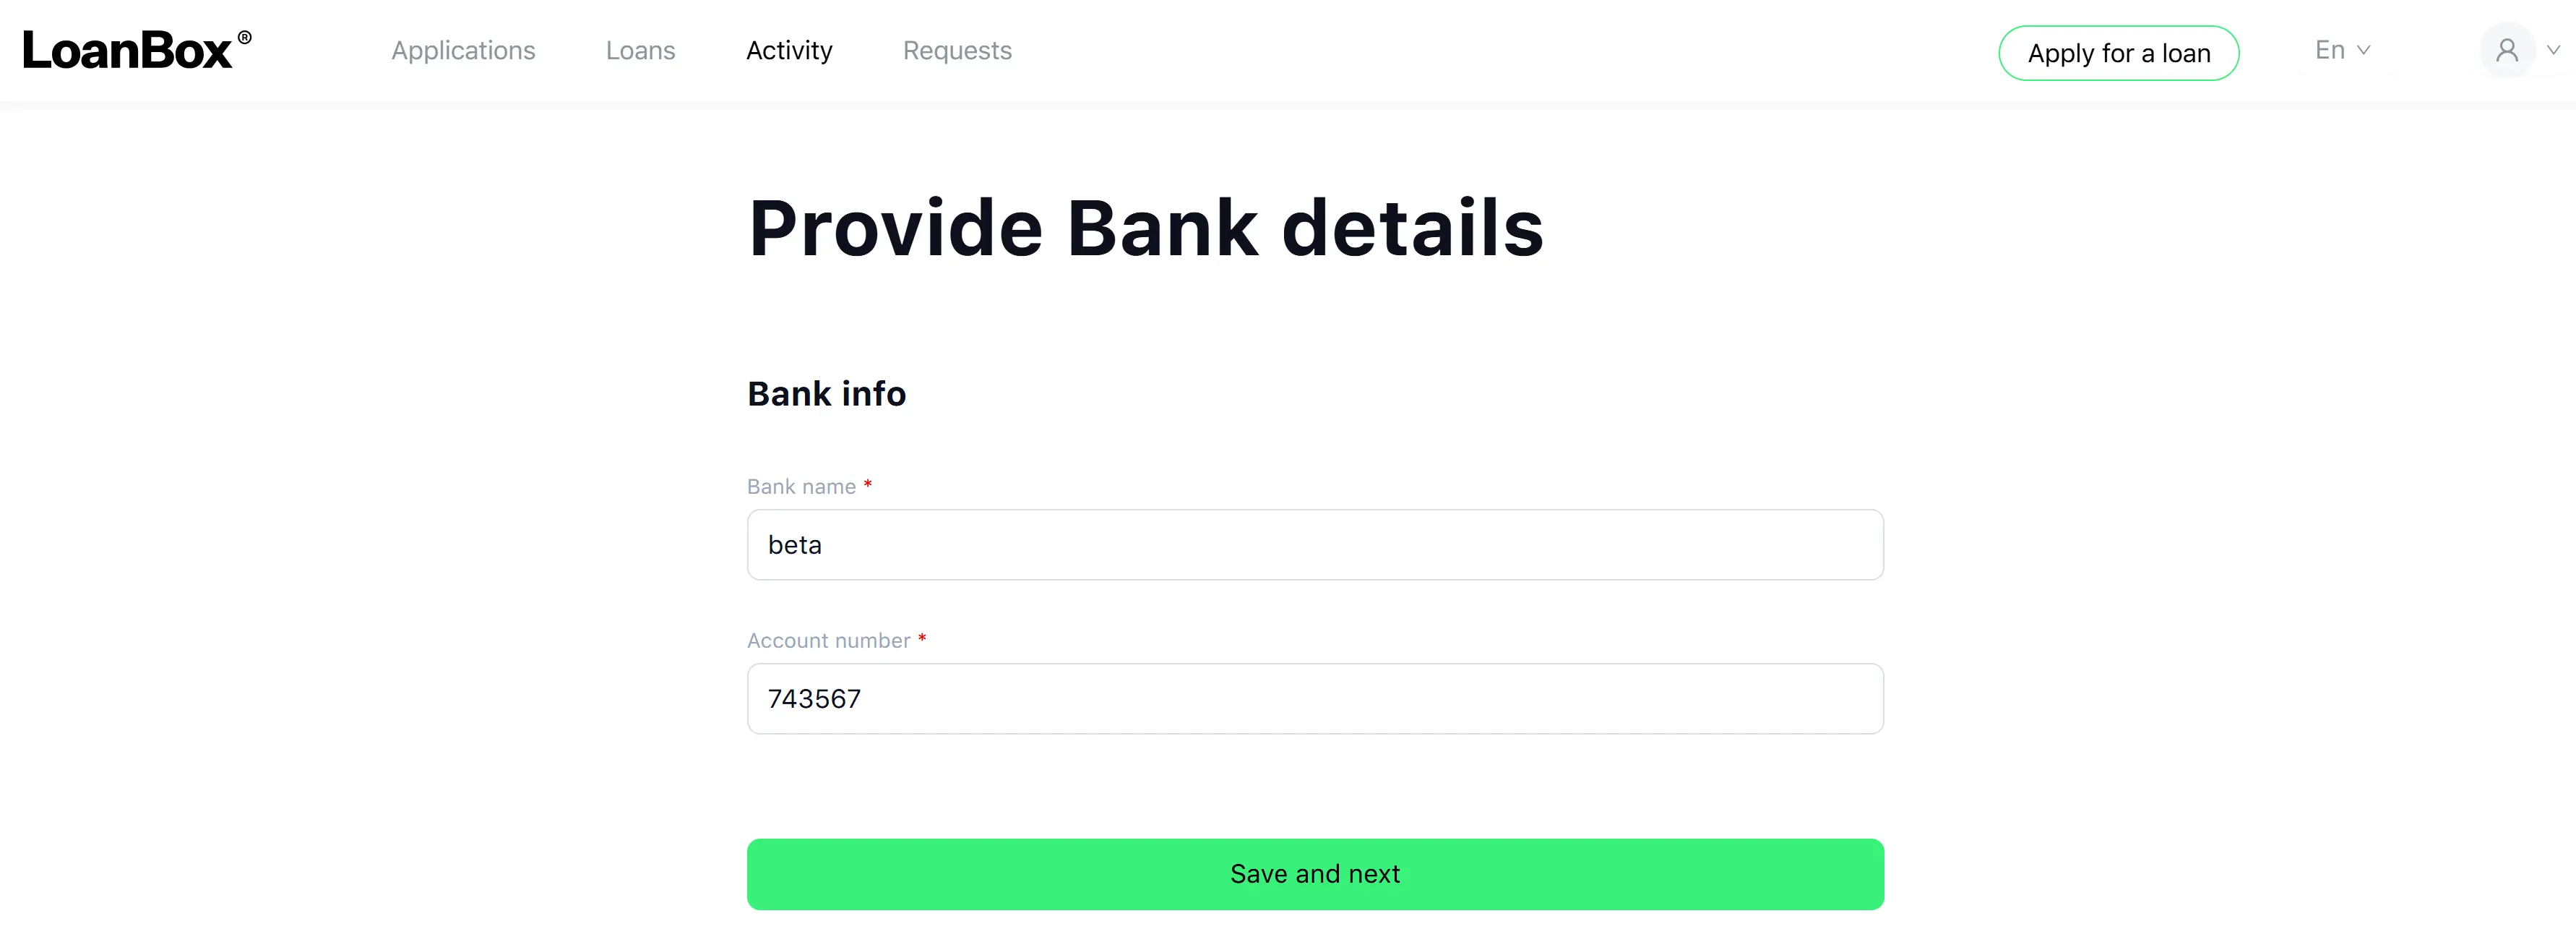
c. Bank account verification.
The system verifies the customer’s bank account depending on the system Bank account verification configuration. This is done automatically through an open banking provider (Flinks, Plaid, or Illion) or manually by an operator. Bank account details are saved on the customer.
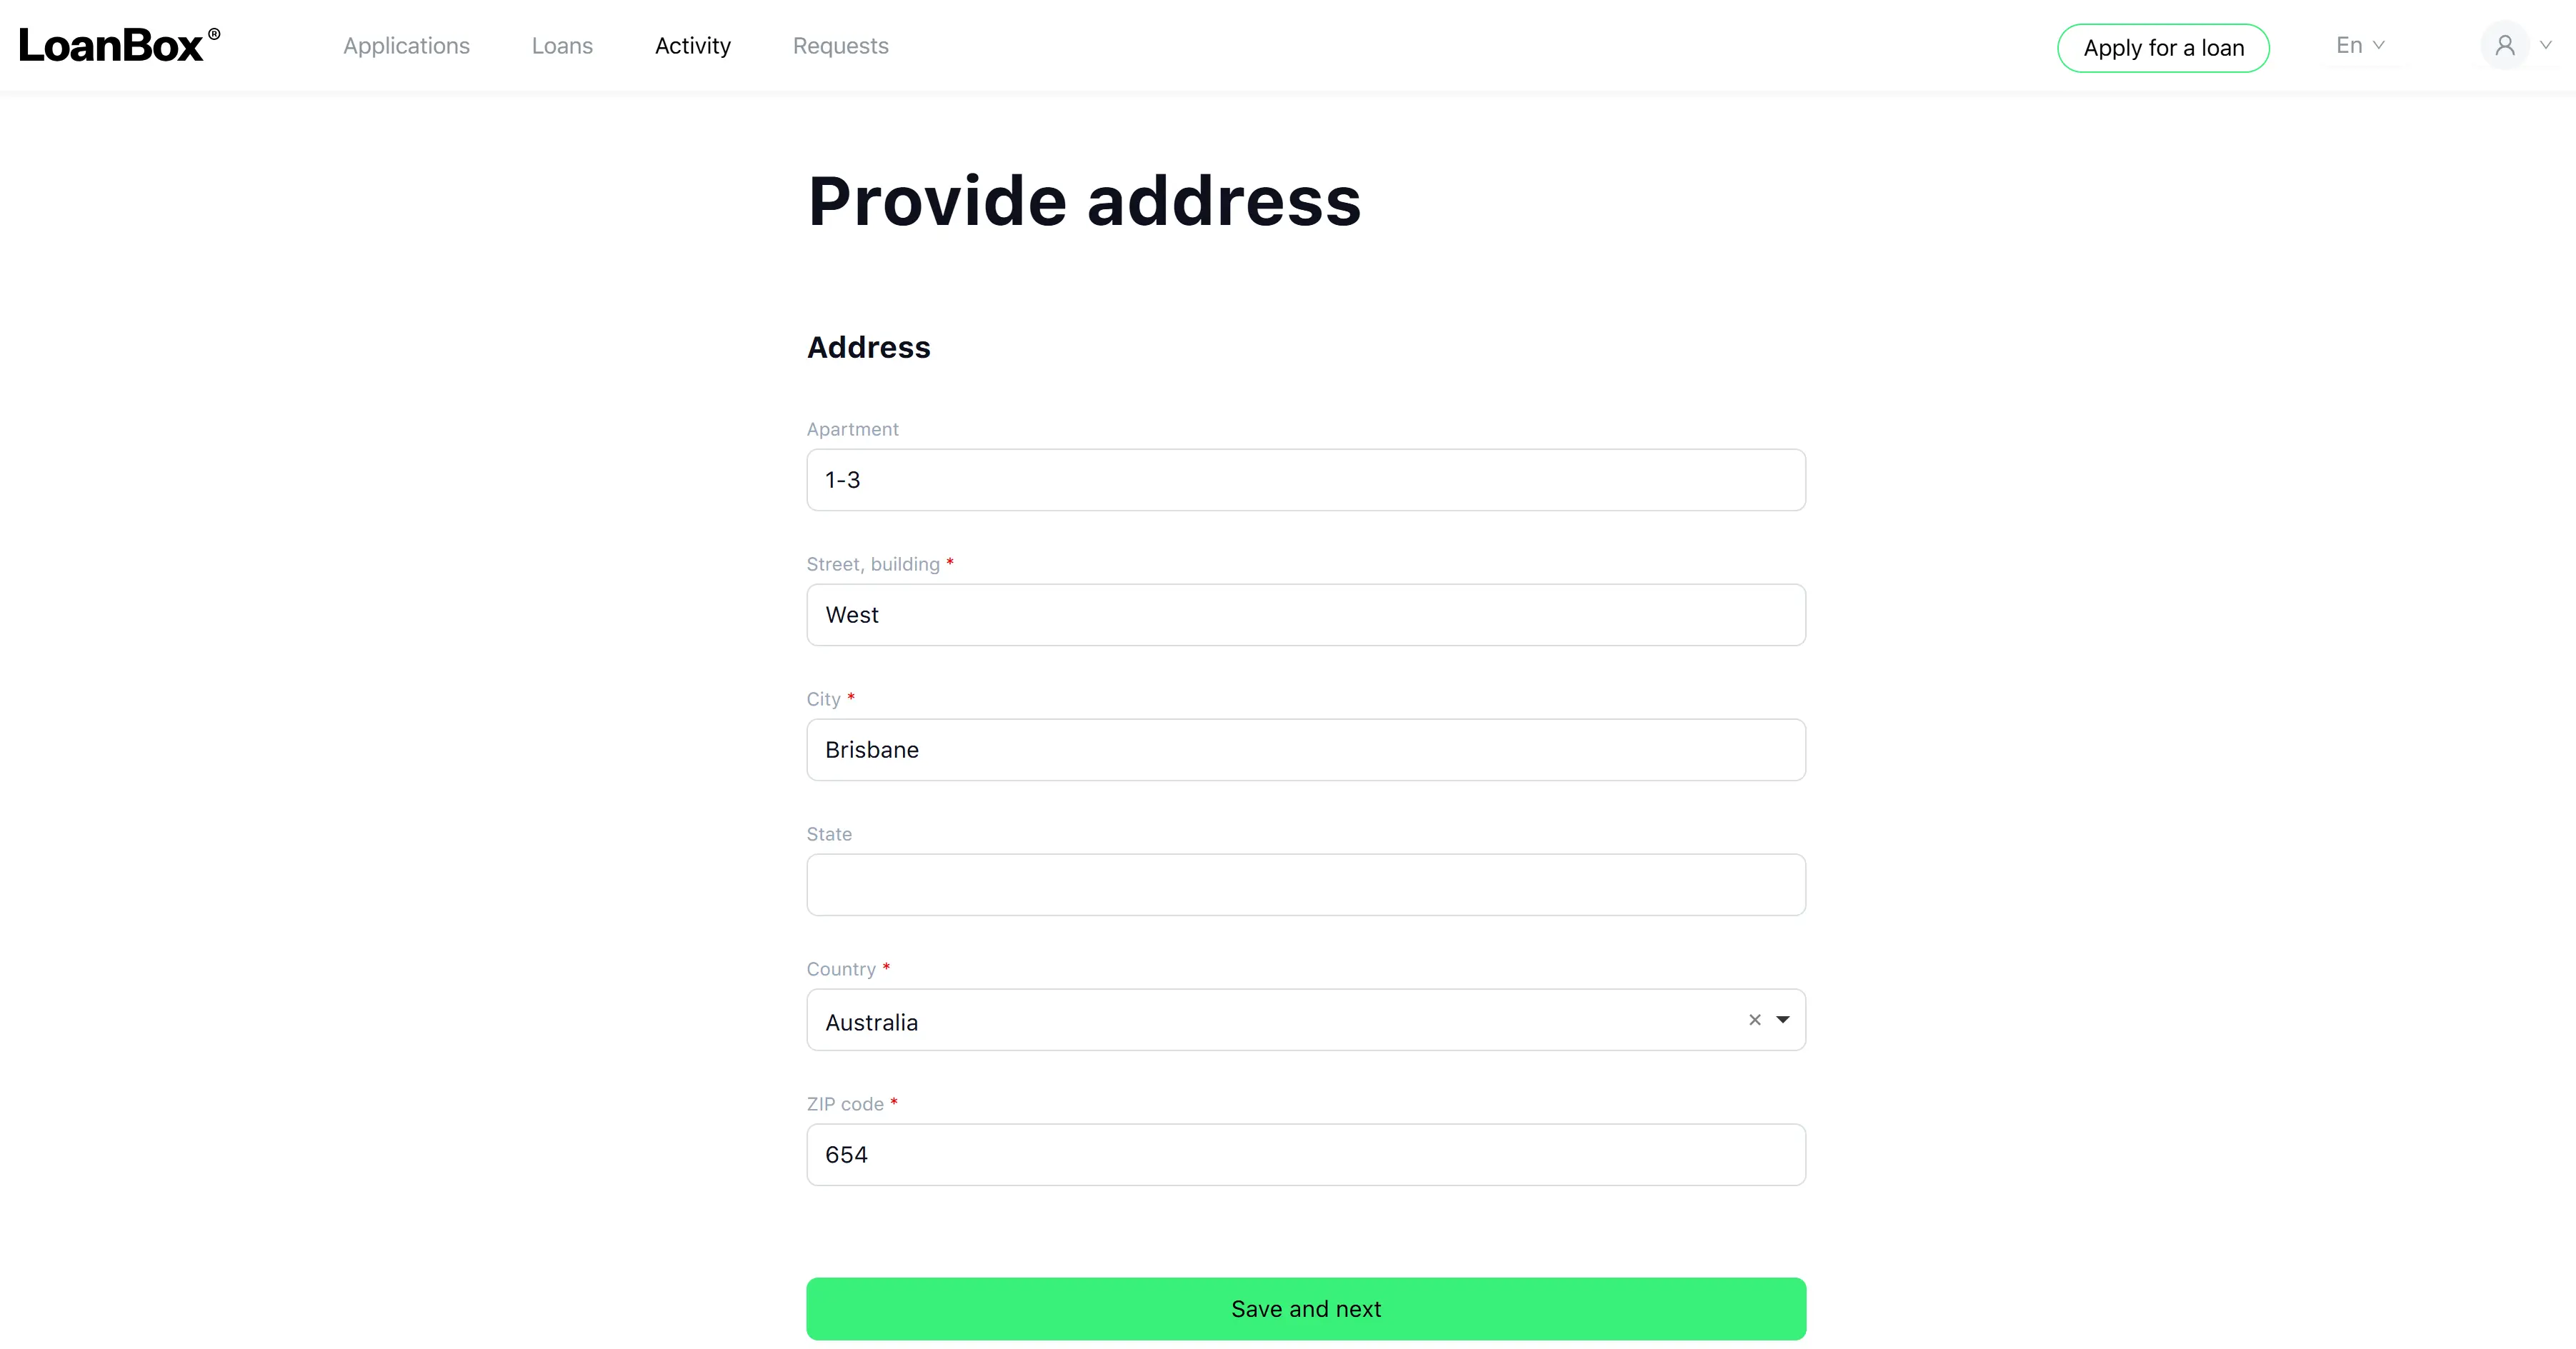
d. Provide address.
The customer (or operator) fills in the residential address.
| Field | Type | Required | Notes |
|---|---|---|---|
| Formatted address / Country / Postal code / Street / City / State / Apartment | Text fields, possibly auto-completed | Yes (address provider dependent) | Input method depends on the configured address provider: manual input, OpenStreetMap, or Google Maps. |
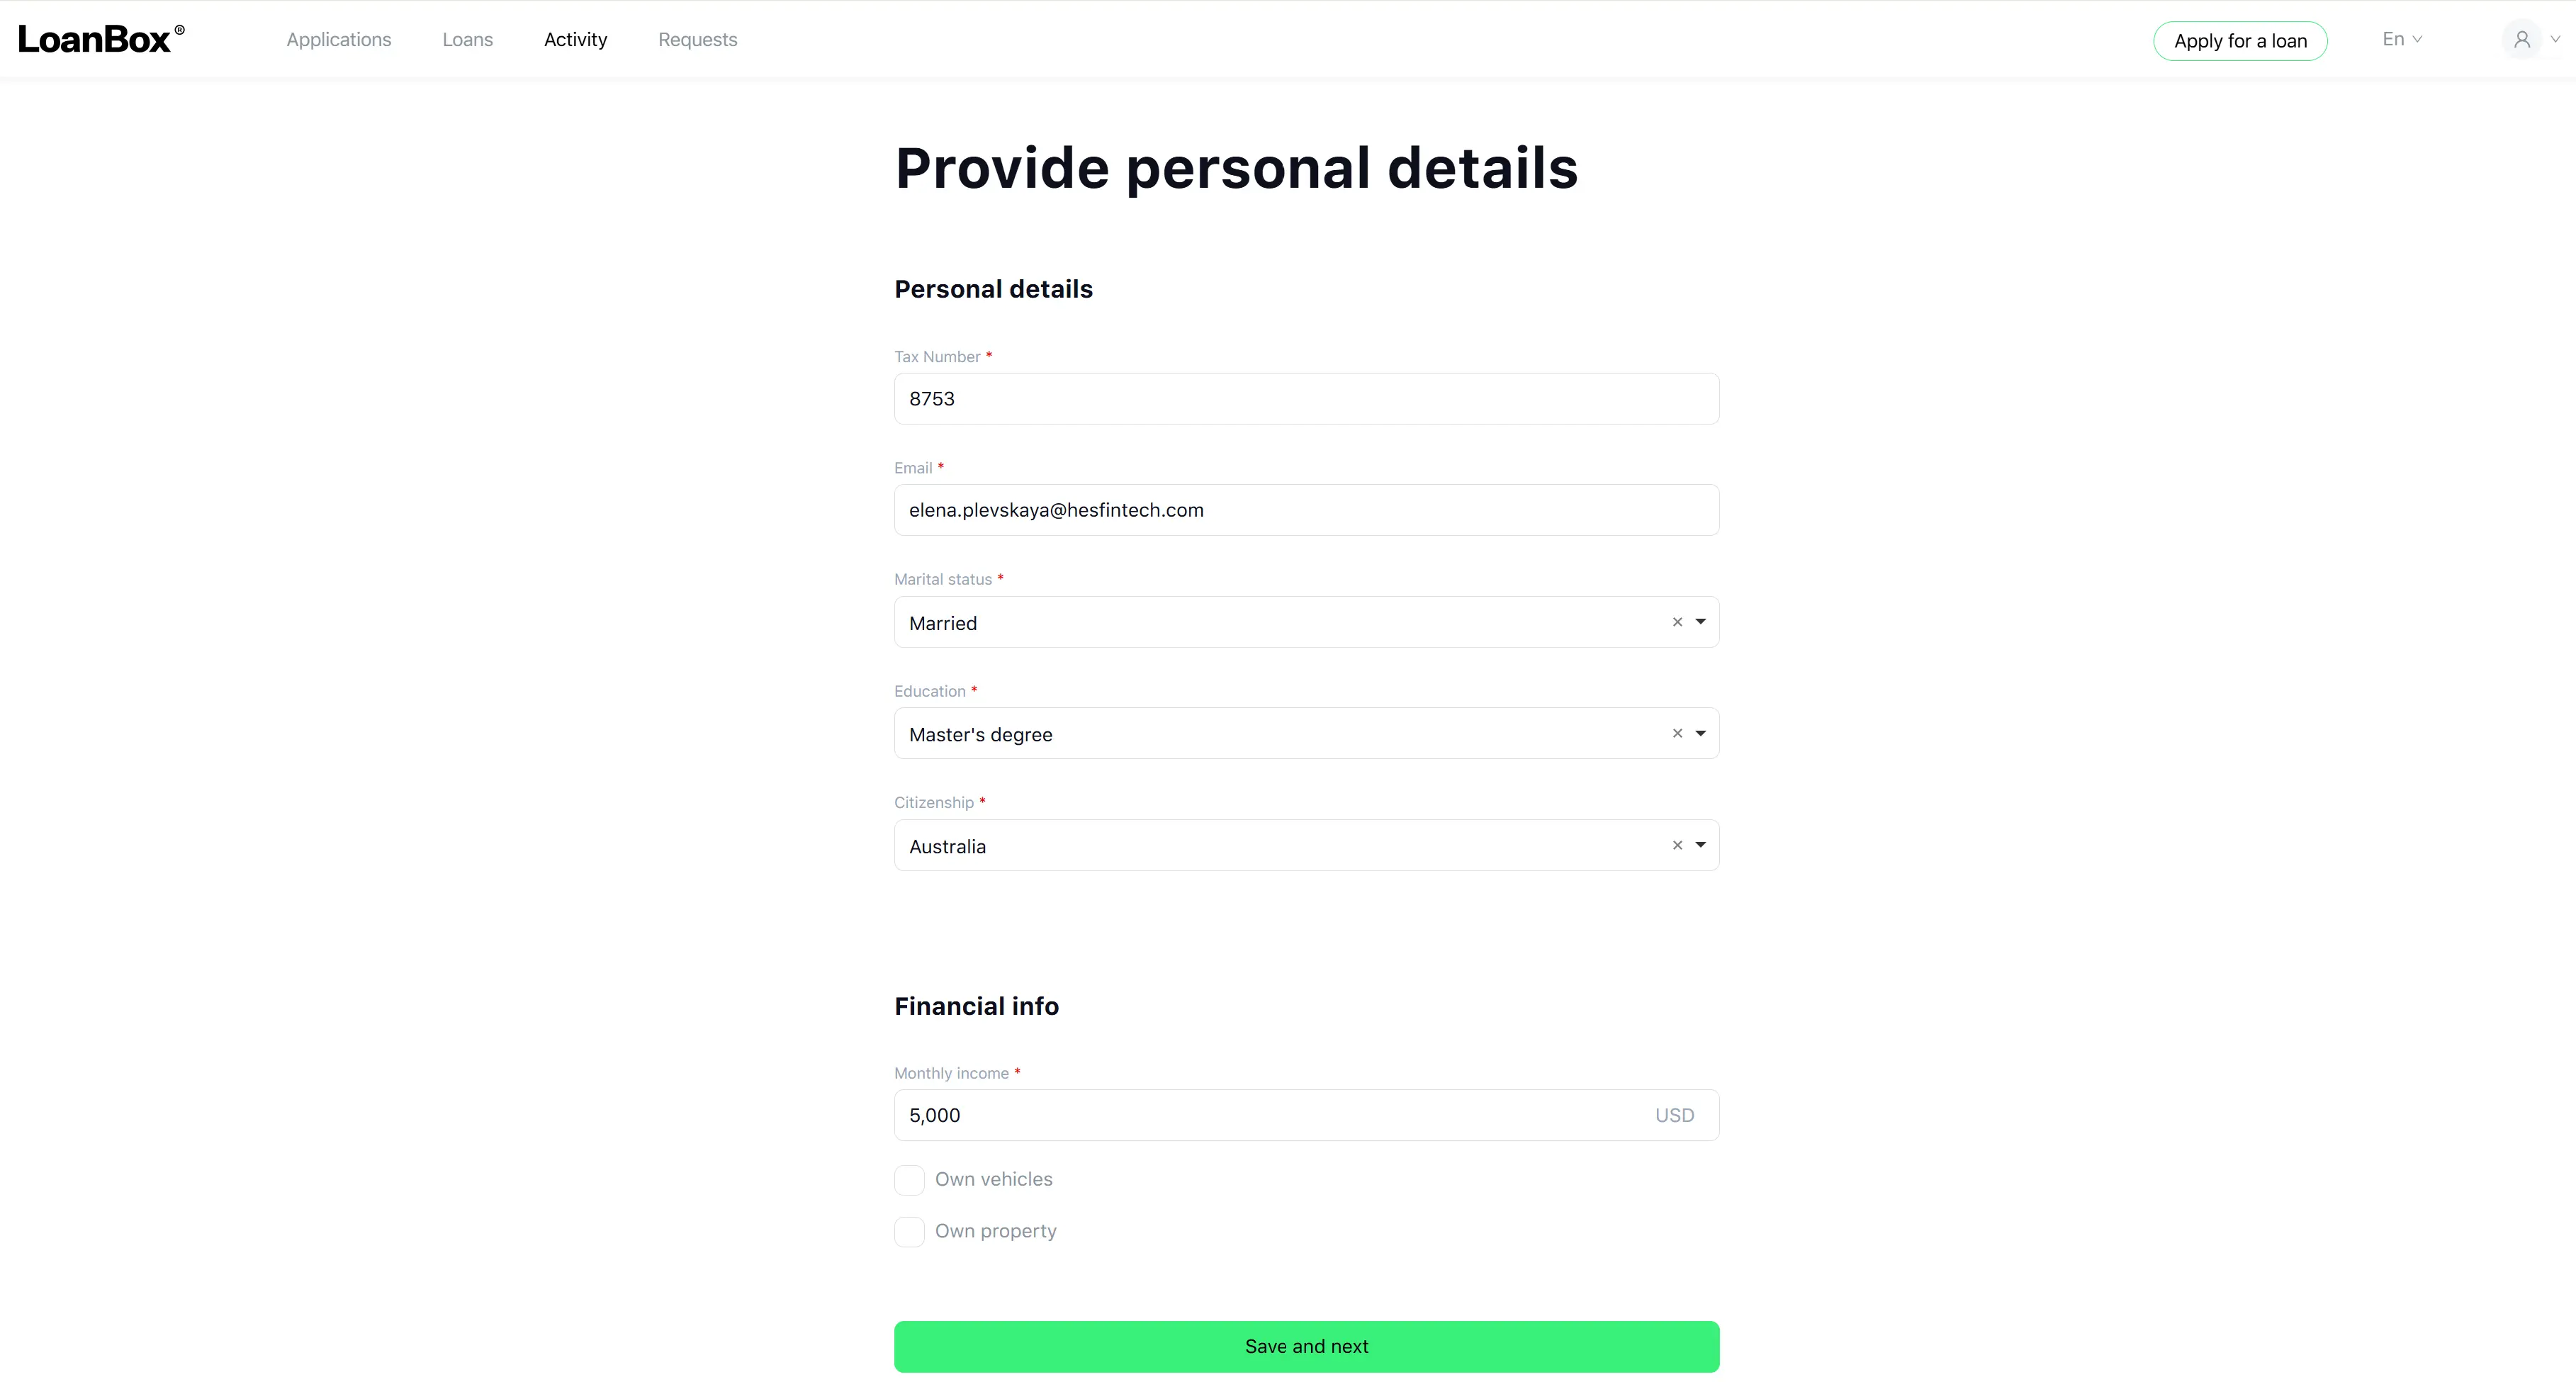
e. Provide personal details.
| Field | Type | Required | Notes |
|---|---|---|---|
| Tax number | Text | Yes | |
| Text | Yes | Shown only when the system authenticates by phone (email is asked here because it was not captured at login). | |
| Phone | Phone number | Yes | Shown only when the system authenticates by email. |
| Citizenship | Dropdown (countries) | Yes | |
| National ID | Text | Yes (conditional) | Shown only when the product group uses Equifax as the credit bureau provider, or when the borrower already has a value. |
| Marital status | Dropdown | Yes | Values come from the deployment’s marital status list. |
| Education | Dropdown | Yes | Values come from the deployment’s education list. |
| Monthly income | Number with currency suffix | Yes | Must be between 0 and 100,000,000 with up to two decimals. |
| Has vehicle | Yes/No | No | Default: No. |
| Has property | Yes/No | No | Default: No. |
After submission, the system runs a first blacklist check on the person using phone, email, full name + date of birth, and ID document number. A match terminates the application.
f. Provide employment information.
All fields are collected inside the employment block of the customer profile.
| Field | Type | Required | Notes |
|---|---|---|---|
| Employer legal name | Text | Yes | |
| Employer phone | Phone | Optional (form-dependent) | |
| Employer website | Text | Optional (form-dependent) | |
| Industry sector | Dropdown | Yes | From the deployment’s industry list. |
| Position | Dropdown | Yes | From the deployment’s position list. |
| Length of employment | Dropdown | Yes | From the deployment’s length-of-employment list. |
| Employer address | Address block | Yes (address provider dependent) | Same providers as the residential address field. |
From this form the customer can navigate back to the personal details step. When they come back, the personal details are preserved.
After submission, the system runs a second blacklist check on the person (same checks as before) to catch values changed during the edit. A match terminates the application.
The person record is then saved.

Legal entity borrower flow
a. System looks up or creates the legal entity record.
The system finds the existing legal entity or creates a new one based on phone/email lookup.
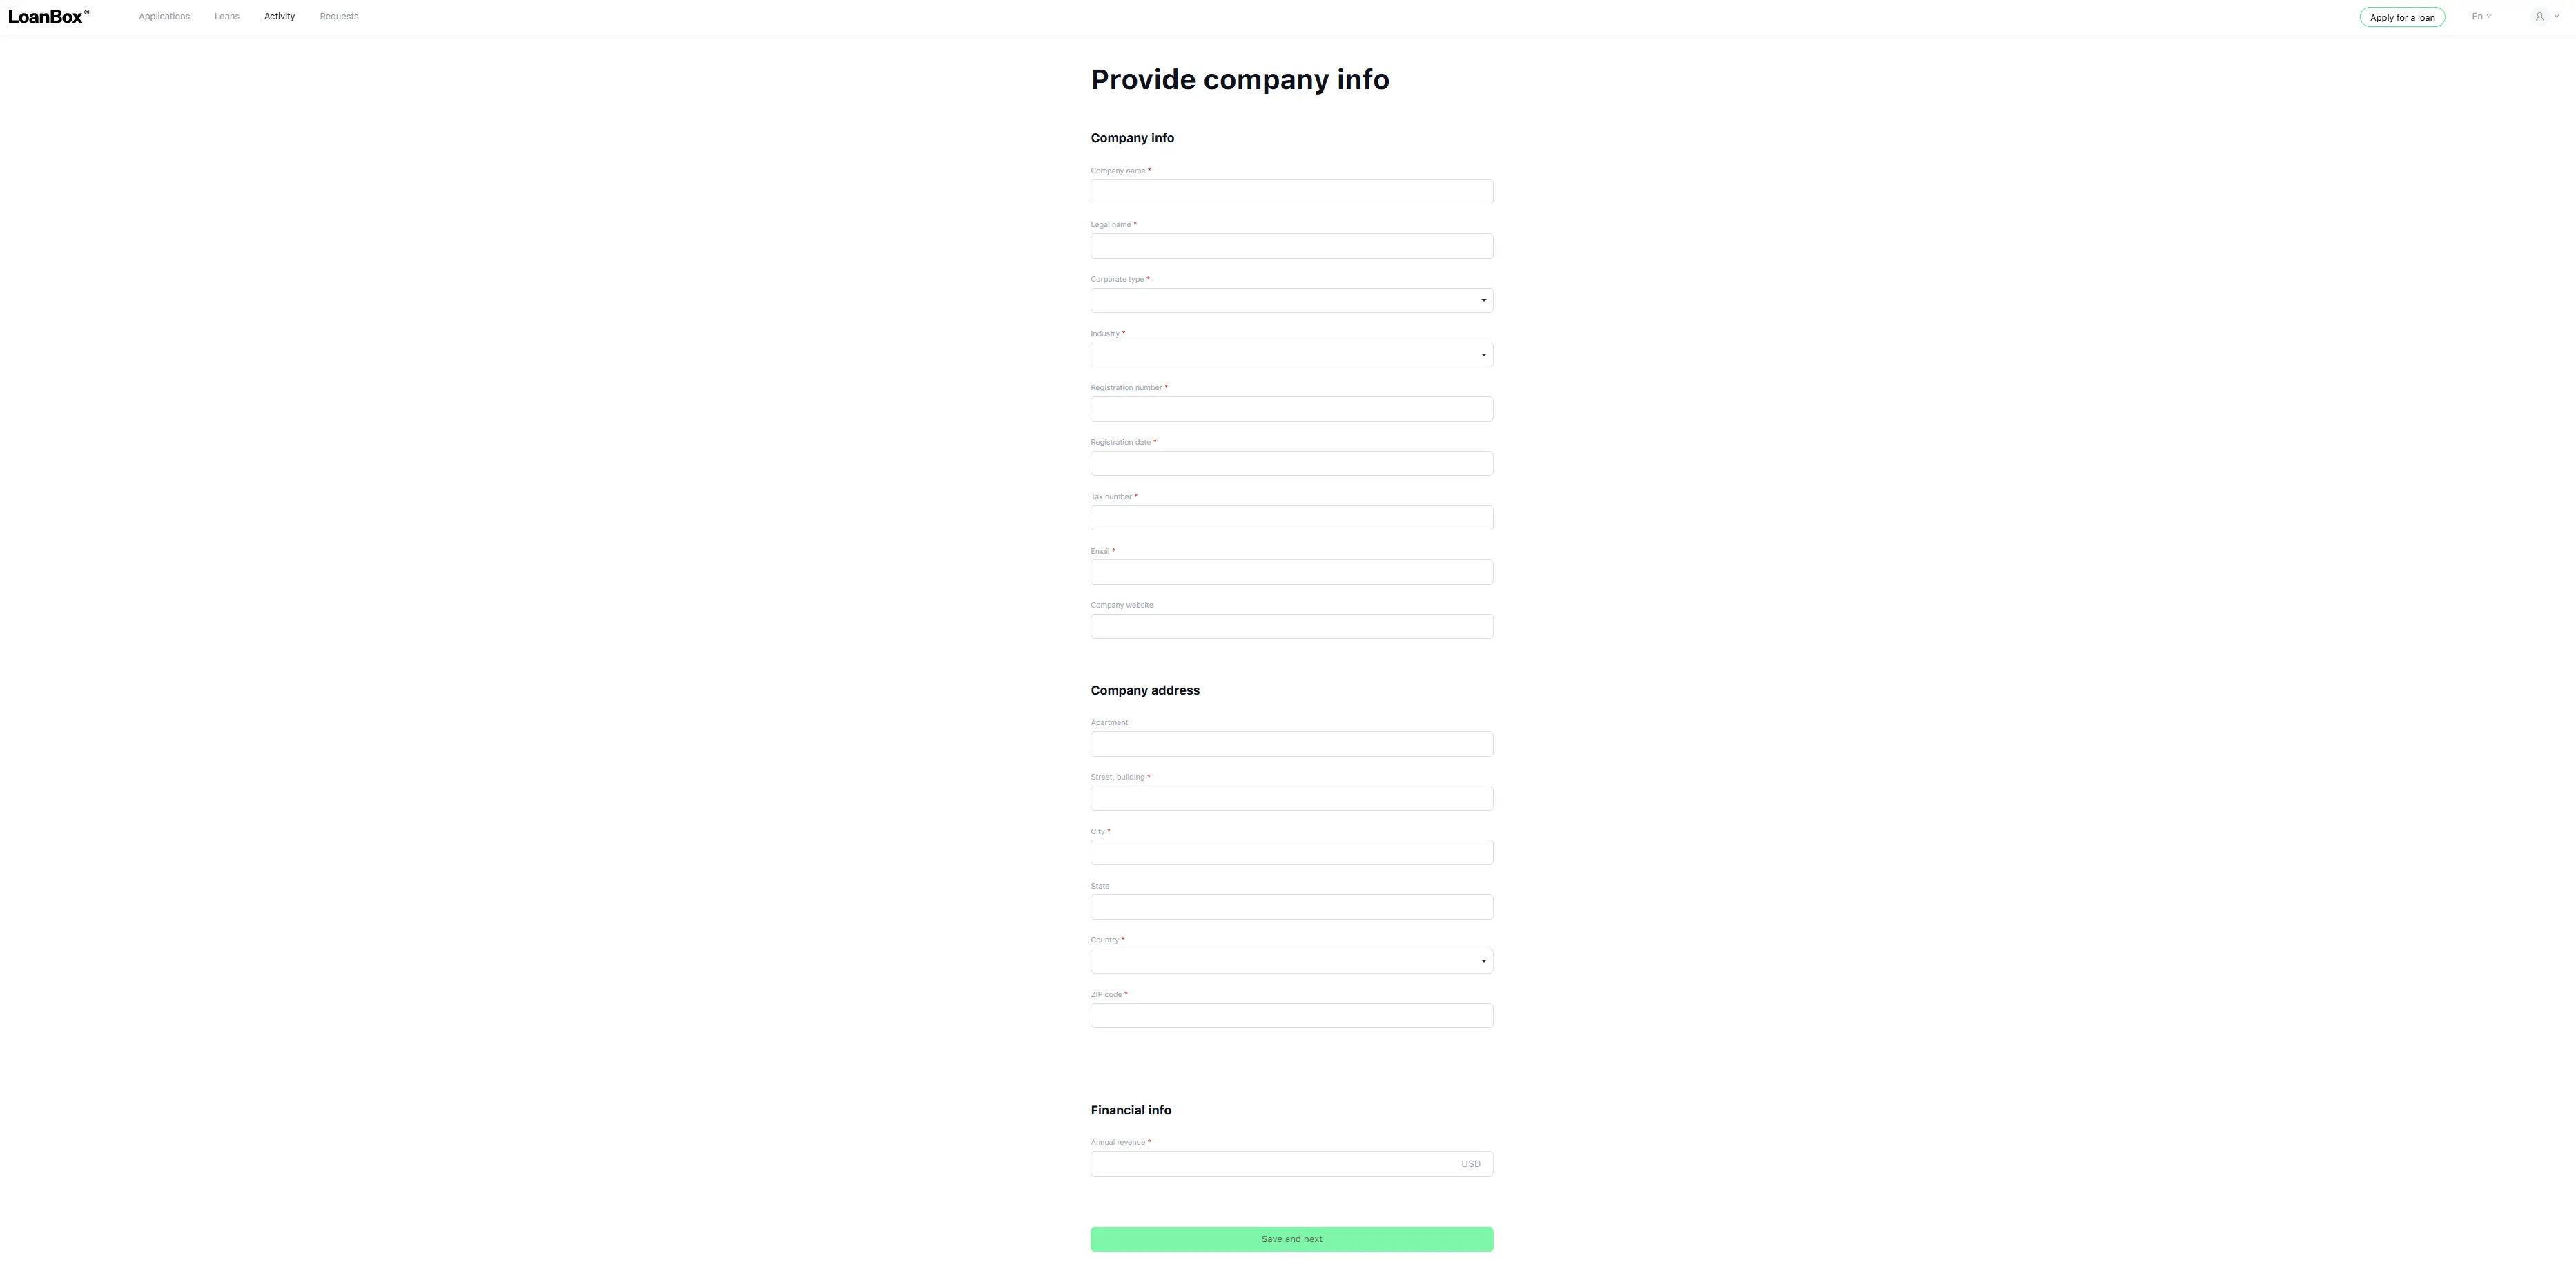
b. Provide company information.
| Field | Type | Required | Notes |
|---|---|---|---|
| Company full name (trading name) | Text | Yes | |
| Legal name | Text | Yes | Official registered name. |
| Corporate type | Dropdown | Yes | Values come from the deployment’s corporate type list (e.g., C-Corp, S-Corp, LLC, etc.). |
| Industry | Dropdown | Yes | From the deployment’s industry list. |
| Registration number | Text | Yes | |
| Registration date | Date | Yes | Cannot be in the future. |
| Tax number | Text | Yes | |
| Yes | |||
| Website | Text | No | |
| Company address | Address block | Yes (address provider dependent) | |
| Annual revenue | Number with currency suffix | Yes | Between 0 and 1,000,000,000. |
After submission, the system runs a first blacklist check on the legal entity using phone, email, and tax number. A match terminates the application.
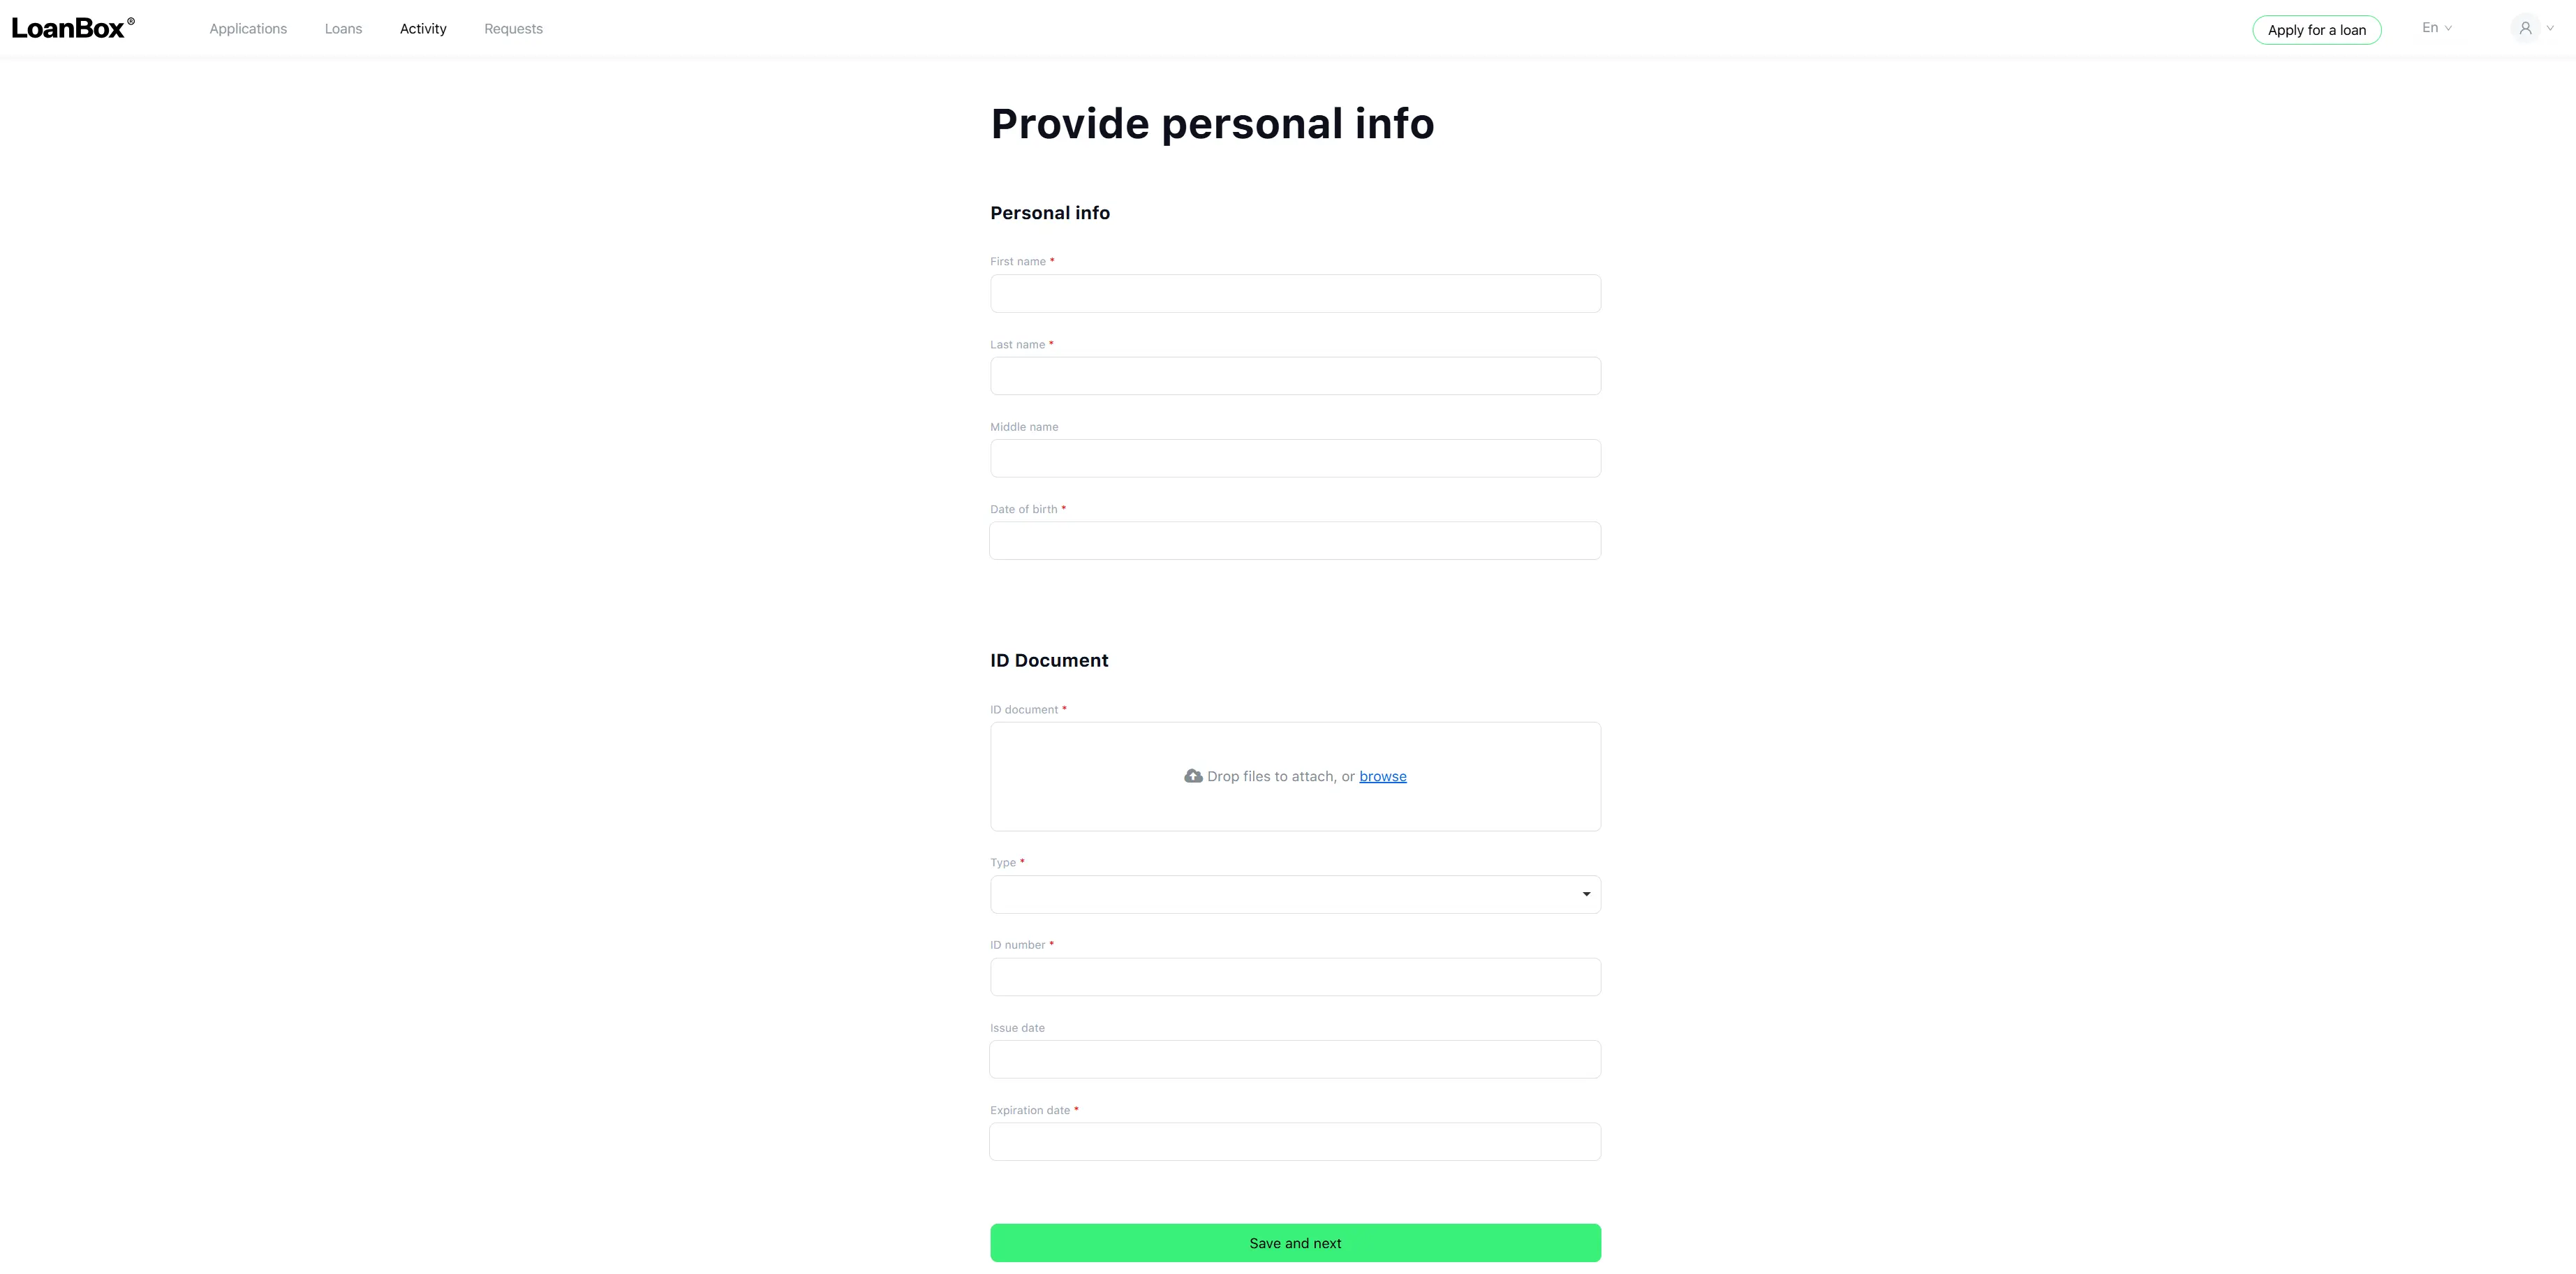
c. Identity verification (KYC) on the company representative.
The system runs KYC on the authorized representative of the company (automatically or manually) depending on the system KYC configuration. If rejected, the application is terminated.
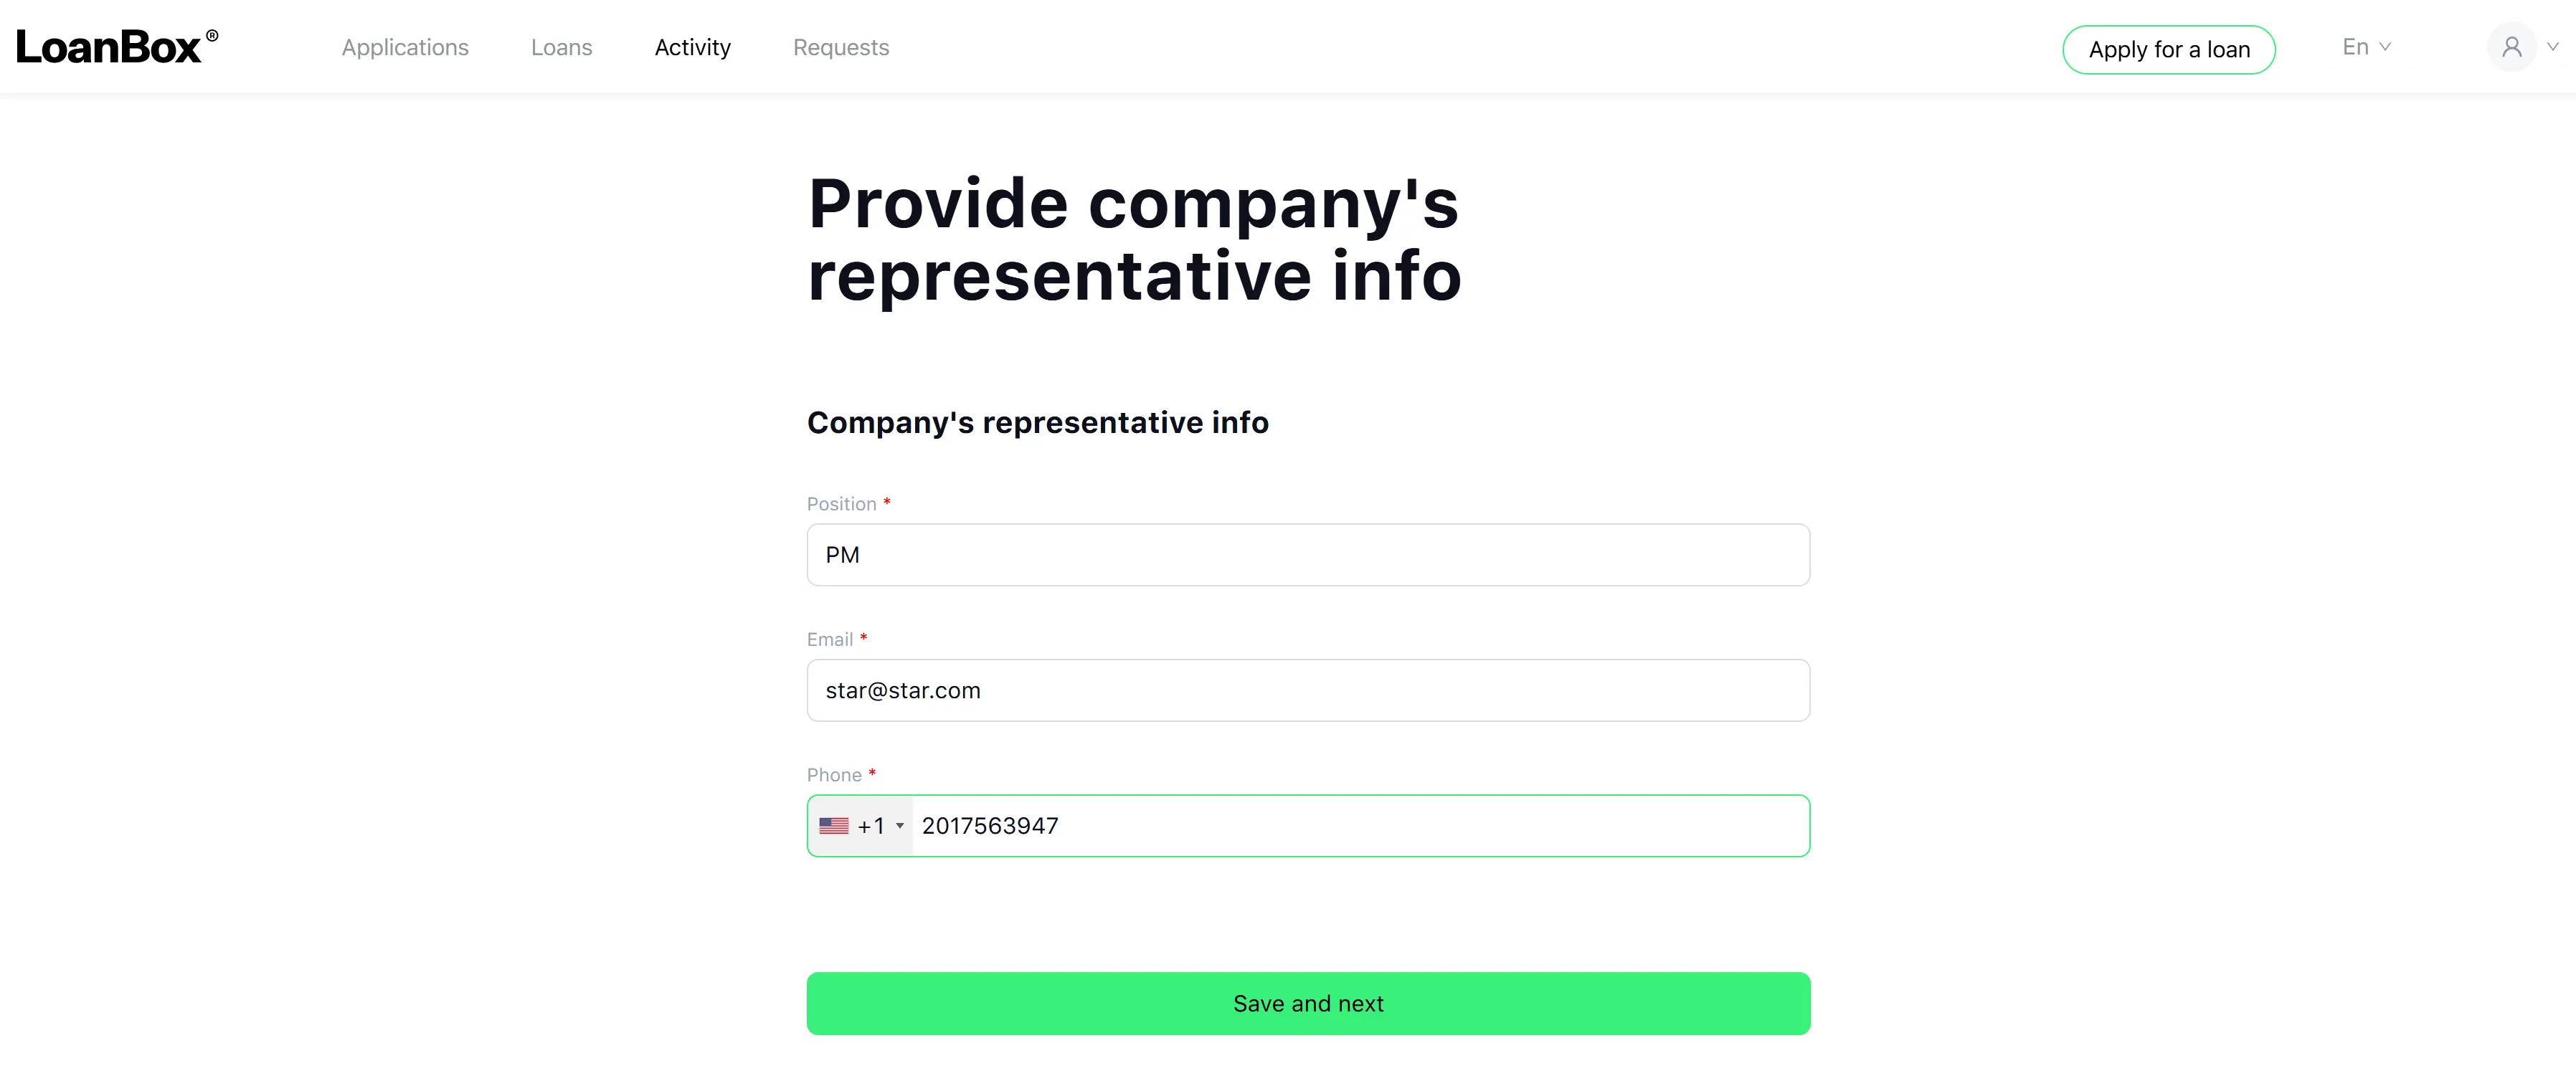
d. Provide the company’s representative info.
The operator fills in representative details (position and personal information of the authorized representative) based on the KYC-verified person.
e. Provide bank information.
Bank account details of the company are entered. From this form the user can navigate back to the representative info step. When they come back, representative data is preserved.
After submission, the system runs a second blacklist check on the legal entity. A match terminates the application.
The legal entity record is then saved.
Step 5. Provide collateral info (conditional)
This step is shown only when the product group’s “Request Collateral” setting is on. Otherwise, the system moves directly to the next step.
| Field | Type | Required | Notes |
|---|---|---|---|
| Collateral type | Dropdown | No (server-side rules apply) | Values come from the deployment’s collateral type list. |
| Registration number | Text | No | Up to 255 characters. |
| Registration date | Date | No | |
| Description | Long text | No | Up to 3,000 characters. |
| Supporting documents | File upload | No | Up to 5 image files, 20 MB each. |
| Item-specific fields | Varies | Varies | A dynamic sub-form configured on the product group; its fields, types, and validations are defined by the product group administrator. |
Note
Step 6. Provide further info (conditional)
This step is shown only when the product group’s “Request Further Info” setting is on. Otherwise, the system moves directly to the next step.
The fields on this screen are fully dynamic—they are defined by the product group administrator on the product group’s “Further information form” and can include any mix of text, number, date, dropdown, checkbox, and file upload fields. Their labels, types, and validation rules are entirely product-group-specific.
Step 7. Confirm loan conditions
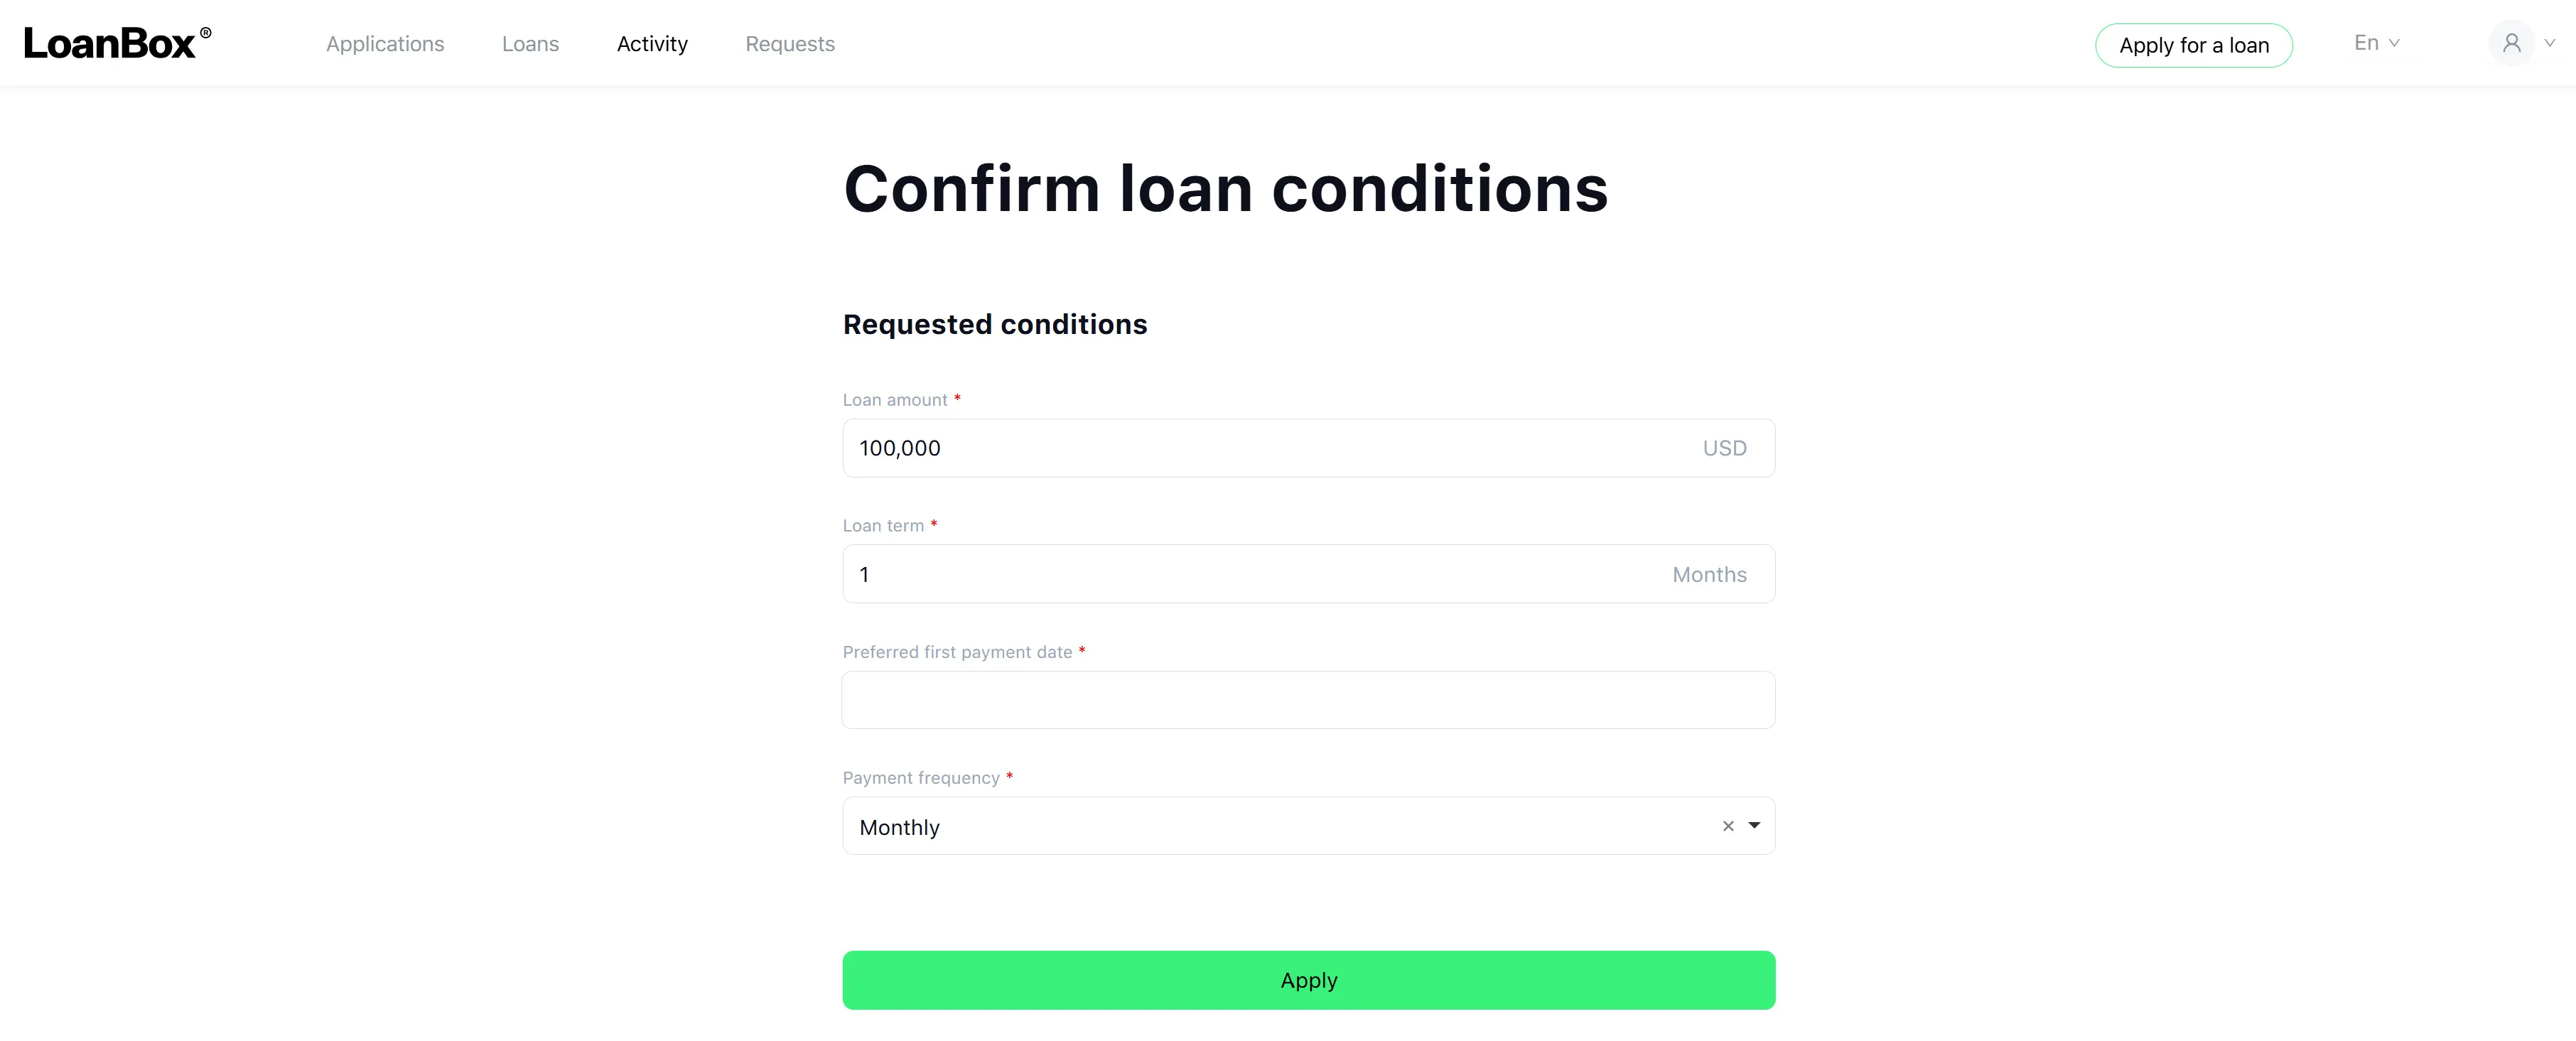
This is the last step of the intake. The customer (or operator) reviews the conditions they are about to submit and, if the product group has requested any supporting documents, attaches them here. Submitting this screen hands the application over to origination.
The screen is organized into two blocks: Requested conditions (always shown) and Supporting documents (conditional on product group settings).
Requested conditions block (always shown)
| Field | Description | Type | Required | Default | Notes |
|---|---|---|---|---|---|
| Loan amount | The amount requested | Number | Yes | Taken from the loan calculator step | Must stay within the product group’s min/max amount. Currency suffix from deployment settings. |
| Loan term | The term requested | Number | Yes | Taken from the loan calculator step | Must stay within the product group’s min/max term. Period suffix comes from the product group’s term period (days, months, etc.). |
| Loan purpose | Reason for taking the loan | Dropdown | Yes | — | Shown only when the product group has “Request Loan Purpose” on. Values come from the deployment’s loan purpose list (filtered by borrower type). |
| First payment date | The date of the first repayment | Date picker | Yes | — | Shown only when the product group has “Configurable first payment date” on AND the product is not a PDL and not a Credit line. The selectable range starts 3 days from today and extends up to the product group’s configured “Range of days for first payment date”. |
| Payment frequency | How often repayments are due | Dropdown | Yes | Taken from the loan calculator step | Shown only when the product group has “Configurable first payment date” on AND the product is not a PDL and not a Credit line. Values come from the product group’s available payment frequencies. |
An “Apply” button at the bottom submits the step and hands the application to origination.
Supporting documents block (conditional)
The supporting documents block appears only when at least one of the following document requests is enabled on the product group:
- Request Bank Statement
- Request Utility Bill
- Request Financial Statement
- Request P&L Statement
- Request Balance Sheet
If none of these are enabled, the block is hidden and Step 7 contains only the Requested Conditions fields above.
When the block is displayed, it shows a file-upload control for each document type enabled on the product group. A control for a document type is only shown if that specific request is enabled (or if the customer has already uploaded a file of that type on a previous attempt).
| Upload | Appears when | Required | Notes |
|---|---|---|---|
| Bank statement | Product group has “Request Bank Statement” on | Yes | Image/file upload, up to 20 MB per file. The number of files is capped by the deployment’s per-field attachment limit. |
| Utility bill | Product group has “Request Utility Bill” on | Yes | Image/file upload, up to 20 MB per file. The number of files is capped by the deployment’s per-field attachment limit. |
| Financial statement | Product group has “Request Financial Statement” on | Yes | Image/file upload, up to 20 MB per file. The number of files is capped by the deployment’s per-field attachment limit. |
| P&L statement | Product group has “Request P&L Statement” on | Yes | Image/file upload, up to 20 MB per file. The number of files is capped by the deployment’s per-field attachment limit. |
| Balance sheet | Product group has “Request Balance Sheet” on | Yes | Image/file upload, up to 20 MB per file. The number of files is capped by the deployment’s per-field attachment limit. |
Completion of this step:
On “Apply”, the application moves out of the intake phase and is handed over to origination (the decisioning process). On the Borrower Portal, the customer is then placed on a read-only “application is being processed” view that refreshes automatically and lets the customer cancel the application at any time.
Cancellation during intake
During the intake phase the application can be canceled in the following cases. Cancellations that happen later (during origination) are not covered here.
| Cause | When |
|---|---|
| Customer closes the application from the Borrower Portal tracking view | Any time after the loan calculator is submitted, until origination has started manual processing |
| Customer did not complete the loan calculator within 48 hours | During the loan calculator step |
| Customer had an active application or was on the blacklist at start | At the “eligibility pre-checks” step |
| Customer was added to the blacklist during data collection | During data collection |