Signing option
The first part of the process is the same for all signing options. The signing-option-specific tasks come after the contract has been generated.
Common preparation steps (all options)
These steps run automatically, and the borrower sees the “Wait for an offer” screen on the Borrower Portal while they are happening.
- Step 1 — First payment date check. The system checks that the configured first payment date is at least 4 days in the future. If not (and the product is not a Credit Line or a Payday Loan), the application is declined and the borrower receives a decline notification.
- Step 2 — Show “Wait for an offer” to the borrower. The Borrower Portal displays the screen titled “Wait for an offer” with the message: “Please, wait a few minutes while we are working on your offer.” The screen refreshes automatically every 10 seconds. It stays visible until the contract is ready to be signed.
- Step 3 — Record the signing start time. The system stores the moment from which the 72-hour deadline starts counting.
- Step 4 — Calculate the repayment schedule. The system selects the amortization strategy that matches the product group and produces the planned repayment schedule for the approved amount and term.
- Step 5 — Generate the contract. The system generates the contract PDF from the contract template that is attached to the product group, filled with the borrower’s data and the approved loan terms.
- Step 6 — Select the signing service. Based on the product group’s Signing option, the system-wide E-sign service, and the document subject, the system picks one of four signing flows described below.
After step 6 the borrower’s experience and the back-office tasks differ depending on the chosen signing option.
Option A. Signing with OTP
The borrower stays on the Borrower Portal throughout the signing.
Borrower Portal tasks:
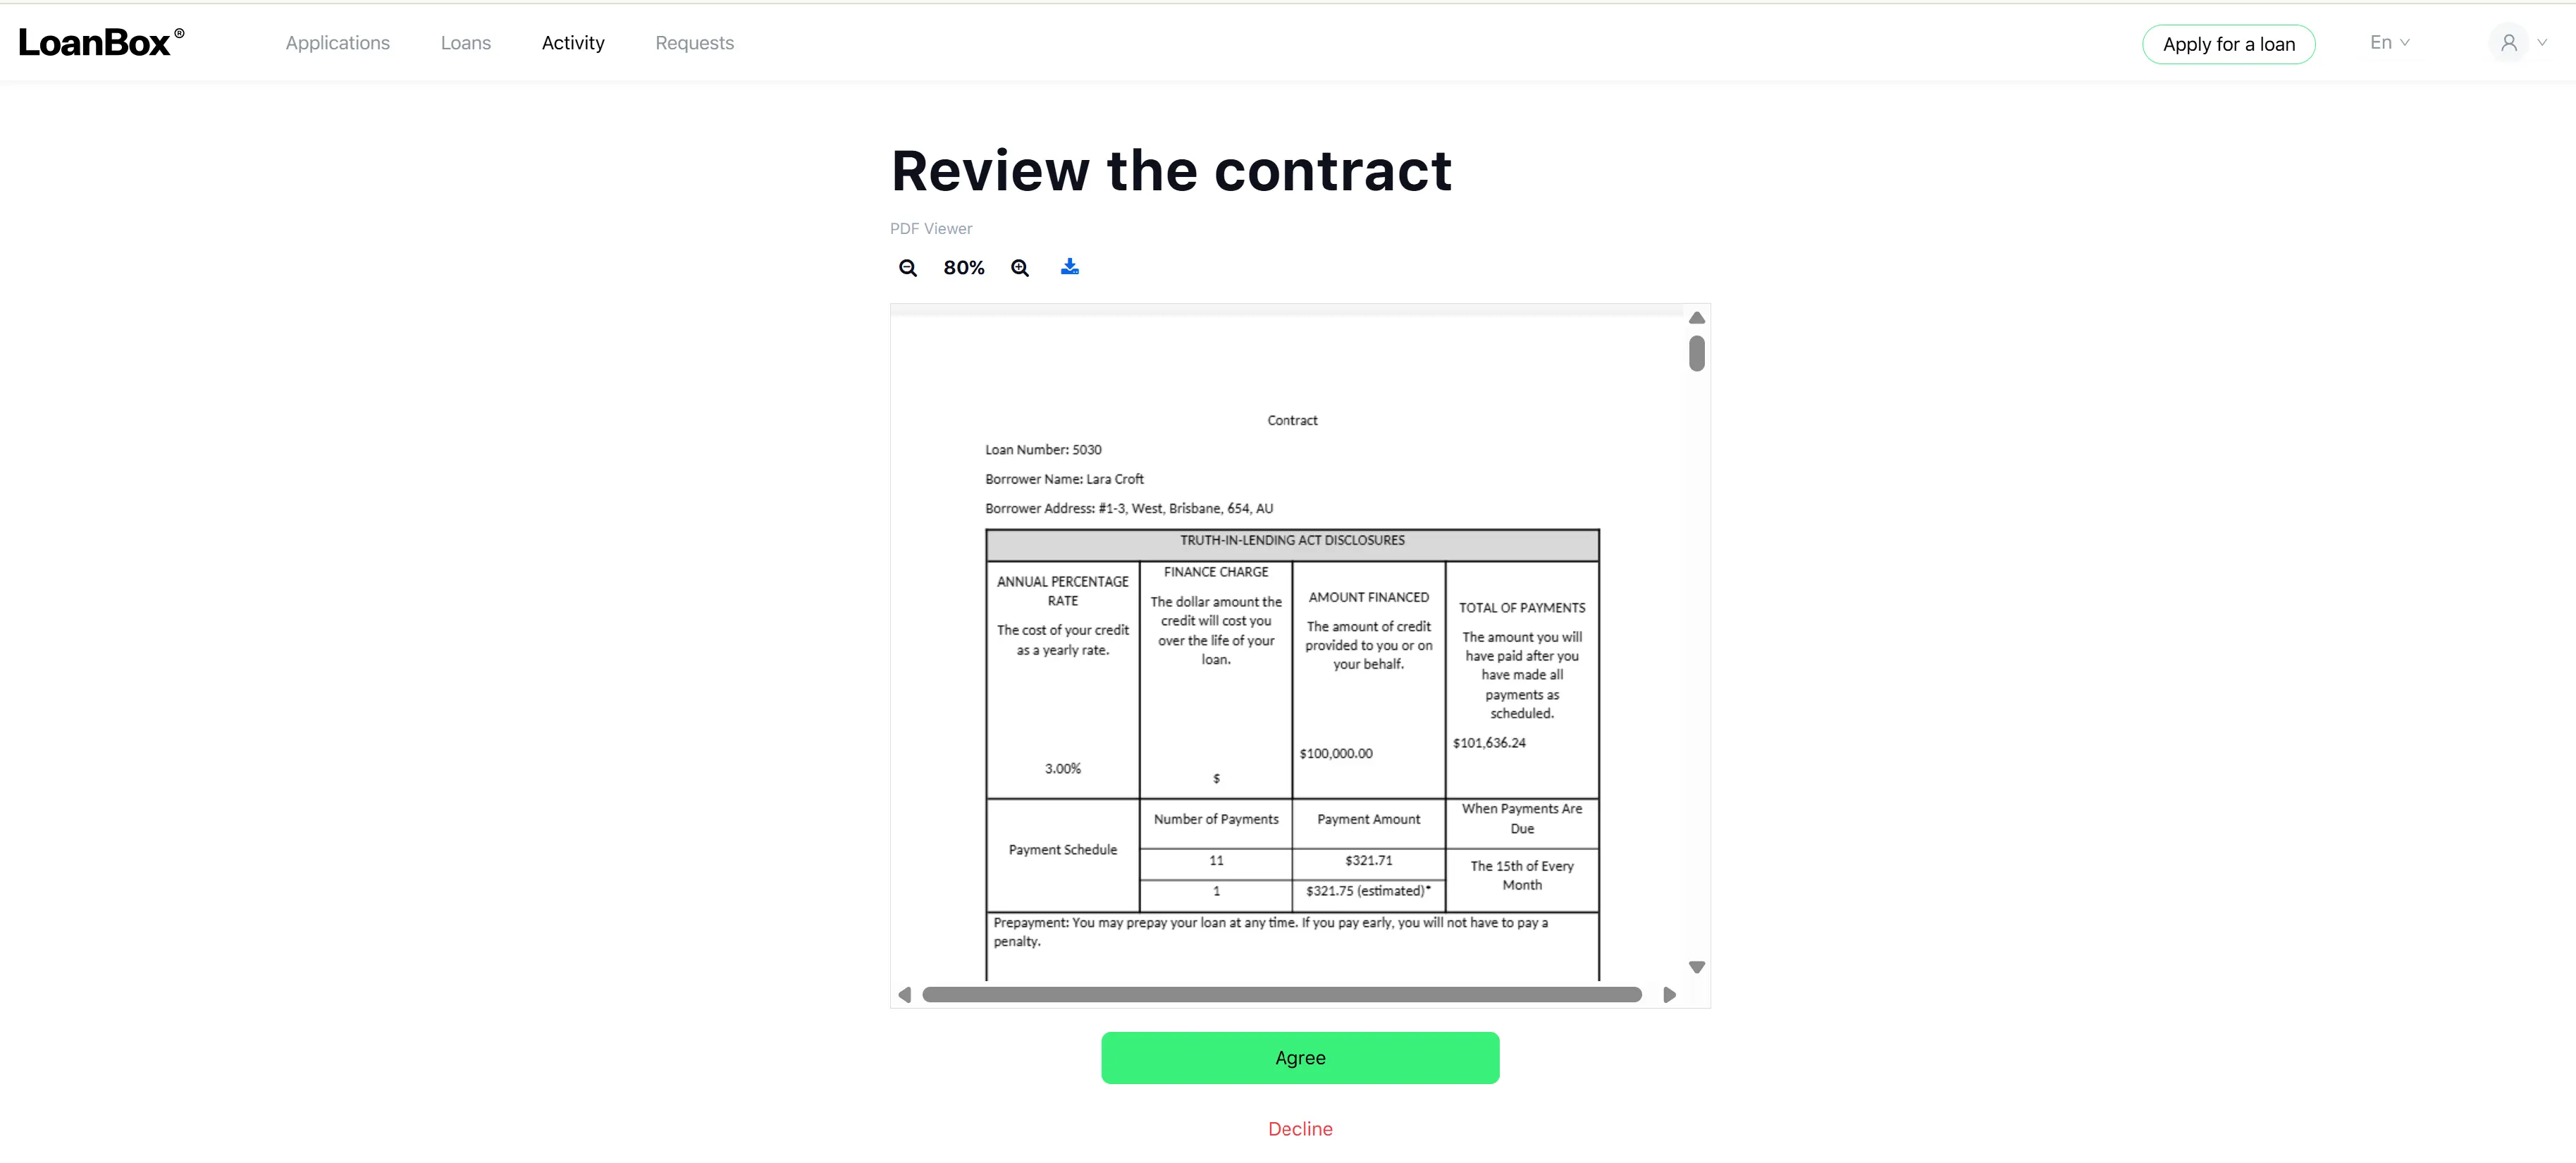
Step A1. Review the contract — Borrower Portal
| Property | Value |
|---|---|
| Where it appears | Borrower Portal |
| Screen title | Review the contract |
What the borrower sees and can do:
A built-in PDF viewer that displays the generated contract.
Two buttons:
- Agree — proceed to the OTP signing step.
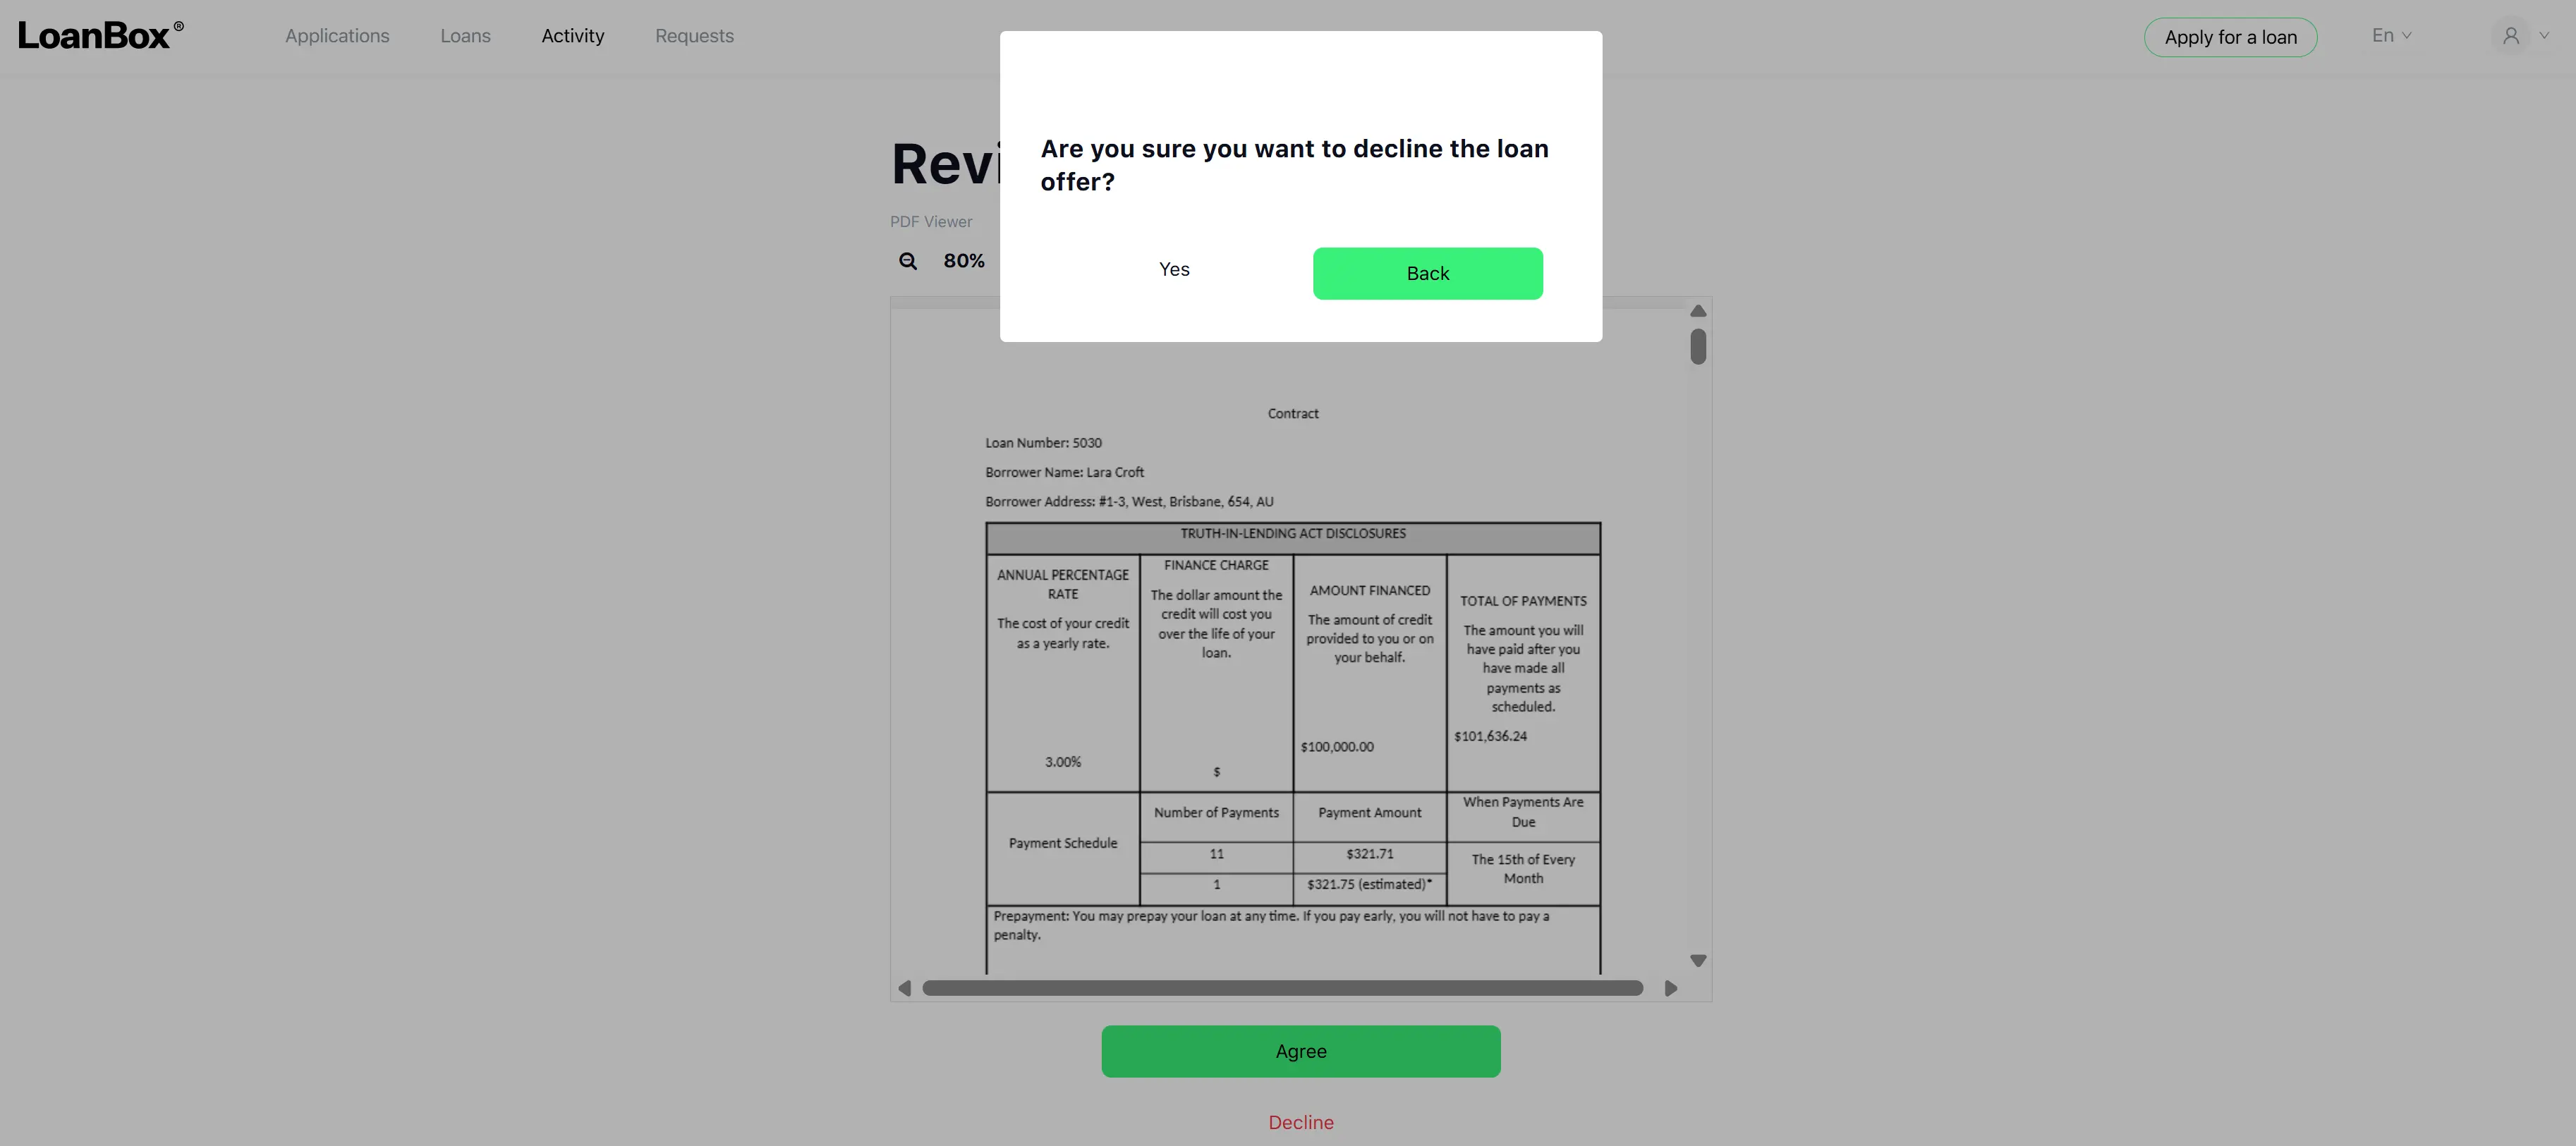
- Decline — opens a confirmation popup “Are you sure you want to decline the loan offer?” with the buttons Yes and Back. Clicking Yes terminates signing and the application is cancelled.
The screen refreshes automatically every 10 seconds, so if a new offer is generated in the background, it picks it up.

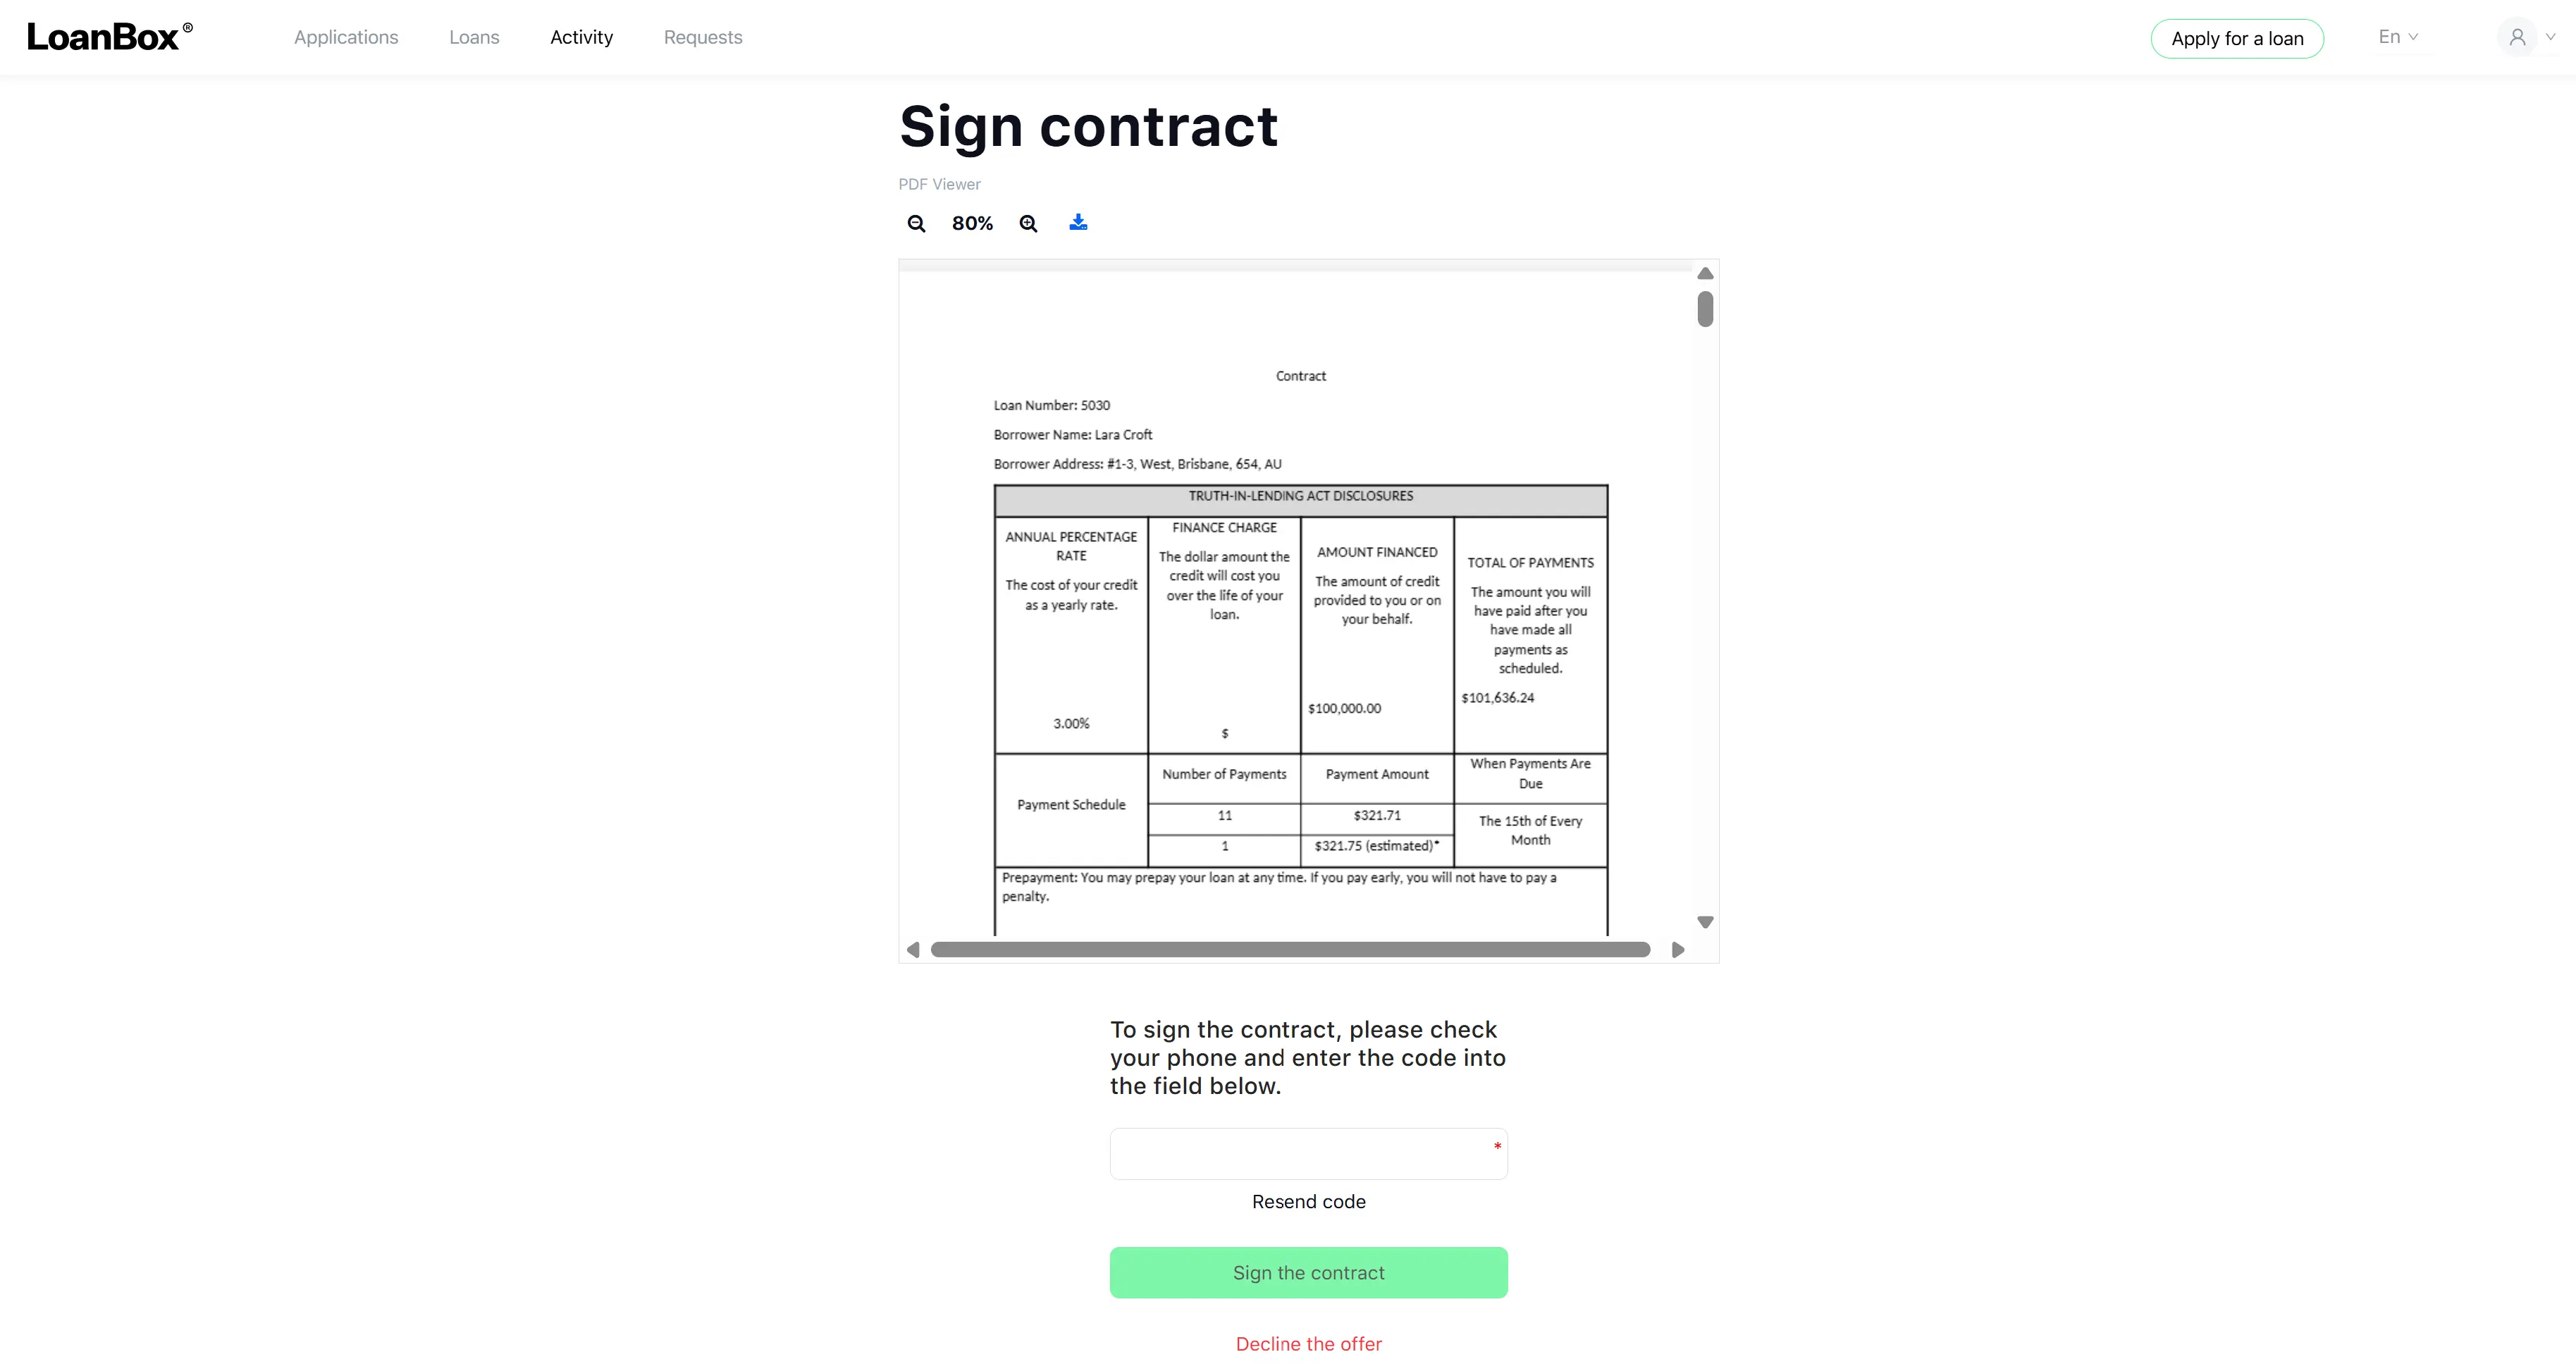
Step A2. Sign the contract with OTP — Borrower Portal
| Property | Value |
|---|---|
| Where it appears | Borrower Portal |
| Screen title | Sign contract |
When this step starts, the system generates a numeric OTP code and sends it to the borrower’s phone by SMS.
What the borrower sees and can do:
- A built-in PDF viewer that displays the generated contract.
- A help message: “To sign the contract, please check your phone and enter the code into the field below.”
- An OTP code text field (required). If the borrower enters a wrong code, the message “Invalid OTP Code” is shown in red, and the field is reset.
- A Resend code button — when clicked, the system sends a new OTP code to the borrower’s phone and the previous code becomes invalid.
- A Sign the contract button — submits the entered OTP. If it matches, the contract is considered signed.
- A Decline the offer button — opens the “Are you sure you want to decline the loan offer?” confirmation popup with Yes and Back. Clicking Yes cancels the application.
Validity rules for the OTP:
- The code is valid for 10 minutes after it is generated. After 10 minutes the code is automatically invalidated and the borrower must use Resend code to receive a new one.
- A successful match attaches the entered code to the signed contract record and moves the borrower to the next step.
Step A3. Loan-origination completion notification — Borrower Portal
| Property | Value |
|---|---|
| Where it appears | Borrower Portal |
| Screen title | Thank you |
The borrower sees a confirmation message: “Document is signed. Wait for the next step.” The screen automatically continues to the next stage of the deal after a short delay.
Back Office tasks: none. Signing with OTP is fully self-service.

Option B. Signing with E-signature in an iframe
The borrower signs the contract directly inside the Borrower Portal using an embedded electronic-signature provider window.
Background preparation by the system (no user task):
- The system identifies the signatory (the borrower if a person, or the legal entity’s representative if a company).
- The system creates the document in the e-signature provider, sends it for signing, and obtains a signing session.
- The system polls the document status every 5 seconds until the document is ready to be signed.
Borrower Portal tasks:
Step B1. Sign the contract with e-signature — Borrower Portal
| Property | Value |
|---|---|
| Where it appears | Borrower Portal |
| Screen title | Sign contract |
What the borrower sees and can do:
- An embedded e-signature window (iframe) where the borrower reviews and signs the document directly.
- A Decline the offer button — opens the confirmation popup “Are you sure you want to decline the loan offer?” with Yes and Back. Clicking Yes marks the document as declined in the e-signature provider and cancels the application.
While the borrower is on this screen, the system checks the document status with the e-signature provider every 30 seconds. As soon as the provider reports the document as completed, the borrower is moved to the next step automatically.
Step B2. Loan-origination completion notification — Borrower Portal
Same as Step A3: the Thank you screen with the message “Document is signed. Wait for the next step.”
Background finalization by the system:
- The system downloads the signed contract from the e-signature provider and saves it on the loan application.
Back Office tasks: none.
Option C. Signing by email link
The borrower does not interact with the Borrower Portal for signing. Instead, they receive a link by email and sign on the e-signature provider’s own page.
Background preparation by the system (no user task):
- The system identifies the signatory.
- The system creates the document in the e-signature provider.
- The system sends the document to the borrower by email and notifies the borrower by SMS that the email has been sent.
Borrower experience (outside the portal):
- The borrower receives a notification by SMS that the contract is ready for signing.
- The borrower opens the email from the e-signature provider, reviews the contract there, and either signs it or declines it on the provider’s page.
System polling:
- The system checks the document status with the provider every 30 minutes.
- As soon as the provider reports that the document is completed, the system downloads the signed contract and saves it on the loan application.
- If the provider reports that the document is declined, the application is cancelled.
Borrower Portal tasks: none for the actual signing. There is no signing screen in the Borrower Portal in this option.
Back Office tasks: none.
Option D. Signing outside the system
The borrower signs the contract physically (offline). A credit officer in the Back Office uploads the signed copy.
Borrower Portal tasks: none. The borrower does not see any signing screen in this option.
Back Office tasks:
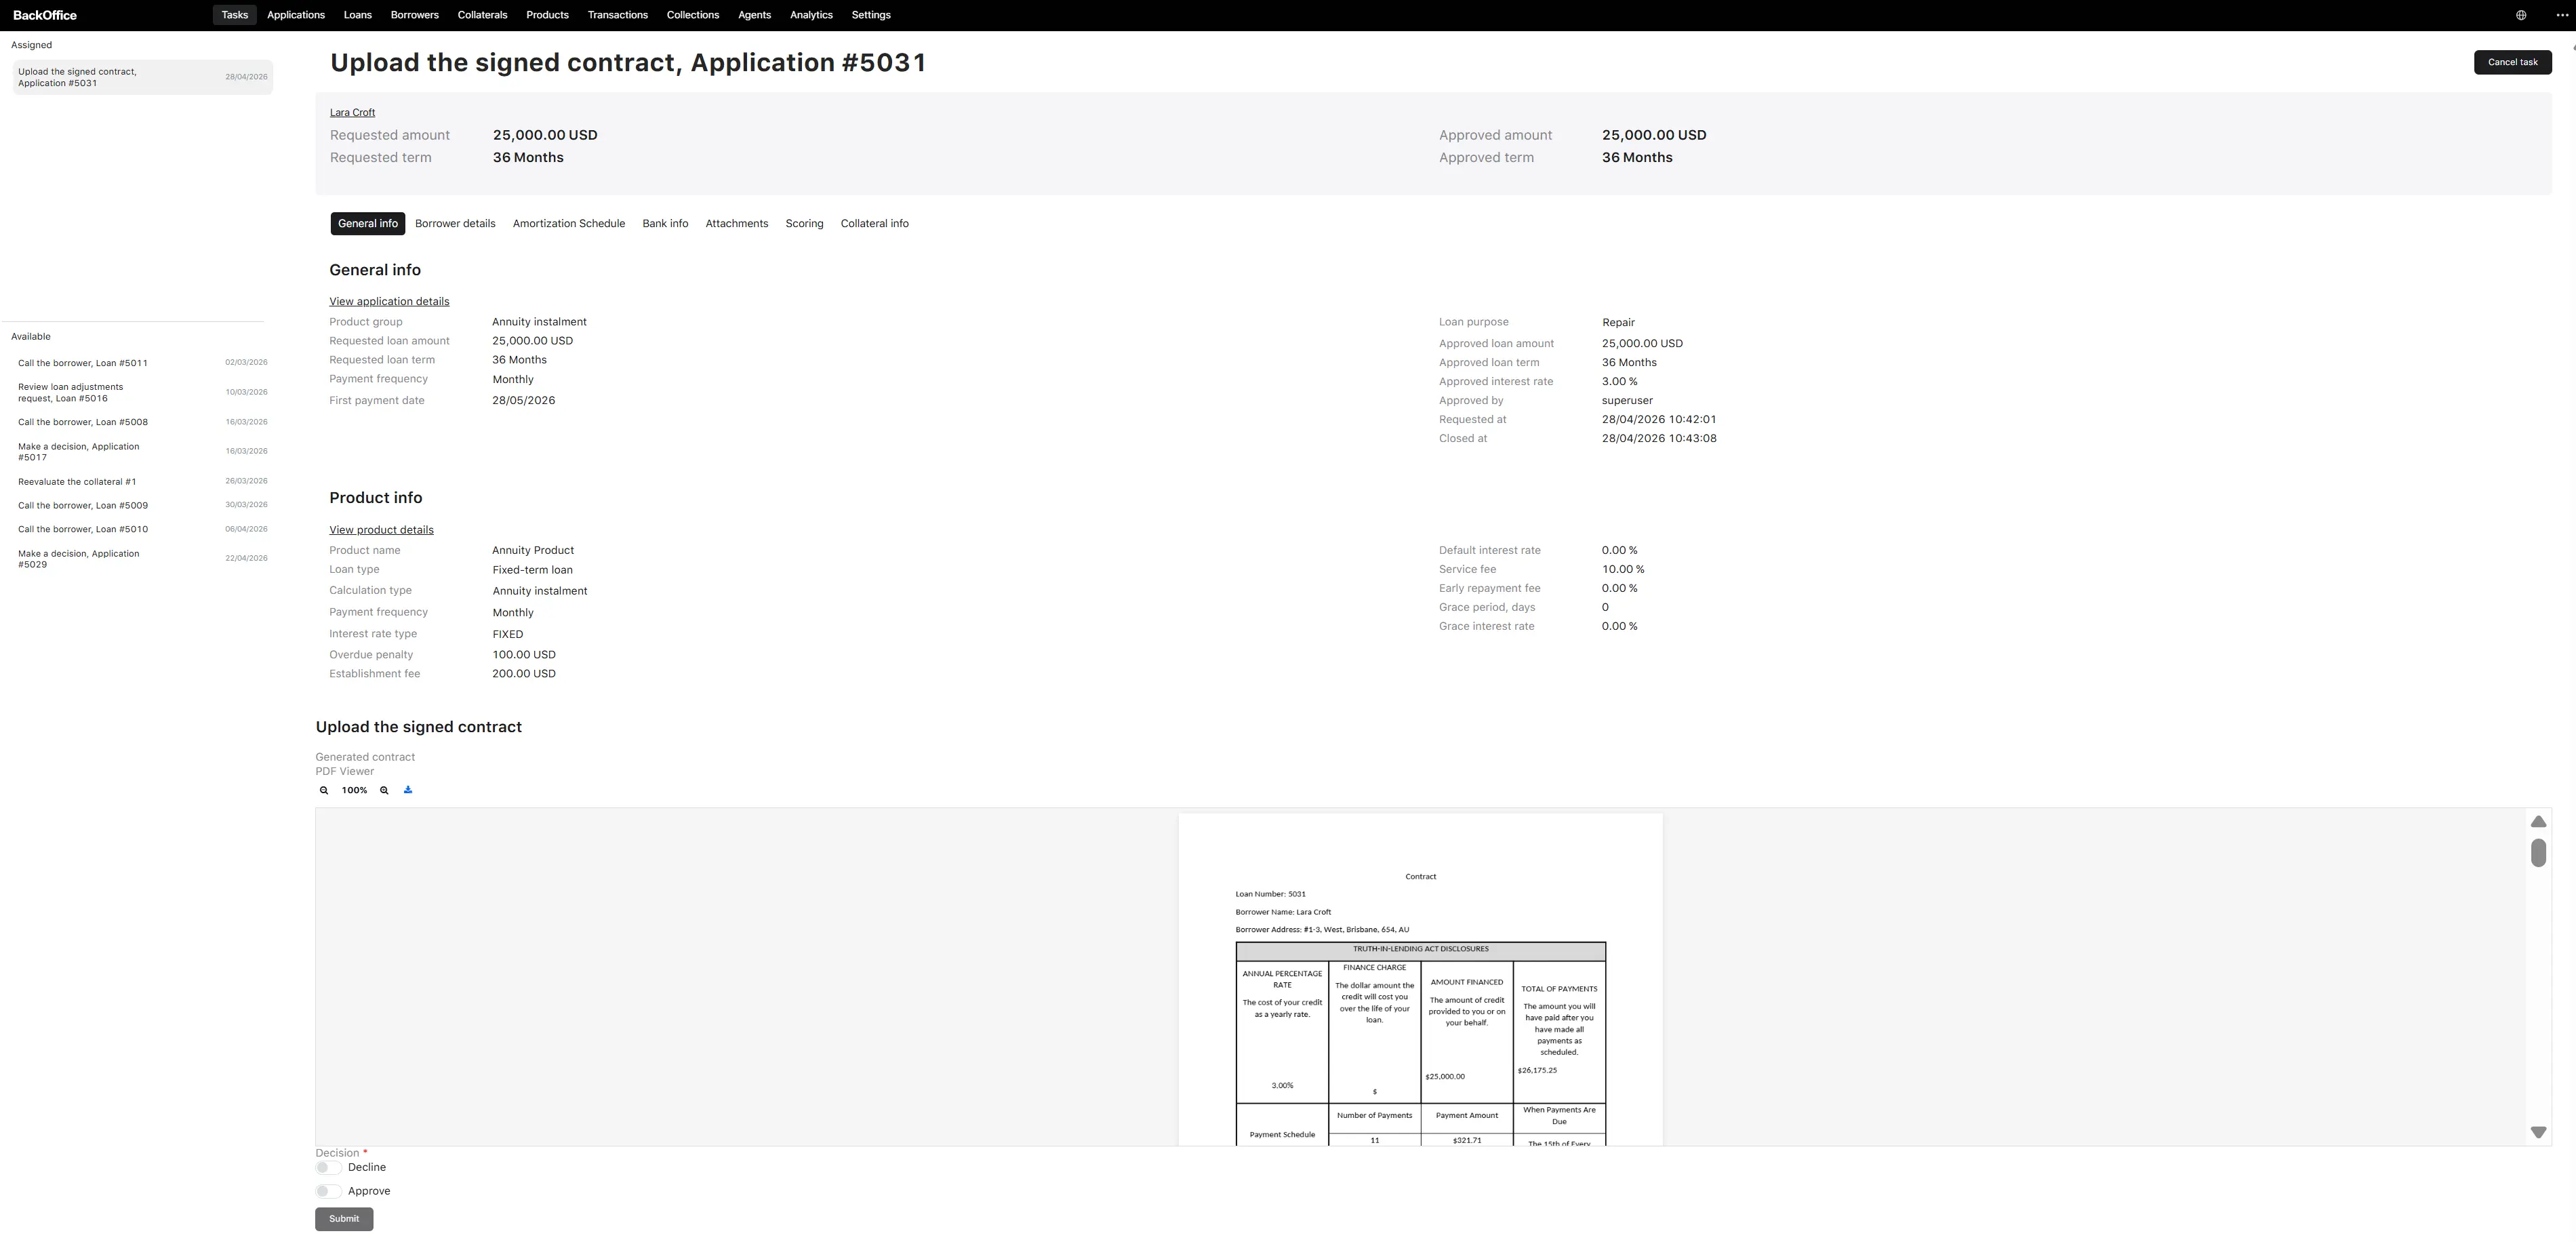
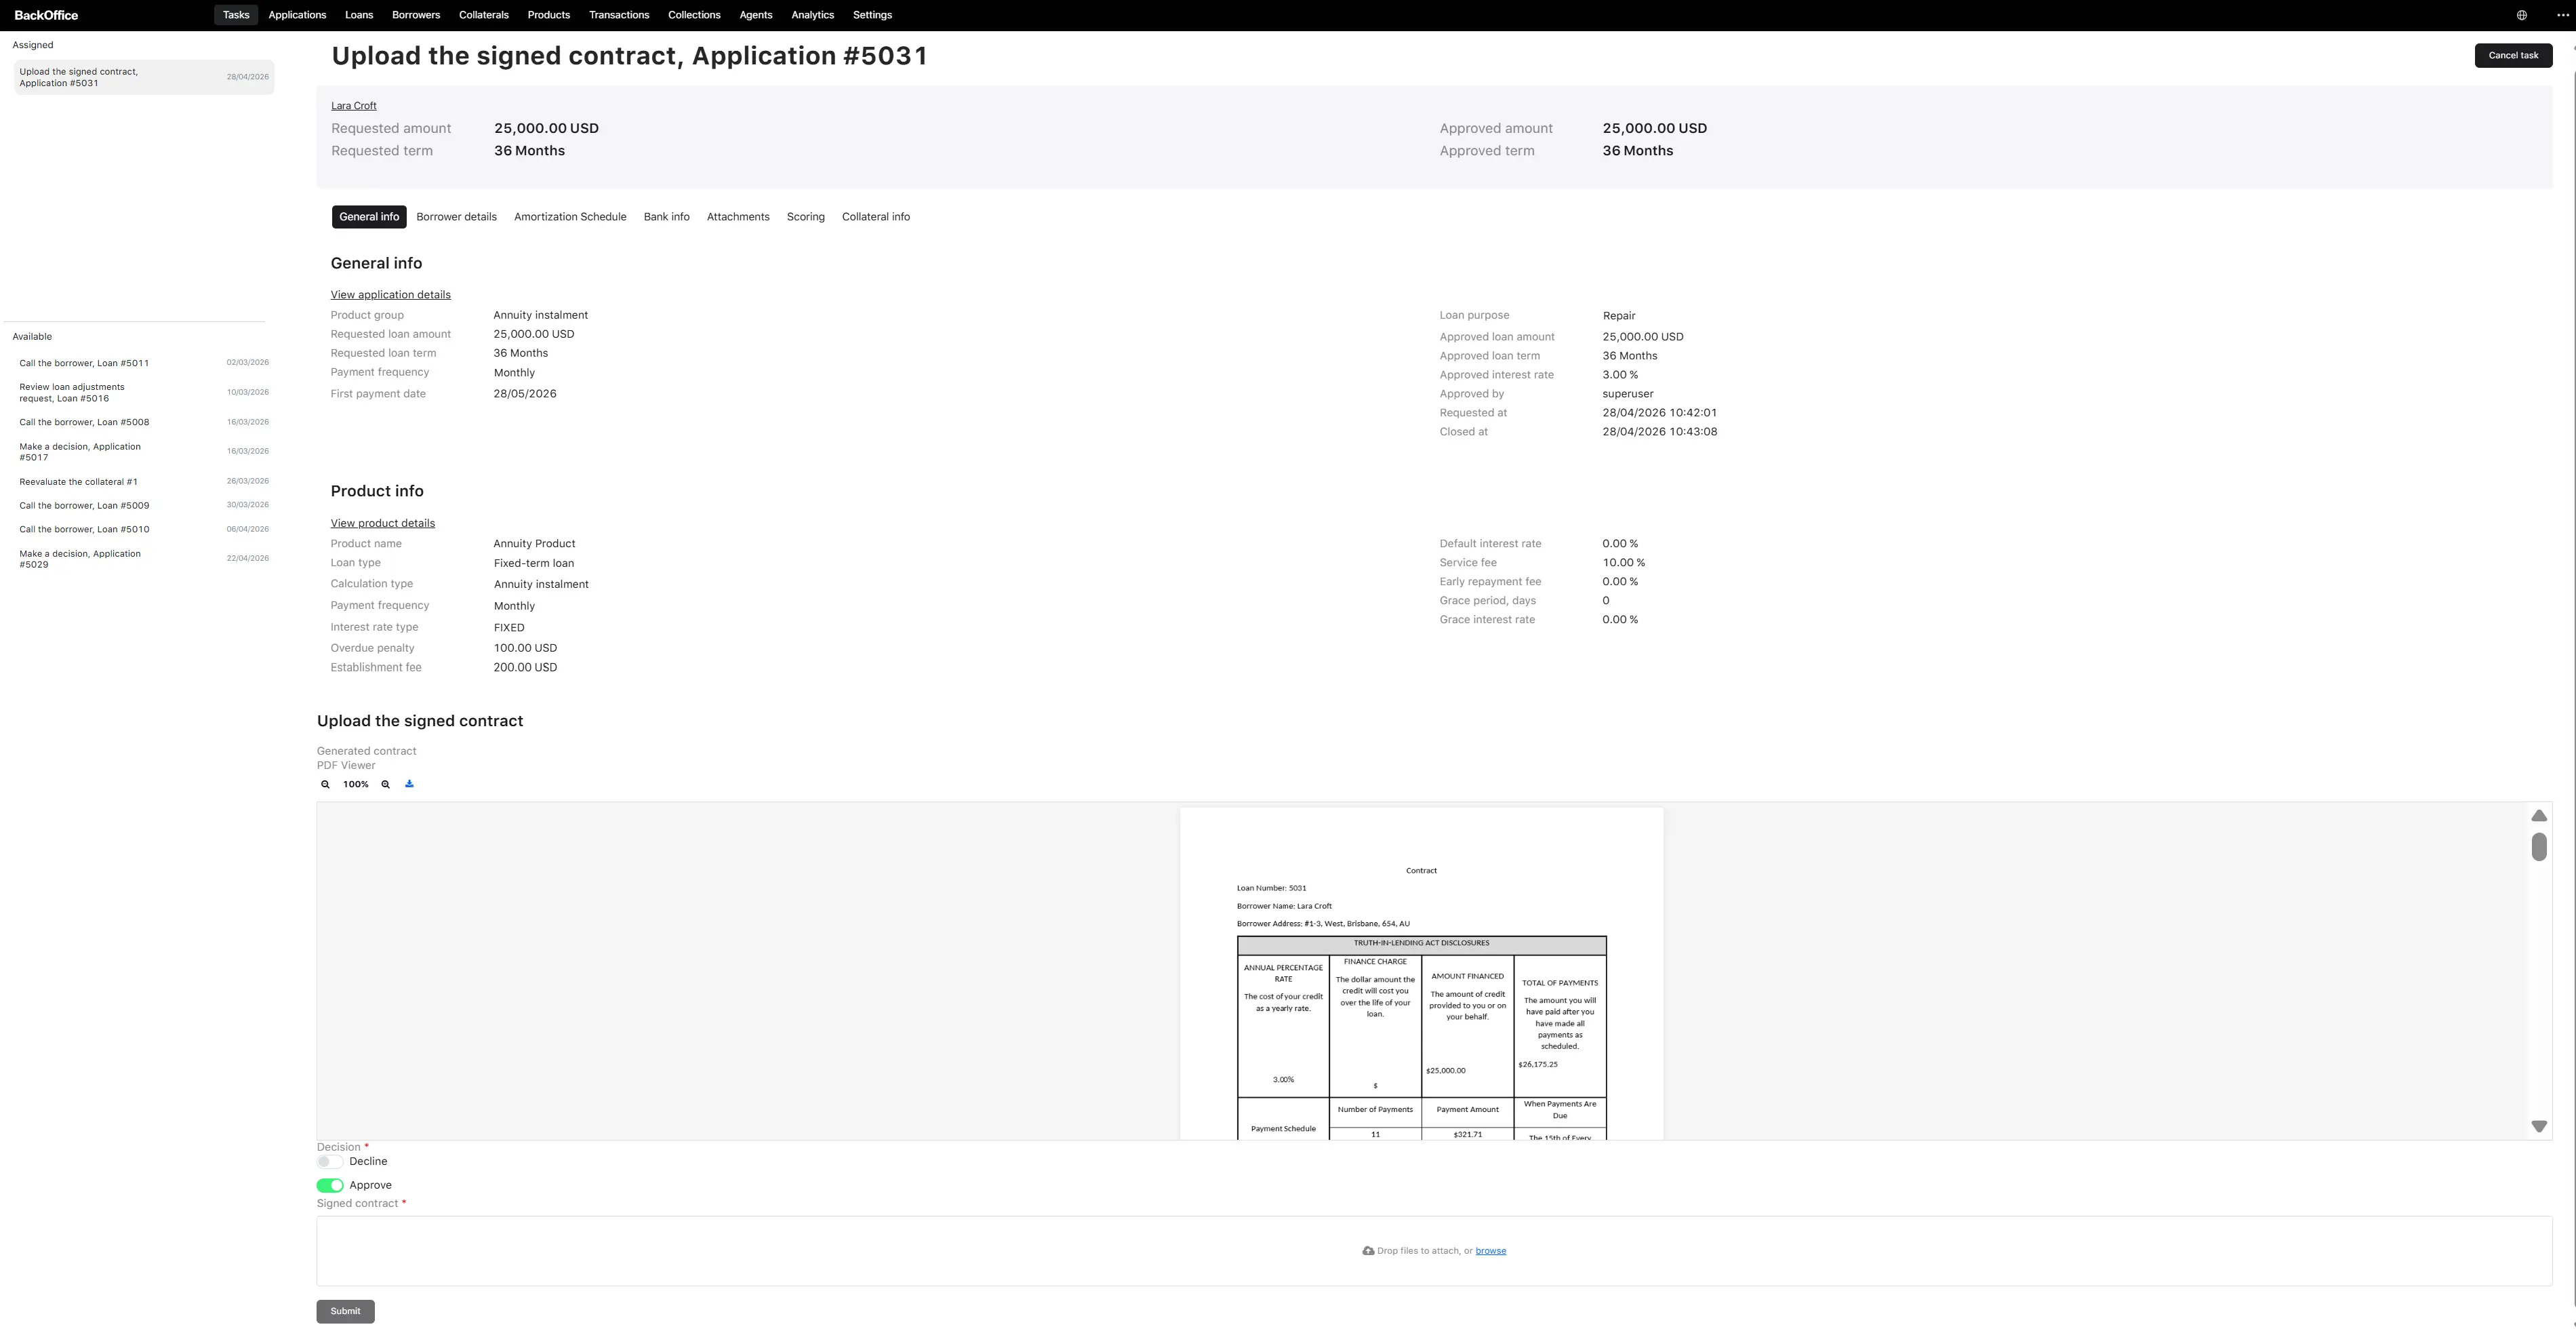
Step D1. Upload the signed contract — Back Office
| Property | Value |
|---|---|
| Where it appears | Back Office |
| Who can do it | Credit Officer |
| Screen title | Upload the signed contract, Application #{application number} |
The screen has two main areas: a read-only context block that lets the credit officer verify the application before uploading and the upload panel with the decision and the file uploader.
Read-only context block — shown at the top, organized into tabs. Above the tabs, the screen also shows: Requested amount, Requested term, Approved amount, Approved term in the application’s currency.
| Tab | Content |
|---|---|
| General info | Borrower name, loan-application general info, link to the application details page, and the loan product general info with a link to the product details page. |
| Borrower details | Borrower general info with a link to the borrower’s profile. |
| Amortization Schedule | The planned repayment schedule for this contract. |
| Bank info | Borrower’s bank and financial info, plus bank-account verification results (if any). |
| Attachments | Supporting documents previously uploaded with the application. Shows “No info” if none. |
| Scoring | Scoring details for this application. |
| Collateral info | Collateral general info for the application (if any). |
Upload panel — Upload the signed contract — this is where the credit officer enters the decision and file:
| Parameter | Description | Type | Required | Possible values | Default | Notes |
|---|---|---|---|---|---|---|
| Generated contract | A built-in PDF viewer showing the contract that the system generated. The credit officer downloads it from here, has the borrower sign it offline, then uploads the signed copy. | PDF preview | — (read-only) | — | — | — |
| Decision | The credit officer’s decision after the borrower has signed (or refused to sign) the contract offline. | Toggle | Yes | Decline — the borrower refused to sign; the application will be cancelled. Approve — the borrower signed; the credit officer must upload the signed file. | — | If Decline is chosen, no file upload is required. |
| Signed contract | The file uploader for the signed contract copy. Shown only when Decision is Approve. | File upload | Yes (only when Decision = Approve) | Image-enabled file upload, max file size 20 MB. | — | The uploaded file replaces the placeholder file on the loan application as the signed contract. |
| Submit | The button that finalizes the task. | Button | — | — | — | Disabled while the form is invalid (for example, when Approve is selected but no file is uploaded). |
After Submit:
- If Decision = Approve, the system saves the uploaded file as the signed contract on the loan application, and the deal continues.
- If Decision = Decline, the application is cancelled, and the borrower receives a cancellation notification.