
The Scoring result decision table
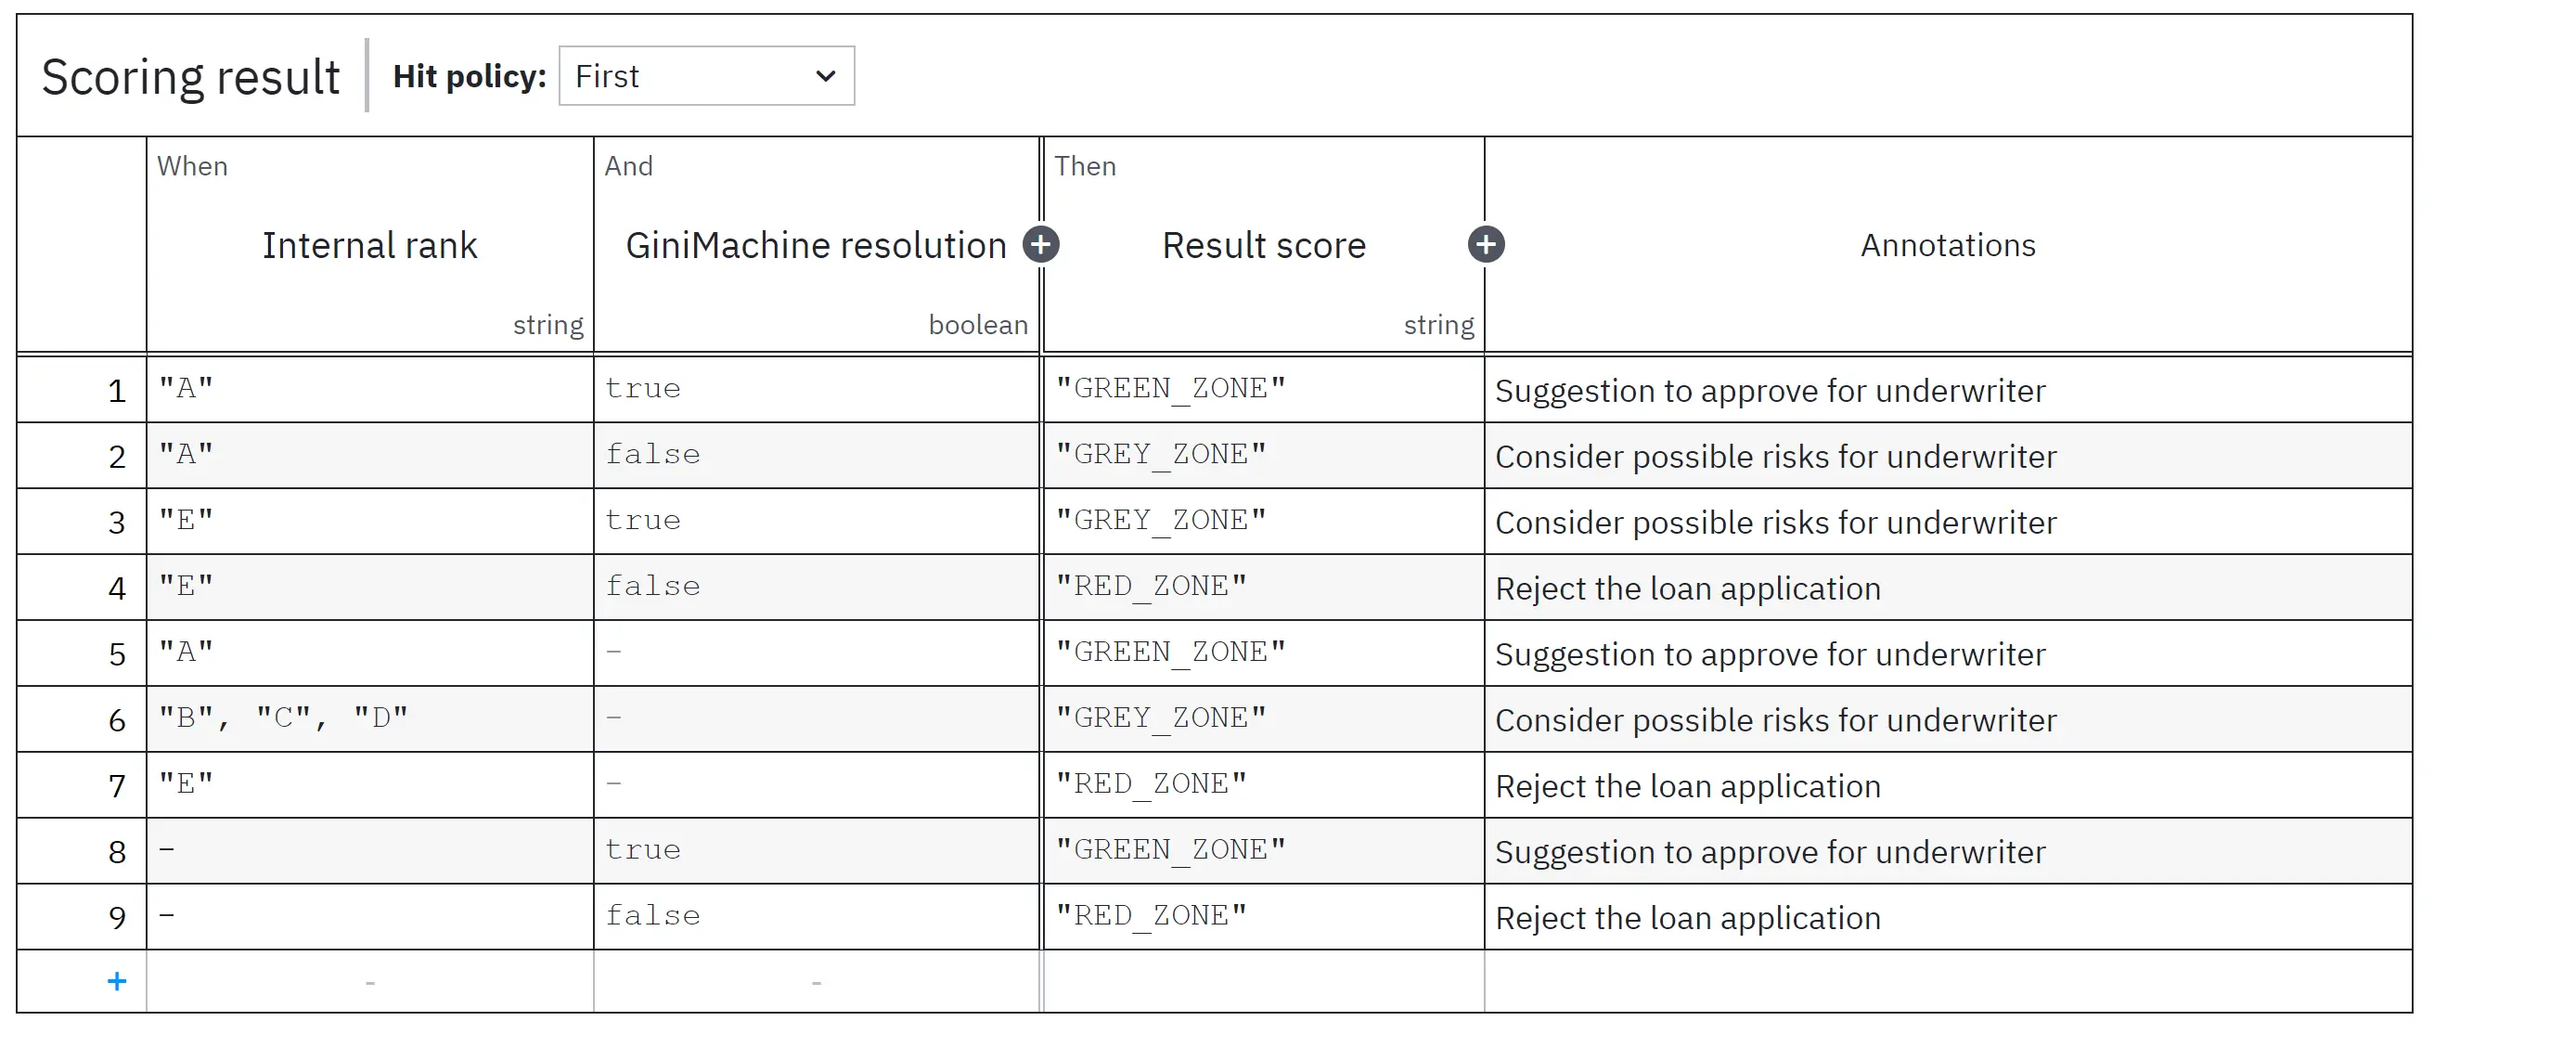
The Scoring result decision table turns the provider outputs into a single verdict. Like the internal scoring model, it is a DMN decision table.
Note
Table structure
| Element | Value |
|---|---|
| Hit policy | First — rules are evaluated from the top, and the first matching rule wins. Rule order is significant. |
| Input: Internal rank | String — “A” to “E”, or – (any) |
| Input: GiniMachine resolution | Boolean — true, false, or – (any) |
| Output: Result Probability of repayment | String — “GREEN_ZONE”, “GREY_ZONE”, “RED_ZONE” |
| Annotations | Free-text guidance shown next to each rule. |
Rules
| # | Internal rank | GiniMachine resolution | Result Probability of repayment | Annotation |
|---|---|---|---|---|
| 1 | “A” | true | GREEN_ZONE | Suggestion to approve for the underwriter |
| 2 | “A” | false | GREY_ZONE | Consider possible risks for the underwriter. |
| 3 | “E” | true | GREY_ZONE | Consider possible risks for the underwriter. |
| 4 | “E” | false | RED_ZONE | Reject the loan application |
| 5 | “A” | – | GREEN_ZONE | Suggestion to approve for the underwriter |
| 6 | “B”, “C”, “D” | – | GREY_ZONE | Consider possible risks for the underwriter. |
| 7 | “E” | – | RED_ZONE | Reject the loan application |
| 8 | – | true | GREEN_ZONE | Suggestion to approve for underwriter |
| 9 | – | false | RED_ZONE | Reject the loan application |
How to read the table
The rules fall into three groups, and the First hit policy keeps them from colliding.
Rules 1 to 4: both providers ran, and the rank is at an extreme. These are the cases where the two providers can meaningfully agree or disagree. Both positive (A with Approve) gives green; both negative (E with Decline) gives red. Disagreement in either direction gives grey; neither provider overrides the other, and the application goes to a human.
Rules 5 to 7: matched on the internal rank alone. These catch everything that did not match rules 1 to 4. Because rule 6 matches B, C, and D with the resolution set to any, mid-range ranks produce a grey zone regardless of what GiniMachine returned.
That is worth knowing before go-live: a lender running both providers will route the middle of the rank distribution to manual underwriting even when GiniMachine gives a clear answer. A lender who wants GiniMachine to break ties on mid-ranks adds explicit rules for those combinations above rule 6 — under the First hit policy, position in the table gives a rule precedence.
Rules 8 and 9: matched on the resolution alone. These apply when the internal rank is not present. The resolution maps straight to green or red, with no grey band.
Result zones
| Zone | Meaning |
|---|---|
| Green zone | Both available signals are positive. |
| Grey zone | The signals disagree, or the internal rank is mid-range. |
| Red zone | Every available signal is negative. |
What happens next
The result score does not decide the application on its own. The platform’s action for each zone is set by the Underwriting mode on the product group.
Underwriting modes
| Underwriting mode | Green zone | Grey zone | Red zone |
|---|---|---|---|
| Automatic | Approved automatically | Rejected automatically | Rejected automatically |
| Semi-Automatic | Approved automatically | Routed to a credit officer | Rejected automatically |
| Manual | Routed to a credit officer | Routed to a credit officer | Routed to a credit officer |
- Under manual underwriting, the zone is a recommendation, and the officer can decide against it.
- Under semi-automatic underwriting, the officer is involved only where the signals disagree.
- Under automatic underwriting, no officer is involved, and the grey zone resolves to a rejection.